Version française


? | Home page | Tutorial | Mixing in theory

Homepage
Home page


MIXING IN THEORY

During the mixing step, you will balance instruments, place them in the sound space, set their volumes, modify their frequencies, fix or hide the flaws. The purpose is to define each instrument's location, make them separated from one another and create a song that is pleasant to listen to.

Dynamics
Equalization
Panning
Compression
Reverb
Delay
Depth
Conclusion

Top of page

DYNAMICS

Dynamics is the interval between the lowest and the highest volumes in a sound. OK, fine, but we are doing Rock music, who cares about low volume? We want to kick ass! Drums must beat, guitars must yell, the bass must make the walls shake and the vocals must be loud! Pump up the volume! Wooo... calm down!

If everything is loud, then nothing is

Yes, that's logical. If everything is loud all the time, nothing stands out. But it's the contrasts that bring both subtleties and raging moments to light. How do you expect to surprise your listeners with a sound hurricane if you've already given them thunder and lightning without a break? You have to spare some quiet moments before the storm. Let's compare this with drawing. A black dot on a white background will stand out more easily than the very same black dot on a dark-gray background.
Black dot
Obvious? Yes, but many musicians just care for that "powerful sound" to such an extent that it eventually becomes tiring to listen to.

You can increase the contrasts through the very writing of the song (guitar/vocal bars, followed by a passage with 3 guitars, 1 distorted bass, big drums...), or through interpretation (the musicians play louder, faster...), or through the use of effects (saturation, compression...).

Contrasts don't have to be huge, it all depends on what kind of emotion you wish to convey, on the music genre, on the topic of the song, on what you are looking for...

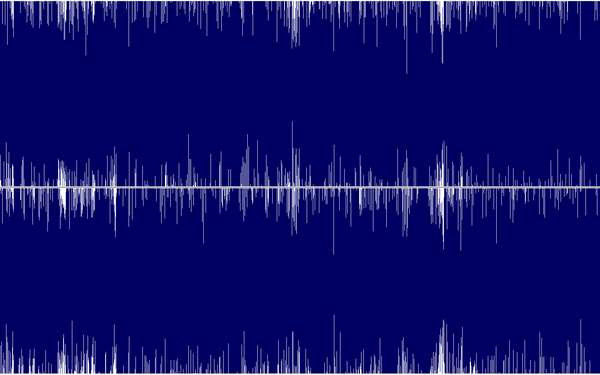
Nowadays, too many songs just look (and sound) like this:
Over compression
Do your ears a favor: don't do this
Top of page

EQ

EQ stands for equalization. It's a tool that allows you to set the level of the frequencies that make the sound. Basically, it's like a volume knob, but instead of changing the volume of a whole song, you lower or raise only the frequencies of your choice. Just like when you use a stereo amplifier for instance: you can find "bass", "medium" and "treble" knobs. They are a simple EQ that help you to tune the sound.

Well, you are going to apply this same principle to each of the instruments of your song.

The purpose of equalization is simple: changing the sound, so that each instrument primarily occupies the frequency range that defines it the best, without encroaching on the other instruments.

In other words, lower the level of the frequencies that are not necessary to an instrument without distorting it, and see to it that the various instruments main frequencies do not overlap. Each instrument will thus be alone in its own sound space without encroaching on the others, ensuring all instruments are clearly distinct from the rest.

The hard part is to do this without distorting the sound of the instruments, and also to see to it that instruments which have common frequencies by nature be well-marked.

You will deduce that the more instruments there are, the more complex mixing becomes.
Top of page

PANNING

Music is usually mixed in stereo. Not always, but we have two ears, we use headsets or speakers that usually come in pairs, so it only makes sense to use left and right channels when mixing.

That's what panning is: acting on the width of a sound, from left to right.

On top of the EQing described above, we can also part instruments from one another by placing them in different spaces. If two guitars play simultaneously in your song, you may want to place one on the left and the other one on the right. This will help to distinguish them and it will also balance the sound.
Top of page

COMPRESSION

Compression affects the dynamic range of a sound signal.

It reduces the amplitude modulations of the sound, that is to say the gap between the lowest and the highest levels.
Kjaerhus Audio Classic compressor
I will use the above compressor as an example. All compressors have more or less the same basic functions, so it will be easy to reproduce the manipulations on alternative models.

Let's see how this works:

- Threshold: this defines the minimum level from which the compressor will start affecting the sound. 0 is the highest sound level.
- Ratio: this is the level of compression you are going to apply. A 1:1 ratio has no effect, whereas an infinite ratio will limit the sound to the threshold level. In this case, the compressor acts like a limiter and nothing will go higher than the threshold. The higher the ratio, the more compressed the sound will be, and the volume level will be reduced in proportion, until we use the output button.
- Knee: this knob sets how much the compression will affect the sound right before and after the threshold. The softer it is, the softer the transition will be. A hard knee will result in a more abrupt transition. It is rather difficult to hear the effect of this function.
- Attack: this knob indicates the time it takes for the compression to start acting once the threshold is reached. Set it short (0 ms) to compress the sound as soon as the threshold is reached, and set it longer to avoid compressing the attack of an instrument. For example, with a solo guitar, you may want to preserve the string attack and thus set the attack knob on 10 or 20 ms. It all depends on what you wish to do.
- Release: this knob indicates the time it takes for the compression to stop acting once the volume level goes back lower than the threshold. A long release allows for a less brutal change of gain.
- Output: it can also be called "Gain". This knob sets the output volume level after compression of the sound. It compensates for the loss of volume due to the compression.

So basically, compression takes all the sound energy there is between the threshold and the highest level of the original signal and crushes it in a smaller gap. Then you raise the whole signal with the output button, which eventually renders a denser, richer sound compared to the uncompressed signal. This can be subtle or obvious, depending on your settings and the original sound.
Top of page

REVERB

Reverberation brings a little air to a recording that would otherwise sound hollow or confined. It is not necessary to add much of it, or it could drown the sound and give the impression that the recording took place in a cathedral, unless this is what you are looking to obtain. A lot of reverb can be nice at some specific moments in a song, on one specific instrument, but I doubt anyone would apply this effect at a high level on a whole song.

It is recommended to put some on vocals. This will add depth. The more you add, the more the sound will seem to move away and get drowned in the mix. On the contrary, the less there is, the more vocals will seem to be close to the listener. A nice little touch of reverb makes vocals sound richer, deeper and more beautiful. Just find the right level.
Top of page

DELAY

Delay is a sound effect that allows to... delay an audio signal and have it repeated. It's very much like an echo: shout and you will hear your voice first, then the echo of your voice repeated one or several times.

This effect is somewhat related to the reverb effect, with one major difference: delay repeats at regular intervals without generating a continuous surrounding sound. You can use it instead of the reverb to avoid overcrowding the mix.

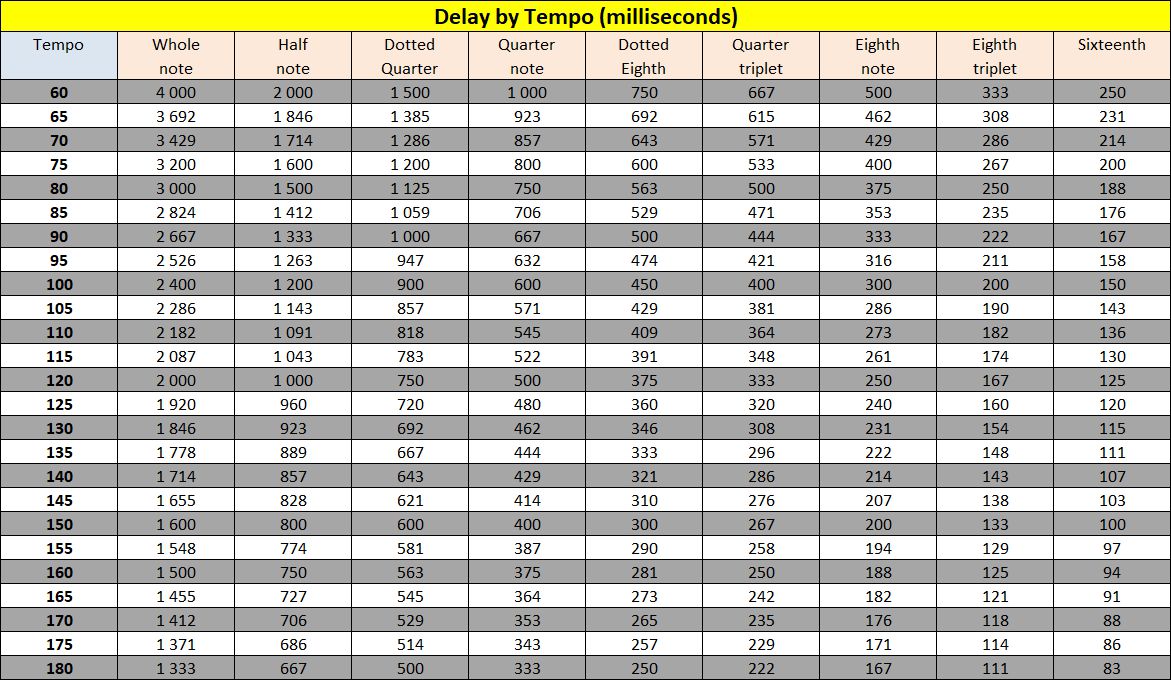
As a general rule, set this effect by basing it on the song tempo. Choose whichever interval you wish to hear the echoes. Here is a chart to help you:
Delay by tempo
Click on the chart to download the corresponding Excel file ("Delay by Tempo & Instrument Frequencies.xls" - 64 KB)
Top of page

DEPTH

By changing not only the volume, but also the frequencies or some effects like reverb, you can give the impression that a sound is more or less near the listener. This adds depth to a recording.

In everyday life, how do you recognize a distant sound?

Its volume is low. At least relatively. A motorbike engine roaring in the distance will be much less loud than if it were 2 metres away from you. Thus, the first thing to do is to lower the volume of the instrument you want to place in the background.

Distant sounds don't have much bass frequencies. Bass frequencies require a lot of energy to move. Unless you hear a very powerful sound (like an explosion), the bass tone won't get to you. So you may cut low frequencies with a high-pass filter or an EQ.

On the other end of the sound spectrum, high frequencies of a distant sound are also fainted because they are absorbed by obstacles as they're moving. So you also need to lower these high frequencies.

Distant sounds are indistinct, unintelligible. Human voice, for example: if you hear someone speaking in the distance, you will of course recognize that this is a human voice (yes, your brain is that smart), you will probably know whether it belongs to a man or a woman, but you will not understand a word. You are going to have to reproduce this lack of clarity to simulate distance. A little reverb, a little chorus or some phaser touch will do. Give it a try and see what suits your music best.

You can't always tell exactly where the faint sound you're hearing is coming from. So pan the background instruments in the middle position and leave the sides to foreground instruments.

When listening to a music, a listener will mainly focus on changing elements. The use of a repeating, short musical pattern, treated as described above, will be easily forgotten and place itself in the background. The purpose of a background instrument is to add some fullness to the song, without being so interesting that it draws attention. It should be kept simple to have it blend into the song without being noticed too much.
And of course, on the contrary, foreground instruments will be the ones bringing volume, lowest and highest frequencies, melodies, and elements of surprise.
Example of a voice that gradually goes away from the listener
(full screen for a better view)
Top of page

CONCLUSION

When adding effects, check the result by activating and deactivating them as the song (or the instrument) plays. It will help you to see whether an effect is too present, or not enough, whether it is necessary, whether it is too agressive, etc. You may like heavy reverb, but too much of it just drowns it all and makes the song inaudible. Control is essential. Too little is useless, you might as well remove the effect completely, whereas too much will make everything weighty and will surely waste the whole piece.

An effect often turns out to be... effective if you miss it when it's gone, even though you were not certain to hear it when it was on.
Recording - Previous | Next - Mixing in practice
Top of page


MESSAGES

(leave a message)

Messages page # 1 2 3 4 5 6 7 8 9 10 11 12 13 14 15 16 17 18 19 20 21 22 23 24 25 26 27 28 29 30 31 32 33 34 35


Only
le 19/01/2011 à 21h18

Je suis en République Démocratique du Congo,dans la capitale Kinshasa. Je voudrais monter un home studio avec une bonne qualité de son. Je veux savoir comment installer le matériel, quelle est la disposition. C'est possible de monter un home studio avec un budget de 5000 euros ?

* * * * * * * * * * * * * * * *
<em>Je ne connais pas les tarifs au Congo, mais avec 5000 euros, tu peux déjà te faire plaisir. Après, tout dépend de ce que tu cherches. Si tu n'as rien du tout et que tu veux te faire un local avec isolation sonore, acheter un ordinateur, des logiciels et puis des instruments de musique, c'est pas sûr que ce soit suffisant.

Mais si c'est simplement pour acheter un ordinateur, une interface audio, un micro, un préampli et des enceintes de monitoring, alors oui, 5000 euros suffisent.

Un conseil : il faut que les élements cités ci-dessus soient homogènes dans la chaîne sonore. Inutile d'acheter un super micro très cher pour l'associer à un préampli bas de gamme. Tout doit être dans la même gamme de qualité (ce qui ne veut pas forcément dire dans la même gamme de prix !).

Pour plus de détails, parce que je ne peux pas répondre à tous sur chaque problème particulier, et que ce n'est pas le but de mon site, je vous conseille le site <a href="http://fr.audiofanzine.com/" target="_blanck">Audiofanzine</a>, qui est très complet et dont le forum est une mine d'informations inépuisable.

Grebz</em>


jeff2902
le 19/01/2011 à 19h51

Bonjour,

Je voudrais pouvoir obtenir un son proche de celui de groupes de pop-punk tel que <a href="http://www.youtube.com/watch?v=GcNiKCmWdYE" target="_blanck">All time Low</a> par exemple, un son assez propre.

J'utilise déjà Guitar Rig 4 et Amplitube mais les sons ne me conviennnent pas. J'ai essayé plusieurs amplis Lepou, mais impossible d'obtenir un son propre. Pourriez vous m'aider svp ? Je vous remercie d'avance.

PS : le MySpace du <a href="http://myspace.com/nastyshades" target="_blanck">groupe dans lequel je joue</a>.

* * * * * * * * * * * * * * * *

<em>D'après ce que j'entends, il y a un gros travail d'égalisation pour éviter les recoupements de fréquence, ce qui permet de bien séparer les sonorités des guitares. Je pense aussi qu'ils ont au minimum doublé les prises de guitare pour faire un effet "mur du son". Il y a des guitares partout qui jouent plus ou moins la même chose, on n'a pas un instant de repos.

La caisse claire est très en avant, de même que la voix lead. Juste après, on a les guitares, la basse est plutôt en retrait (en même temps, le bassiste ne fait pas grand-chose d'intéressant, il se contente de suivre les accords) et les cymbales sont assez discrètes aussi.

Il semblerait que le groupe All Time Low utilise des amplis et baffles Mesa, des simus de chez Line 6, et qu'ils font aussi appel à des simulateurs d'amplis et de baffles (comme moi !).

Fais des essais avec des simulations Nick Crow, le NRR1 d'Ignite Amps ou le Lecto de Lepou, en ajoutant un simulateur de baffle avec des impulsions de baffle MESA (je crois qu'il y en a dans celles que je propose).

Grebz</em>


Pioud
le 02/01/2011 à 12h16

Hello Grebz,

Super ton tuto sur la convolution ! Très intéressant !
Merci pour toutes ces informations !
Je vois peut être un axe d'amélioration afin d'obtenir une convolution de bonne qualité :
Lorsque tu relies la sortie de ton interface audio à ton ampli guitare, tu as un problème d'impédance qui n'est pas respecté : il faut je pense utiliser une boite de reamp (inverse d'une DI) afin d'adapter l'impédance.
Voilà, bonne continuation et bonne année !!!

PJ

* * * * * * * * * * * * * * * *

<em>Alors là, je n'en sais rien du tout. Dans les différents tutoriaux que j'ai pu lire ou voir en vidéo (en anglais dans la plupart des cas, c'est pour ça que j'ai décidé d'en faire un en français), je n'ai jamais rien vu qui concerne l'impédance. Ce qui ne veut pas dire que le problème ne se présente pas, d'ailleurs.
Mais je dois dire que je n'ai rien constaté de gênant lors de la création de mes impulsions. N'ayant pas de boîte de reamp, je ne vais pas pouvoir essayer, mais que ceux qui suivent le tuto n'hésitent pas à essayer d'en ajouter une dans la chaîne, histoire de vérifier que ça améliore les choses. Et si c'est le cas, tant mieux ! Tout ce qui peut contribuer à améliorer les techniques est le bienvenu.

Et bonne année à tous, bien entendu ! Bonheur, bonne bouffe et teint hâlé !

Grebz</em>


Brughes
le 27/12/2010 à 11h43

J'ai composé un morceau rythmique. Si cela t'intéresse, je te l'envoie.

* * * * * * * * * * * * * * * *

<em>Si vous avez des morceaux, indiquez-moi plutôt un lien où les écouter (myspace, jamendo ou autre...)

Grebz</em>


LaurentB
le 24/12/2010 à 11h41

Bonjour,

J'essaie Sonar X1 depuis quelques jours et je le trouve super, sauf un problème que je n'arrive pas à résoudre : voir mes plugins VST !

J'ai bien entendu précisé le chemin de mes plugins (program files\vstplugins)et la quasi-totalité de mes VST n'est pas visible quand je veux affecter un effet audio à une piste.

J'ai pourtant l'habitude de faire fonctionner des VST dans FL Studio ou Reaper.
Le plus bizarre, c'est que mis à part un ou deux rejetés, Sonar semble les voir lors du scan : je ne comprends pas.

Si vous pouvez m'aider, ça serait sympa.

Merci pour votre site et les impulsions d'ampli à télécharger.

* * * * * * * * * * * * * * * *

<em>Si vous utilisez un Sonar 64 bits sur un Windows 64 bits également, il ne faut pas oublier que Windows gère 2 dossiers Program Files différents. Le premier s'appelle "Program Files (x86)" et contient tous les programmes 32 bits. Le second s'appelle "Programmes" (dans la version française, et "Program Files" dans la version anglaise) et contient tous les programmes 64 bits.

Il est tout à fait possible de placer manuellement ses plugins dans l'un ou l'autre des répertoires, mais bien entendu, il faut indiquer à Sonar d'aller chercher dans les deux.

Dans mon cas, mes VST 32 bits sont dans ce répertoire-là :
C:\Program Files (x86)\Cakewalk\Vstplugins
Et mes VST 64 bits sont là :
C:\Programmes\Cakewalk\Vstplugins

Certains VST sont fournis avec un programme d'installation. Il ne faut pas simplement les placer manuellement dans le bon répertoire VST, ils vont s'installer eux-mêmes dans un répertoire spécifique, à moins bien sûr de choisir le répertoire VST lors de l'installation.

Par exemple, le simulateur d'ampli TH1 de Overloud s'installe par défaut dans le répertoire C:\Programmes\Overloud
Il n'est donc pas dans un répertoire VST. Pour que Sonar le voit (j'imagine que c'est pareil dans un autre séquenceur), il faut ajouter ce chemin dans le gestionnaire de plugins de Sonar, sinon il sera introuvable dans la liste des VST disponibles.

Grebz</em>

Top of page