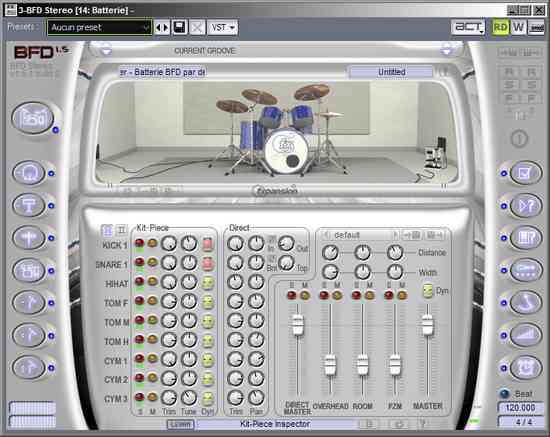
For this song, I used a virtual drums software called FXpansion BFD 1.5, which is rather old but still sounds good. It uses real drum samples (kicks, snares, toms, cymbals) and sounds realistic. Many settings are available and allow you to change the way your drums will sound (drum head tension, microphone positioning...). Since then, I upgraded to BFD 3, but I was still a BFD 1.5 user when I composed this song.
Life uses the following drum elements:
* Kick drum
* A rimshot snare drum sound during the quieter parts
* A normal snare drum hit sound for louder parts
* A hi-hat and a few crash and ride cymbal hits
I didn't use any splash cymbal or toms in the song.
Routing
The drums are routed as follows:
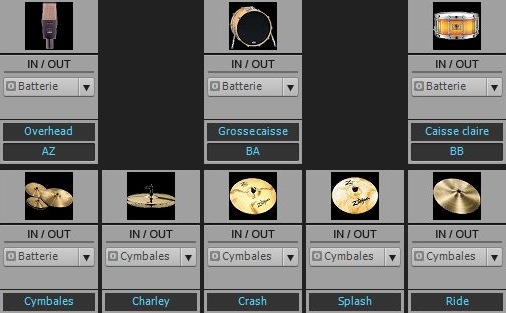
MIDI AND AUDIO DRUM TRACKS
The MIDI track contains the drum score itself. It is linked to the audio tracks of each drum element.
Each one of the audio tracks is routed to the corresponding bus (snare drum track routed to snare drum bus, etc.)
This is the sound of the kick drum before processing
"Kick drum" bus
On this bus, I put a parametric equalizer plugin called "TrackPlug" from Wave Arts.
This is the sound I get after applying the TrackPlug plugin
Source: kick drum audio track
Target: Drums bus
Volume: -7.5 dB
Panning: 2% left
Kick drums are usually located at the center of the stereo field. I put it slightly to the left, by 2%, so that it leaves way to the vocals in the center, even though vocals and kick drum frequencies are unlikely to interfere. You will also see that I put the snare drum slightly to the right, by 2%, for the same reason. Kick drum and snare drum are thus slightly separated, although it isn't that obvious when listening to it.
TrackPlug plugin
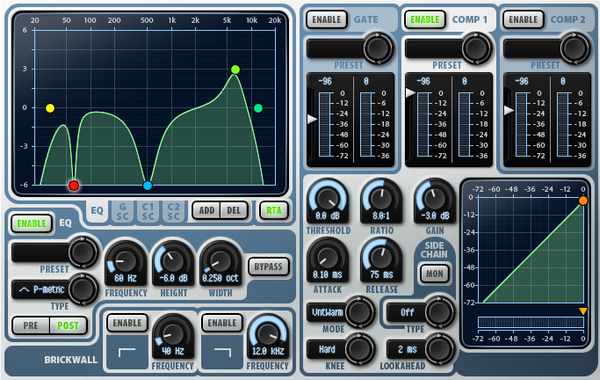
To obtain this kick drum sound, I used the following settings:
- A high-pass filter at 30 Hz (yellow dot): below this value, frequencies become useless. On the one hand, few audio devices are able to reproduce them, they are not very musical and like all low frequencies, they demand a lot of energy to be rendered correctly, and that is to the detriment of other frequencies. So I cut them, and I did not want a song heavily loaded in low frequencies.
- A 60 Hz band, set at -6 dB and a width of 0.25 octave (red dot). This dip frees some room for the "Saw bass" low synth, for which I boosted this particular frequency by 2 dB (see here). The low tone of the synth is thus more audible, and the kick drum sound is not affected too much.
- A 500 Hz band, set at -6 dB and a width of 1 octave (blue dot). This dip reinforces the kick drum "boom" and suppresses some unpleasant tones. This also leaves some room for low vocal frequencies.
- A 6.12 KHz, set at +3 dB and a width of 1 octave (green dot). Raising this frequency adds some "slamming" to the kick sound.
- A low-pass filter at 11 KHz (turquoise dot): There was no sound beyond this frequency, so I added this filter to cut any parasite sound that would not add anything good to the kick drum sound, and could even conflict with the cymbals in the high frequencies.
- Compressing part of the plugin: threshold set at 0 dB, ratio of 8:1 and gain set at -3 dB. The attack time is very short with a value of 0.10 ms (that will make the hit less powerful than it originally was) and the release time is set to 75 ms.
- In the end, the EQ and the compression result in a very dry sound, a bit thinner than the sound before treatment, with a slightly lower volume due to the negative compression gain. I did not want a huge, invasive kick drum sound. Mastering plugins will later bring some thickness to it.
SNARE DRUM
This is the snare drum sound before processing
First, the rimshot sound, then the normal hit sound
"Snare drum" bus
On this bus, I put a parametric equalizer plugin called "TrackPlug", as well as a limiter plugin called "FinalPlug", both from Wave Arts. The order in which you place the plugins matters. Here, The EQ comes first to shape the sound, then the limiter will boost the equalized signal.
This is the sound after processing with the TrackPlug and FinalPlug plugins
First the rimshot sound, then the hit sound
Source: snare drum audio track
Target: Drums bus
Volume : 0 dB
Panning: 2% right
The snare drum is usually located in the center of the stereo field. I put it slightly to the right, by 2%, so that it leaves room for the vocals. I also deported the kick drum 2% to the left. Thus, kick drum and snare drum are separated a bit, while remaining mostly centered.
TrackPlug plugin
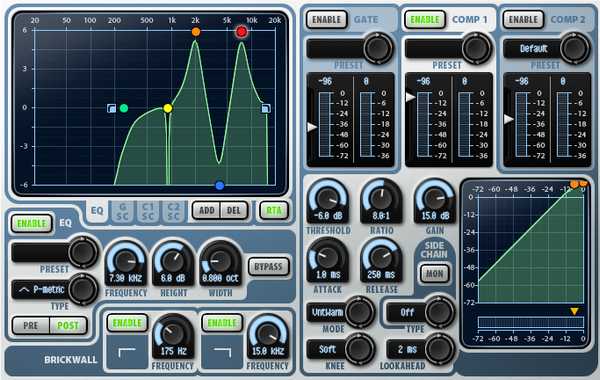
These are the settings I used with the TrackPlug plugin on the snare drum:
- A brickwall at 175 Hz in order to cut all frequencies below this value. This makes sure that no snare drum frequency will interfere with the low synths, the bass or the kick drum. It's a bit redundant because I also us high-pass filter as described below, but let's call it a double security measure.
- A high-pass filter at 2500 Hz (green dot): lower frequencies start declining at 2500 Hz and decrease more and more below this value.
- A "notch" 880 Hz band. This type of band completely suppresses the sound in the target frequency. I used this on a width of only 0.1 octave because it was generating an unpleasant sound. Maybe because of the drum sample used? Anyway, suppressing this precise frequency solved the problem without affecting my snare drum sound.
- A 1.97 KHz, set at +6 dB and a width of 0.8 octave (orange dot). This adds a little smack to the snare drum sample I chose.
- A 3.88 KHz, set at -6 dB and a width of 0.8 octave (blue dot). Decreasing this frequency does make the snare drum sound somewhat thinner if you listen to it soloed, but it makes the sound more dry and prevents from encroaching upon guitar or vocals frequency ranges. Once drowned in the mix, decreasing this frequency isn't really audible.
- A 7.3 KHz band, set at +6 dB and a width of 0.8 octave (red dot). Boosting this frequency boosts the brightness and clarity of the snare drum, and helps standing out in the mix.
- Another brickwall at 15 KHz to suppress all very high useless frequencies.
- The compressor part of the plugin has a threshold set at -6 dB, a ratio of 8:1 and an important gain, around +15 dB. The attack is set to a fast 1 ms and a slow decrease of 250 ms.
- Like the kick drum, the EQ and the compression make the snare drum sound very dry, somewhat high-pitched, and it stands out easily in the mix. The Mastering stage will boost a bit further.
FinalPlug plugin
These are the settings used with the plugin FinalPlug for the snare drum:
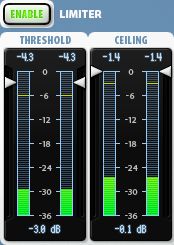
Final Plug is a commercial plugin, you will find free limiters here, as well as a compressor (that can also be used as a limiter with the appropriate settings). A limiter will boost the sound by defining a bottom volume from which the sound will be raised up to the maximum ceiling value
- Threshold set at -3 dB. This is a rather small compression amount, just enough to boost the sound a bit, without having to edit the bus volume itself.
- Ceiling: set at 0.1 dB. The plugin will limit the bus volume just before reaching the maximum.
CYMBALS
The buses of the hi-hat, the crash and the ride cymbal are all routed to the "cymbals" bus.
This is the sound of the cymbals before processing
Hi-hat
Crash
Ride
"Cymbals" bus
Each of the buses for the hi-hat, the crash cymbal and the ride cymbal include an EQ plugin, the Trackplug plugin from Wave Arts, and the Cymbals bus includes a limiter plugin, the FinalPlug from Wave Arts. So the 3 cymbals are EQed on their respective bus, before their signal is sent to the main Cymbals bus.
Source: audio tracks from the Hi-hat, the Crash cymbal and the Ride cymbal
Target: the buses of the Hi-hat, the Crash and Ride Cymbal are routed to the Cymbals bus, which in turn is routed to the Drums bus
Volume: 0 dB (Hi-hat, Crash and Ride buses), -3 dB (Cymbals bus)
Panning: 35% right (Hi-hat), 25% right (Crash), 35% left (Ride), 0% (Cymbals bus)
The stereo placement of the cymbals isn't always the same as the one I chose. You could enlarge the stereo panning by putting the Hi-hat more to the right (90 or 100% for instance), and the ride on the opposite side. Or you could on the contrary narrow the stereo panning by putting the elements closer to the center. You may also invert the panning by placing the Hi-hat on the left and the ride on the right. The audience in a concert sees the Hi-hat on their right side, whereas it is located on the left from the drummer's point of view. Also the elements are located all around the drummer from his point of view, but from the audience's point of view, the sound of the whole drumkit seems to be coming from one point in space. So depending on which point of view you wish to refer to, you may pan the element in very different positions.
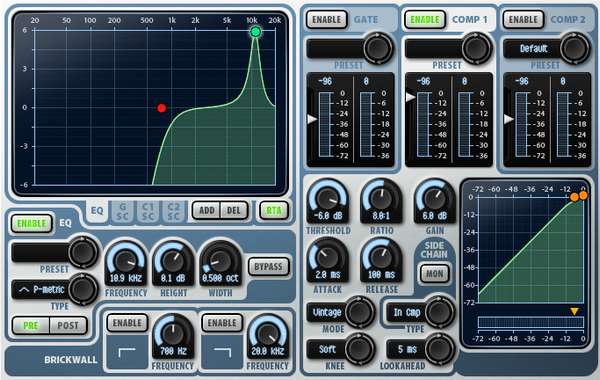
Hi-hat TrackPlug plugin
Settings for the TrackPlug plugin on the Hi-hat bus:
This is the sound obtained after processing with the TrackPlug plugin ("hi-hat", "Crash" and "Ride" buses) and the FinalPlug plugin ("Cymbals" bus)
Hi-hat
- A high-pass filter at 750 Hz (red dot): the lower frequencies are useless with a Hi-hat, as it's merely producing a high-pitched sound, like all cymbals.
- a band at 10.9 KHz, with a volume of +6 dB and a width of 0.5 octave (green dot). After scanning the frequencies, I found this one was the best choice for the Hi-hat in my opinion.
- The compressor part of the plugin is set with a threshold at -6 dB, an 8:1 ratio and a gain level of 6 dB. The attack is very short with 2 ms and the release value is 100 ms.
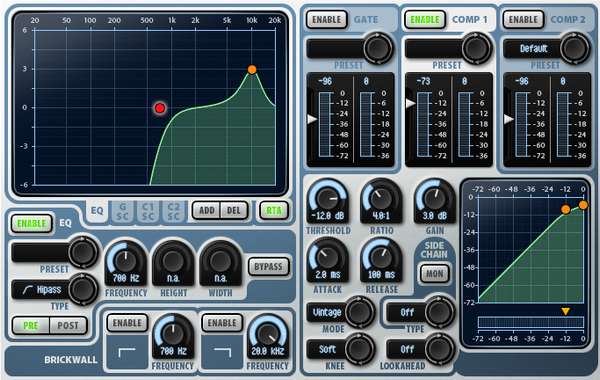
Crash TrackPlug plugin
These are the settings of the TrackPlug plugin on the Crash bus:
This is the sound obtained after processing with the TrackPlug plugin ("Hi-hat", "Crash" and "Ride" buses) and the FinalPlug plugin ("Cymbals" bus)
Crash
- A high-pass filter at 700 Hz (red dot): the lower frequencies are useless with a Crash cymbal, as it's merely producing a high-pitched sound, like all cymbals.
- a band at 9,87 KHz, with a volume of +3 dB and a width of 1 octave (orange dot). After scanning the frequencies, I found this one was the best choice for the Crash cymbal in my opinion.
- The compressor part of the plugin is set with a threshold at -12 dB, a 4:1 ratio and a gain level of 3 dB. The attack is very short with 2 ms and the release value is 100 ms.
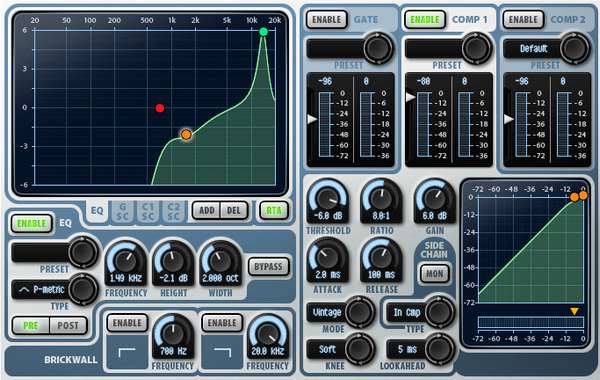
Ride TrackPlug plugin
These are the settings of the TrackPlug plugin on the Ride bus:
Voici le son obtenu après l'ajout du plugin TrackPlug (bus "Charley", "Crash" et "Ride") et du plugin FinalPlug (bus "Cymbales")
Ride
- A high-pass filter at 700 Hz (red dot): the lower frequencies are useless with a Ride cymbal, as it's merely producing a high-pitched sound, like all cymbals.
- a band at 1,49 KHz, with a volume of -2 dB and a width of 2 octaves (orange dot). I found that this frequency was conflicting with other instruments, like guitars and vocals, so I dimmed it by 2 dB, not so much that it would negatively alter the sound of the Ride cymbal.
- a band at 13,7 KHz, with a volume of +6 dB and a width of 0.5 octave (green dot). After scanning the frequencies, I found this one was the best choice for the Ride cymbal in my opinion.
- The compressor part of the plugin is set with a threshold at -6 dB, an 8:1 ratio and a gain of 6 dB. The attack is very short with 2 ms and the release value is 100 ms.
FinalPlug plugin
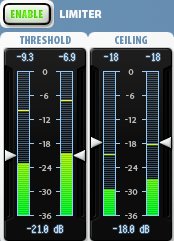
These are the settings of the FinalPlug plugin on the Cymbals bus:
- The threshold is set on -21 dB, a low value because the cymbals' volume, especially the Hi-hat's is rather low, so I need to go get them low enough for the limiter to be effective.
- The ceiling is set on -18 dB, 3 dB above the threshold. This is a weak compression, just enough to boost the sound a bit. In order to prevent the cymbals to sound too loud, the ceiling is set on a low value
- The overall sound of the cymbals will be boosted further by the plugins from the Drums bus and the Master bus. The limiter triggering at -18 dB is therefore not an issue, even thought it may sound weak.
OVERHEADS
The overheads are usually a pair of microphones placed above a drumkit to record the whole instrument, and particularly the cymbals. As we are using a virtual drum plugin, we are not using real microphones, but BFD can simulate overheads.
This is the sound of the overheads before processing
"Overhead" bus
On this bus, I added a parametric equalizer plugin called "TrackPlug" from Wave Arts, as well a limiter plugin called "FinalPlug", from the same company.
This is the sound obtained after using TrackPlug
Source: overheads audio track
Target: Drums bus
Volume: -9 dB
Panning: center
With a real drumkit recording, the overheads sound comes as a support for the other microphones and adds a touch of ambiant sound. As they are placed above the drumkit, they record not only the drum sounds themselves, but also the reverberation of the room, unlike the other microphones that are placed close to the kick drum, the snare drum, etc.
Such room reverberation is indeed simulated within our drums plugin. But as I'm adding a reverb plugin on the main Drums bus at the end of the chain in order to finalize the drums sound, I thus set the Overhead bus volume relatively low (-9 dB), so that it doesn't stand out too much. I removed a lot of lows, the overhead sound will merely bring some brightness to the drums sound.
TrackPlug plugin
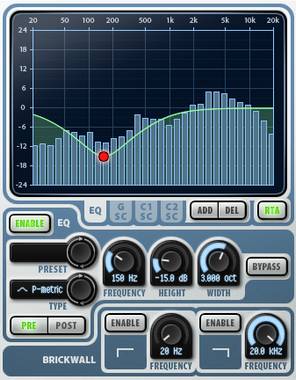
For the overheads, I set the EQ from TrackPlug like this:
- A parametric band at 150 Hz, with a width of 3 octaves to get an impact in all low frequencies up to the low mediums, dipped a lot down to -15 dB.
- I haven't completely removed the low frequencies but I lowered them quite a lot. Just listen how different the raw sound and the EQed sound are. As a consequence: the kick and snare drums sound very thin through the overheads, whereas the hi-hat is much more present.
- No compression was used on this bus.
DRUMS BUS
On this bus, the drums sound is complete (before mastering). I add a limiter with soft settings and a reverb effect. Therefore, it sounds more spacious and more pleasant to hear.
This is the sound of the kick drum with the effects of the Drums bus
* * * * *
This is the sound of the snare drum with the effects of the Drums bus
First the rimshot sound, then the normal hit sound
* * * * *
This is the sound of the cymbals with the effects of the Drums bus
Hi-hat
Crash cymbal
Ride cymbal
This is the sound of the overheads with the effects of the Drums bus
Source: Kick drum, snare drum, cymbals and Overhead buses
Target: Master bus
Volume : -4 dB
Panning: center
FinalPlug plugin
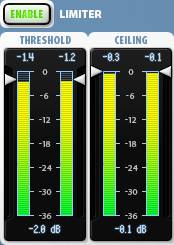
These are the settings used with the FinalPlug plugin on the Drums bus:
Final Plug is a commercial plugin, you will find free limiter plugins here, as well as a compressor plugin (that can be used as a limiter with the appropriate settings). A limiter allows to boost the sound by setting a threshold level from which the sound will be raised up to a defined ceiling value.
- Threshold is set on -2 dB. This is a small compression, just enough to boost the sound up to the level I wanted to reach, without having to modifiy the bus volume itself.
- Ceiling is set on -0.1 dB.
Wizooverb plugin
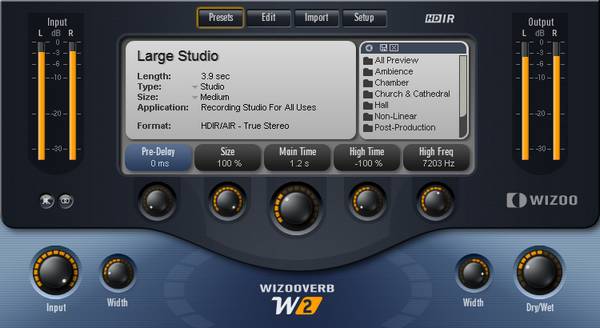
No need to go into the settings details, all reverb plugins offer different options. I'll simply define the general characteristics:
Wizooverb is a commercial plugin, but it is no longer sold, which is a pity because it's excellent. You will find free reverb plugins here. You can find a lot of alternatives on the Internet, with various levels of quality.
- I chose a studio reverb. The Wet sound (the reverberated sound) is on 27%, so 73% comes from the Dry sound (original unaffected sound).
- The reverb duration is 1.2 second.
- There isn't any pre-delay (0 ms). Pre-delay is the time after which reverbs is triggered, after the sound has started playing. In the present case, the reverb starts immediately. The longer the pre-delay, the larger the venue seems to be (depending also on other factors such the Dry/Wet ratio, the room size parameter (if applicable), the reverb duration...). The shorter the pre-delay, the less you will hear the attack of the instrument, as it gets slightly drowned in the reverb. Here, the attack of a drum sound is the impact sound of the stick on the drum element. With a 30 or 40 ms pre-delay, the drum sounds would have been more percussive, as the reverb sound would trigger after the impact sound. I did this choice to smoothe the drums a bit.
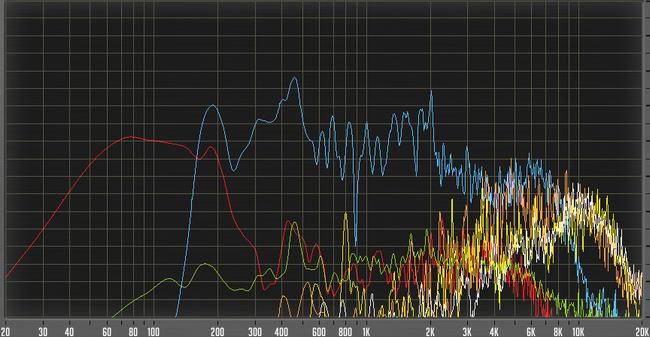
Drums frequencies
Red - Kick drum
Blue - Snare drum
White - Hi-hat
Orange - Crash
Yellow - Ride
Green - Overheads
Of course, many of these frequencies seem to override in the highs, but these are cymbals and they don't play all at the same time.