Version française


? | Home page | Tutorial | Mixing in theory

Homepage
Home page


MIXING IN THEORY

During the mixing step, you will balance instruments, place them in the sound space, set their volumes, modify their frequencies, fix or hide the flaws. The purpose is to define each instrument's location, make them separated from one another and create a song that is pleasant to listen to.

Dynamics
Equalization
Panning
Compression
Reverb
Delay
Depth
Conclusion

Top of page

DYNAMICS

Dynamics is the interval between the lowest and the highest volumes in a sound. OK, fine, but we are doing Rock music, who cares about low volume? We want to kick ass! Drums must beat, guitars must yell, the bass must make the walls shake and the vocals must be loud! Pump up the volume! Wooo... calm down!

If everything is loud, then nothing is

Yes, that's logical. If everything is loud all the time, nothing stands out. But it's the contrasts that bring both subtleties and raging moments to light. How do you expect to surprise your listeners with a sound hurricane if you've already given them thunder and lightning without a break? You have to spare some quiet moments before the storm. Let's compare this with drawing. A black dot on a white background will stand out more easily than the very same black dot on a dark-gray background.
Black dot
Obvious? Yes, but many musicians just care for that "powerful sound" to such an extent that it eventually becomes tiring to listen to.

You can increase the contrasts through the very writing of the song (guitar/vocal bars, followed by a passage with 3 guitars, 1 distorted bass, big drums...), or through interpretation (the musicians play louder, faster...), or through the use of effects (saturation, compression...).

Contrasts don't have to be huge, it all depends on what kind of emotion you wish to convey, on the music genre, on the topic of the song, on what you are looking for...

Nowadays, too many songs just look (and sound) like this:
Over compression
Do your ears a favor: don't do this
Top of page

EQ

EQ stands for equalization. It's a tool that allows you to set the level of the frequencies that make the sound. Basically, it's like a volume knob, but instead of changing the volume of a whole song, you lower or raise only the frequencies of your choice. Just like when you use a stereo amplifier for instance: you can find "bass", "medium" and "treble" knobs. They are a simple EQ that help you to tune the sound.

Well, you are going to apply this same principle to each of the instruments of your song.

The purpose of equalization is simple: changing the sound, so that each instrument primarily occupies the frequency range that defines it the best, without encroaching on the other instruments.

In other words, lower the level of the frequencies that are not necessary to an instrument without distorting it, and see to it that the various instruments main frequencies do not overlap. Each instrument will thus be alone in its own sound space without encroaching on the others, ensuring all instruments are clearly distinct from the rest.

The hard part is to do this without distorting the sound of the instruments, and also to see to it that instruments which have common frequencies by nature be well-marked.

You will deduce that the more instruments there are, the more complex mixing becomes.
Top of page

PANNING

Music is usually mixed in stereo. Not always, but we have two ears, we use headsets or speakers that usually come in pairs, so it only makes sense to use left and right channels when mixing.

That's what panning is: acting on the width of a sound, from left to right.

On top of the EQing described above, we can also part instruments from one another by placing them in different spaces. If two guitars play simultaneously in your song, you may want to place one on the left and the other one on the right. This will help to distinguish them and it will also balance the sound.
Top of page

COMPRESSION

Compression affects the dynamic range of a sound signal.

It reduces the amplitude modulations of the sound, that is to say the gap between the lowest and the highest levels.
Kjaerhus Audio Classic compressor
I will use the above compressor as an example. All compressors have more or less the same basic functions, so it will be easy to reproduce the manipulations on alternative models.

Let's see how this works:

- Threshold: this defines the minimum level from which the compressor will start affecting the sound. 0 is the highest sound level.
- Ratio: this is the level of compression you are going to apply. A 1:1 ratio has no effect, whereas an infinite ratio will limit the sound to the threshold level. In this case, the compressor acts like a limiter and nothing will go higher than the threshold. The higher the ratio, the more compressed the sound will be, and the volume level will be reduced in proportion, until we use the output button.
- Knee: this knob sets how much the compression will affect the sound right before and after the threshold. The softer it is, the softer the transition will be. A hard knee will result in a more abrupt transition. It is rather difficult to hear the effect of this function.
- Attack: this knob indicates the time it takes for the compression to start acting once the threshold is reached. Set it short (0 ms) to compress the sound as soon as the threshold is reached, and set it longer to avoid compressing the attack of an instrument. For example, with a solo guitar, you may want to preserve the string attack and thus set the attack knob on 10 or 20 ms. It all depends on what you wish to do.
- Release: this knob indicates the time it takes for the compression to stop acting once the volume level goes back lower than the threshold. A long release allows for a less brutal change of gain.
- Output: it can also be called "Gain". This knob sets the output volume level after compression of the sound. It compensates for the loss of volume due to the compression.

So basically, compression takes all the sound energy there is between the threshold and the highest level of the original signal and crushes it in a smaller gap. Then you raise the whole signal with the output button, which eventually renders a denser, richer sound compared to the uncompressed signal. This can be subtle or obvious, depending on your settings and the original sound.
Top of page

REVERB

Reverberation brings a little air to a recording that would otherwise sound hollow or confined. It is not necessary to add much of it, or it could drown the sound and give the impression that the recording took place in a cathedral, unless this is what you are looking to obtain. A lot of reverb can be nice at some specific moments in a song, on one specific instrument, but I doubt anyone would apply this effect at a high level on a whole song.

It is recommended to put some on vocals. This will add depth. The more you add, the more the sound will seem to move away and get drowned in the mix. On the contrary, the less there is, the more vocals will seem to be close to the listener. A nice little touch of reverb makes vocals sound richer, deeper and more beautiful. Just find the right level.
Top of page

DELAY

Delay is a sound effect that allows to... delay an audio signal and have it repeated. It's very much like an echo: shout and you will hear your voice first, then the echo of your voice repeated one or several times.

This effect is somewhat related to the reverb effect, with one major difference: delay repeats at regular intervals without generating a continuous surrounding sound. You can use it instead of the reverb to avoid overcrowding the mix.

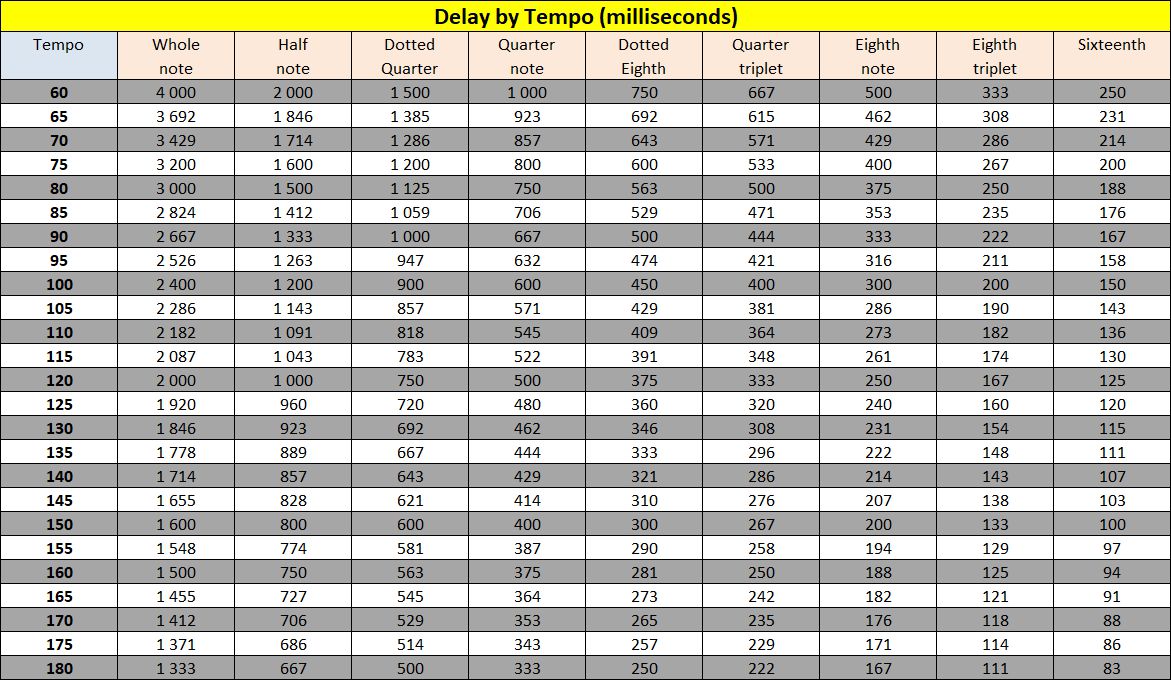
As a general rule, set this effect by basing it on the song tempo. Choose whichever interval you wish to hear the echoes. Here is a chart to help you:
Delay by tempo
Click on the chart to download the corresponding Excel file ("Delay by Tempo & Instrument Frequencies.xls" - 64 KB)
Top of page

DEPTH

By changing not only the volume, but also the frequencies or some effects like reverb, you can give the impression that a sound is more or less near the listener. This adds depth to a recording.

In everyday life, how do you recognize a distant sound?

Its volume is low. At least relatively. A motorbike engine roaring in the distance will be much less loud than if it were 2 metres away from you. Thus, the first thing to do is to lower the volume of the instrument you want to place in the background.

Distant sounds don't have much bass frequencies. Bass frequencies require a lot of energy to move. Unless you hear a very powerful sound (like an explosion), the bass tone won't get to you. So you may cut low frequencies with a high-pass filter or an EQ.

On the other end of the sound spectrum, high frequencies of a distant sound are also fainted because they are absorbed by obstacles as they're moving. So you also need to lower these high frequencies.

Distant sounds are indistinct, unintelligible. Human voice, for example: if you hear someone speaking in the distance, you will of course recognize that this is a human voice (yes, your brain is that smart), you will probably know whether it belongs to a man or a woman, but you will not understand a word. You are going to have to reproduce this lack of clarity to simulate distance. A little reverb, a little chorus or some phaser touch will do. Give it a try and see what suits your music best.

You can't always tell exactly where the faint sound you're hearing is coming from. So pan the background instruments in the middle position and leave the sides to foreground instruments.

When listening to a music, a listener will mainly focus on changing elements. The use of a repeating, short musical pattern, treated as described above, will be easily forgotten and place itself in the background. The purpose of a background instrument is to add some fullness to the song, without being so interesting that it draws attention. It should be kept simple to have it blend into the song without being noticed too much.
And of course, on the contrary, foreground instruments will be the ones bringing volume, lowest and highest frequencies, melodies, and elements of surprise.
Example of a voice that gradually goes away from the listener
(full screen for a better view)
Top of page

CONCLUSION

When adding effects, check the result by activating and deactivating them as the song (or the instrument) plays. It will help you to see whether an effect is too present, or not enough, whether it is necessary, whether it is too agressive, etc. You may like heavy reverb, but too much of it just drowns it all and makes the song inaudible. Control is essential. Too little is useless, you might as well remove the effect completely, whereas too much will make everything weighty and will surely waste the whole piece.

An effect often turns out to be... effective if you miss it when it's gone, even though you were not certain to hear it when it was on.
Recording - Previous | Next - Mixing in practice
Top of page


MESSAGES

(leave a message)

Messages page # 1 2 3 4 5 6 7 8 9 10 11 12 13 14 15 16 17 18 19 20 21 22 23 24 25 26 27 28 29 30 31 32 33 34 35


hammer-on
le 08/04/2011 à 23h10

D'abord merci de partager tes connaissances.

Une question dans ce monde de Rock, existe-t-il des simulateurs et baffles plus dédiés pour les sons clairs, exemple le Jazz Chorus 120 de Roland (style Pat Metheny, Larry Carlton, Carlos Santana).

* * * * * * * * * * * * * * * *

<em>Bonjour,

Content que mon site te soit utile !
En ce qui concerne des simulateurs de têtes ou de baffles qui soient bons en sons clairs, beaucoup des têtes dont je parle ici, que ce soit les simus payantes ou gratuites, proposent plusieurs canaux, comme les vraies têtes. On trouve souvent un canal clair et un ou deux canaux pour la disto. C'est vrai que le canal clair produit souvent un son un peu crunchy s'il est réglé à un volume trop élevé. Pour garder un son vraiment clair, une utilisation du canal clean à un volume moyen, associé à un baffle de bonne qualité (Orange, Soldano, Fender) devrait faire l'affaire.

Les amplis typés Metal donnent en général de beaux sons clairs, mais peut-être un peu froids, tandis que les amplis rock vintage auront tendance à cruncher plus vite mais auront ce petit grain chaleureux en plus.
Dans les amplis gratuits, j'aime énormément le NRR1 de Ignite Amps, très polyvalent. Son canal clair, associé à un baffle Orange par exemple est à mon goût très réussi.
Le Fender Twin de SimulAnalog, gratuit également, est assez ancien mais très réussi et il inclut son propre baffle. C'est une reproduction fidèle (je trouve) du modèle original.
Le Lextac de Lepou est capable de faire de beaux sons clairs également, associé au bon baffle.
Dans les payants, je suis tombé amoureux du Amplifikation Creme de Kuassa. Il n'est pas cher (34 dollars) et il a une palette de sonorités assez vaste. Il inclut même son propre simulateur de baffle qu'on peut bypasser si l'on veut pour utiliser un simulateur de baffle externe. Peut-être pas le meilleur pour les sons vraiment clairs, toutefois.

Après, il y a les Guitar Rig, Amplitube ou mieux encore TH1 (TH2 maintenant) ou Peavey Revalver MK3 qui proposent un nombre impressionnant d'amplis divers et variés, et on peut y trouver de tout, du son clair au Metal le plus extrême, mais c'est pas donné.

Je vais pas être très original, mais le meilleur conseil que je puisse donner, c'est... d'essayer. Il ne faut pas hésiter à prendre un ampli et tourner les boutons dans tous les sens, essayer diverses associations d'amplis et de baffles. Personne ne peut savoir le son que tu as en tête, LE son que tu cherches exactement. Ça prend du temps, moi je n'ai pas non plus toujours le temps ou simplement la patience de prendre 2 heures ou plus à fignoler un son précis, et pourtant, c'est le meilleur moyen d'y arriver.
Les recettes miracle, déjà toutes prêtes, ça n'existe pas.
Bon courage !

Grebz</em>


NickiRage
le 23/02/2011 à 20h39

Salut Grebz !

Je voulais juste savoir, je voudrais vraiment me rapprocher le plus possible du son des Avenged Sevenfold ! Donc je voudrais savoir quel ampli, cabinet etc... et les réglages si tu as le temps bien sûr :)

Je te remercie pour tout le travail que tu fais et tout ce que tu m'as apporté !!

NickiRage

* * * * * * * * * * * * * * * *

<em>Bonjour,

Voilà ce que j'ai pu trouver sur le matos du groupe, mais en ce qui concerne les réglages, je ne vais pas trop pouvoir t'aider :
<a href="http://www.uberproaudio.com/who-plays-what/188-avenged-sevenfold-synyster-gates-guitar-gear-rig-and-equipment" target="_blank">Matériel de Avenged Sevenfold</a>
Surtout qu'ils utilisent non seulement des amplis (bien sûr !) mais aussi pas mal de pédales pour modifier le son. Dans quel ordre et avec quels réglages, c'est dur à dire et j'imagine que ça dépend des chansons. Ils n'ont probablement pas UN seul réglage pour toutes les chansons.

Grebz</em>


Gigi
le 05/02/2011 à 10h14

Bonjour,

Bravo pour ce site qui est clair, sympa et rassurant !

Je suis en train d'installer (moi aussi) un home studio...Novice, j'ai regardé vos recommandations pour l'installation... Je viens d'acheter un Neumann... Bon, maintenant, je suis coincée, car j'ai acheté la Harley des micros, sans avoir bien pensé à son garage, son essence, etc...

Bref, après ce gros achat, je ne sais pas quel ampli et quelle interface audio acheter le moins cher possible (d'occasion sur E-Bay il y a de bonnes affaires)... Mais quelles marques choisir ?

Je peux encore investir, mais le budget est devenu serré...

J'ai lu des tonnes de pages de forum, mais aucun cas n'est comme le mien... qui est aussi bête que moi me direz-vous ? (j'ai le 103 TLM)

Sinon, bonne continuation et vive la Musique !

Gigi

* * * * * * * * * * * * * * * *

<em>
Effectivement, investir dans un Neumann, c'est bien, mais il faut assurer derrière pour garder la cohérence de la chaîne audio. En interface audio, je dirai que les marques RME ou MOTU sont hautement recommandables, on trouve aussi du bon matériel chez M-Audio, Presonus ou Edirol.
(voir cette page sur <a href="http://fr.audiofanzine.com/carte-son-externe/" target="_blank">Audiofanzine</a>)

Pour ce qui est des préamplis, PreSonus propose des préamplis à lampe pas trop chers (modèles BlueTube ou TubePre). Après, les prix peuvent monter en flèche avec d'autres marques comme SPL ou Avalon.
(voir cette page sur Audiofanzine pour les <a href="http://fr.audiofanzine.com/preampli-lampes/" target="_blank">préamplis à lampe</a>, et celle-ci pour les <a href="http://fr.audiofanzine.com/preampli-transistors/" target="_blank">préamplis à transistor</a>)

Grebz</em>

* * * * * * * * * * * * * * * *

Merci de vos conseils, c'est vraiment gentil...
Votre site est vraiment indispensable et je vais suivre vos recommandations pour l'installation. Vous au moins, vous vous exprimez avec un langage clair et donc accessible aux néophytes.

Bonne continuation et vive la Musique !


SolartNow
le 02/02/2011 à 21h01

Bravo pour ce site, c'est du super job, sérieux, pédagogique, intelligent, méthodique, pratique, efficace, compétent, que des "complimentations" révérencieuses...

Je suis conquis Mr Grebz, mes meilleurs voeux pour vos projets... et puisque "qui donne reçoit"... J'espère que tu vas recevoir (ce que tu espères bien sûr !)

Signé un modeste MusicoBricolo : <a href="http://solartnow.c.la/" target="_blanck">SolartNow</a>.


M.M.
le 27/01/2011 à 01h42

Avec quel type de préampli dois-je utiliser un micro royer r121 pour l'optimiser au mieux ?
Ma liste de préamplis : Universal Audio 2610 et (6176), TL Audio vc1, SPL Chanel one, Presonus Digimax.
Merci d'avance.

* * * * * * * * * * * * * * * *

<em>Désolé, je n'en sais rien. Pour des questions sur du matériel spécifique, voyez sur les forums du site <a href="http://fr.audiofanzine.com/" target="_blanck">Audiofanzine</a>. Il y aura soit la réponse à vos questions, soit quelqu'un qui saura.

Pour ma part, je me contente de parler du matériel et des logiciels que je connais et que j'utilise chez moi, dans mon home studio. Pour le reste, ça sort de ma compétence.

Grebz</em>

* * * * * * * * * * * * * * * *

Merci quand même ! Sympa ton site..

Top of page