Version française


? | Home page | Tutorial | Mixing in theory

Homepage
Home page


MIXING IN THEORY

During the mixing step, you will balance instruments, place them in the sound space, set their volumes, modify their frequencies, fix or hide the flaws. The purpose is to define each instrument's location, make them separated from one another and create a song that is pleasant to listen to.

Dynamics
Equalization
Panning
Compression
Reverb
Delay
Depth
Conclusion

Top of page

DYNAMICS

Dynamics is the interval between the lowest and the highest volumes in a sound. OK, fine, but we are doing Rock music, who cares about low volume? We want to kick ass! Drums must beat, guitars must yell, the bass must make the walls shake and the vocals must be loud! Pump up the volume! Wooo... calm down!

If everything is loud, then nothing is

Yes, that's logical. If everything is loud all the time, nothing stands out. But it's the contrasts that bring both subtleties and raging moments to light. How do you expect to surprise your listeners with a sound hurricane if you've already given them thunder and lightning without a break? You have to spare some quiet moments before the storm. Let's compare this with drawing. A black dot on a white background will stand out more easily than the very same black dot on a dark-gray background.
Black dot
Obvious? Yes, but many musicians just care for that "powerful sound" to such an extent that it eventually becomes tiring to listen to.

You can increase the contrasts through the very writing of the song (guitar/vocal bars, followed by a passage with 3 guitars, 1 distorted bass, big drums...), or through interpretation (the musicians play louder, faster...), or through the use of effects (saturation, compression...).

Contrasts don't have to be huge, it all depends on what kind of emotion you wish to convey, on the music genre, on the topic of the song, on what you are looking for...

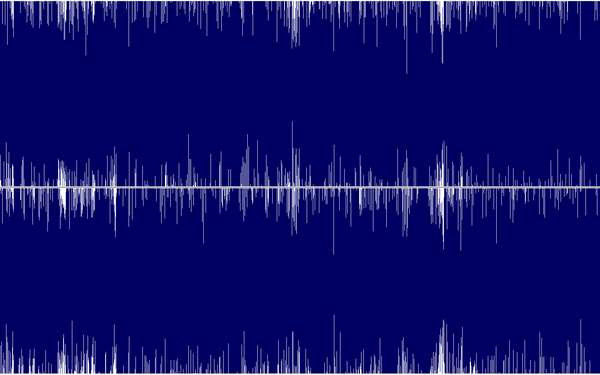
Nowadays, too many songs just look (and sound) like this:
Over compression
Do your ears a favor: don't do this
Top of page

EQ

EQ stands for equalization. It's a tool that allows you to set the level of the frequencies that make the sound. Basically, it's like a volume knob, but instead of changing the volume of a whole song, you lower or raise only the frequencies of your choice. Just like when you use a stereo amplifier for instance: you can find "bass", "medium" and "treble" knobs. They are a simple EQ that help you to tune the sound.

Well, you are going to apply this same principle to each of the instruments of your song.

The purpose of equalization is simple: changing the sound, so that each instrument primarily occupies the frequency range that defines it the best, without encroaching on the other instruments.

In other words, lower the level of the frequencies that are not necessary to an instrument without distorting it, and see to it that the various instruments main frequencies do not overlap. Each instrument will thus be alone in its own sound space without encroaching on the others, ensuring all instruments are clearly distinct from the rest.

The hard part is to do this without distorting the sound of the instruments, and also to see to it that instruments which have common frequencies by nature be well-marked.

You will deduce that the more instruments there are, the more complex mixing becomes.
Top of page

PANNING

Music is usually mixed in stereo. Not always, but we have two ears, we use headsets or speakers that usually come in pairs, so it only makes sense to use left and right channels when mixing.

That's what panning is: acting on the width of a sound, from left to right.

On top of the EQing described above, we can also part instruments from one another by placing them in different spaces. If two guitars play simultaneously in your song, you may want to place one on the left and the other one on the right. This will help to distinguish them and it will also balance the sound.
Top of page

COMPRESSION

Compression affects the dynamic range of a sound signal.

It reduces the amplitude modulations of the sound, that is to say the gap between the lowest and the highest levels.
Kjaerhus Audio Classic compressor
I will use the above compressor as an example. All compressors have more or less the same basic functions, so it will be easy to reproduce the manipulations on alternative models.

Let's see how this works:

- Threshold: this defines the minimum level from which the compressor will start affecting the sound. 0 is the highest sound level.
- Ratio: this is the level of compression you are going to apply. A 1:1 ratio has no effect, whereas an infinite ratio will limit the sound to the threshold level. In this case, the compressor acts like a limiter and nothing will go higher than the threshold. The higher the ratio, the more compressed the sound will be, and the volume level will be reduced in proportion, until we use the output button.
- Knee: this knob sets how much the compression will affect the sound right before and after the threshold. The softer it is, the softer the transition will be. A hard knee will result in a more abrupt transition. It is rather difficult to hear the effect of this function.
- Attack: this knob indicates the time it takes for the compression to start acting once the threshold is reached. Set it short (0 ms) to compress the sound as soon as the threshold is reached, and set it longer to avoid compressing the attack of an instrument. For example, with a solo guitar, you may want to preserve the string attack and thus set the attack knob on 10 or 20 ms. It all depends on what you wish to do.
- Release: this knob indicates the time it takes for the compression to stop acting once the volume level goes back lower than the threshold. A long release allows for a less brutal change of gain.
- Output: it can also be called "Gain". This knob sets the output volume level after compression of the sound. It compensates for the loss of volume due to the compression.

So basically, compression takes all the sound energy there is between the threshold and the highest level of the original signal and crushes it in a smaller gap. Then you raise the whole signal with the output button, which eventually renders a denser, richer sound compared to the uncompressed signal. This can be subtle or obvious, depending on your settings and the original sound.
Top of page

REVERB

Reverberation brings a little air to a recording that would otherwise sound hollow or confined. It is not necessary to add much of it, or it could drown the sound and give the impression that the recording took place in a cathedral, unless this is what you are looking to obtain. A lot of reverb can be nice at some specific moments in a song, on one specific instrument, but I doubt anyone would apply this effect at a high level on a whole song.

It is recommended to put some on vocals. This will add depth. The more you add, the more the sound will seem to move away and get drowned in the mix. On the contrary, the less there is, the more vocals will seem to be close to the listener. A nice little touch of reverb makes vocals sound richer, deeper and more beautiful. Just find the right level.
Top of page

DELAY

Delay is a sound effect that allows to... delay an audio signal and have it repeated. It's very much like an echo: shout and you will hear your voice first, then the echo of your voice repeated one or several times.

This effect is somewhat related to the reverb effect, with one major difference: delay repeats at regular intervals without generating a continuous surrounding sound. You can use it instead of the reverb to avoid overcrowding the mix.

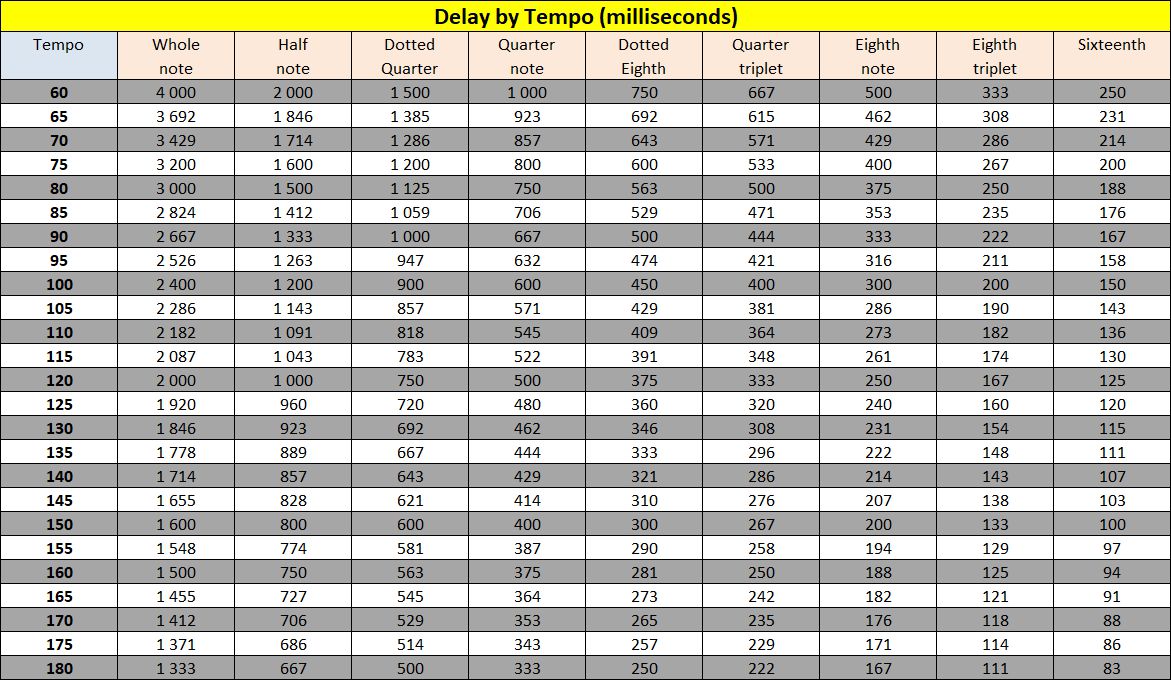
As a general rule, set this effect by basing it on the song tempo. Choose whichever interval you wish to hear the echoes. Here is a chart to help you:
Delay by tempo
Click on the chart to download the corresponding Excel file ("Delay by Tempo & Instrument Frequencies.xls" - 64 KB)
Top of page

DEPTH

By changing not only the volume, but also the frequencies or some effects like reverb, you can give the impression that a sound is more or less near the listener. This adds depth to a recording.

In everyday life, how do you recognize a distant sound?

Its volume is low. At least relatively. A motorbike engine roaring in the distance will be much less loud than if it were 2 metres away from you. Thus, the first thing to do is to lower the volume of the instrument you want to place in the background.

Distant sounds don't have much bass frequencies. Bass frequencies require a lot of energy to move. Unless you hear a very powerful sound (like an explosion), the bass tone won't get to you. So you may cut low frequencies with a high-pass filter or an EQ.

On the other end of the sound spectrum, high frequencies of a distant sound are also fainted because they are absorbed by obstacles as they're moving. So you also need to lower these high frequencies.

Distant sounds are indistinct, unintelligible. Human voice, for example: if you hear someone speaking in the distance, you will of course recognize that this is a human voice (yes, your brain is that smart), you will probably know whether it belongs to a man or a woman, but you will not understand a word. You are going to have to reproduce this lack of clarity to simulate distance. A little reverb, a little chorus or some phaser touch will do. Give it a try and see what suits your music best.

You can't always tell exactly where the faint sound you're hearing is coming from. So pan the background instruments in the middle position and leave the sides to foreground instruments.

When listening to a music, a listener will mainly focus on changing elements. The use of a repeating, short musical pattern, treated as described above, will be easily forgotten and place itself in the background. The purpose of a background instrument is to add some fullness to the song, without being so interesting that it draws attention. It should be kept simple to have it blend into the song without being noticed too much.
And of course, on the contrary, foreground instruments will be the ones bringing volume, lowest and highest frequencies, melodies, and elements of surprise.
Example of a voice that gradually goes away from the listener
(full screen for a better view)
Top of page

CONCLUSION

When adding effects, check the result by activating and deactivating them as the song (or the instrument) plays. It will help you to see whether an effect is too present, or not enough, whether it is necessary, whether it is too agressive, etc. You may like heavy reverb, but too much of it just drowns it all and makes the song inaudible. Control is essential. Too little is useless, you might as well remove the effect completely, whereas too much will make everything weighty and will surely waste the whole piece.

An effect often turns out to be... effective if you miss it when it's gone, even though you were not certain to hear it when it was on.
Recording - Previous | Next - Mixing in practice
Top of page


MESSAGES

(leave a message)

Messages page # 1 2 3 4 5 6 7 8 9 10 11 12 13 14 15 16 17 18 19 20 21 22 23 24 25 26 27 28 29 30 31 32 33 34 35


krickgpe
le 03/05/2017 à 08h34

Bonjour et merci pour ce site très instructif. Les conseils de mixage de guitare et de basse s'appliquent-ils aussi à des pistes déjà enregistrées, je veux dire non enregistrées en live dans le daw ? Merci.

* * * * * * * * * * * * * * * *

<em>En ce qui concerne le mixage de guitares (ou basses) enregistrées par ailleurs, il faut tenir compte de la façon dont elles ont été enregistrées.
Dans mon didacticiel, je pars d’un enregistrement totalement dénué d’effets (guitares branchées directement dans l’interface audio), et j’y ajoute des simulateurs d’ampli, des chargeurs d’impulsions, de la distorsion, etc.
Bien évidemment, si vous utilisez un enregistrement d’une guitare qui passe déjà par un ampli, vous pouvez vous passer de l’étape « simulateur d’ampli » et « chargeur d’impulsions ».
Si l’enregistrement comporte déjà un son de guitare avec de la distorsion, il n’est sans doute pas nécessaire d’en rajouter, sauf si vous pensez qu’il n’y a pas assez de distorsion.
Pareil pour la réverb : si l’enregistrement comporte déjà une réverb audible, il vaut mieux ne pas en rajouter.

En revanche, vous allez sans doute devoir travailler un peu l’égalisation de votre guitare enregistrée pour qu’elle s’intègre à votre mix. Là aussi, adaptez l’EQ à votre mixage en cours, en fonction des instruments déjà présents. Toute égalisation doit se faire en fonction du reste du mix, et pas uniquement sur l’instrument tout seul. Il faut à la fois respecter le timbre de l’instrument, mais aussi veiller à ce qu’il s’intègre bien au tout. Diminuez par exemple un peu les fréquences graves de la guitare pour laisser de la place à celles de la basse. Le mixage est un jeu d’équilibre entre les différents instruments présents.

Ce didacticiel n’est pas un guide à suivre aveuglément en toutes circonstances, c’est plutôt une manière de montrer sur quels paramètres on peut agir, mais c’est à vous de choisir et doser les paramètres adaptés à votre musique.

Grebz</em>


Panigutti
le 18/04/2017 à 20h57

Great work thanks you from paraguay


zakk33
le 05/04/2017 à 18h38

Bonjour,<br/>
Je possède un ampli à lampes Jet City en combo et j'ai vu que l'on pouvait se servir du son de son ampli (préamp) avec des IR à l'aide d'une DI box branchée sur les sorties HP de mon ampli.<br/>
Faut-il une DI qui fasse en plus obligatoirement sim de cab comme les Palmer pdi09, Redbox de chez HK ou Behringer ultra gi100 ?<br/>
En sachant que je n'ai pas de boucle d'effet ni de line in/out, quelle DI pas chère me conseillez-vous ?<br/>
Après, j'utilise des impulsions Ownhammer et Redwirez avec le cab avec un simulateur d'ampli, mais je ne vois pas comment faire pour faire fonctionner un loader d'impulse avec le séquenceur Reaper (sans simu d'apli).<br/><br/>
Merci pour votre éclairage :)<br/><br/>
* * * * * * * * * * * * * * * *<br/><br/>
<em>Bonjour Chris,<br/><br/>
Merci de votre visite sur mon site.<br/>
Très honnêtement, n’utilisant pas de DI ni d’ampli connecté à mon PC d’aucune manière, je ne connais pas les branchements dont vous parlez dans votre message.<br/><br/>
En revanche, pour ce qui est d’utiliser un chargeur d’impulsions et des impulsions avec Reaper, voici comment procéder :<br/>
* Sélectionner la piste voulue pour insérer un plugin, et cliquer sur le bouton FX<br/>
* Deux nouvelles fenêtres apparaissent, dont une avec la liste des plugins détectés par Reaper sur votre ordinateur.<br/>
Sélectionnez votre chargeur d’impulsions puis cliquez sur OK.<br/>
* L’interface du chargeur d’impulsions va alors apparaître dans l’autre fenêtre<br/>
* Vous n’avez plus qu’à y charger la ou les impulsions de votre choix.<br/>
Une fois vos réglages effectuées, vous pouvez fermer cette fenêtre, et vous pourrez la faire réapparaître en cliquant de nouveau sur le bouton FX de la piste.
Si vous voulez ajouter d’autres plugins sur cette piste, cliquez sur le bouton FX pour faire apparaître la fenêtre de plugin, et cliquez sur le bouton « Add » en bas à gauche, ce qui fera apparaître de nouveau la liste des plugins, choisissez le plugin qui vous intéresse comme précédemment et il sera ajouté. Ajoutez par exemple un simulateur d’ampli, et placez-le avant le chargeur d’impulsions en le sélectionnant et en le faisant glisser au-dessus de NadIR.<br/>
Bien entendu, procédez de la même manière pour n’importe quel type de plugin (réverb, delay, EQ, etc.) pour les ajouter à une piste.<br/>
Grebz</em>


Dr Bonkers
le 26/03/2017 à 19h06

Hi, If you are looking for guitar cab and bass cab impulse response (IR) files, you might want to check out my site. I am always adding new guitar cabinet or bass cabinet ir's usually on a weekly or monthly basis in both Fractal Audio & Wav file formats. Currently I have the following for sale:
Ampeg B-15
Aguillar DB810
SVT 8X10
SWR Super Redhead
Norlin Gibson Moog Lab Series L5
1959 Valco Supro 1606 branded as Oahu Publishing Co of Cleveland Ohio 1X6
Sound samples may be found in the Samples tab of my site, which is Google translate compatable.
If you have any quesions tht the site does not answer, please feel free to contact me.
https://www.drbonkerssoundlab.com/
Best,
Dr. B


Latency
le 01/03/2017 à 20h22

Best guitar sim for clean? Not many out there with a clean focus.

* * * * * * * * * * * * * * * *

<em>In the free sims, I'd say the best for clean sounds are the Ignite Amps sims. All of them can handle clean sounds: NRR1, Anvil and even Emissary.
Lepou's sims are also able to produce nice clean sounds, like LE456, Hybrit or Lecto.
Don't forget that free amp sims are usually simulating only the head part of an actual amp. You will need to add an impulse loader (such as Lepou's Lecab 2 or Ignite Amp's NadIR), and load impulses into them. The choice of the impulse will have a huge impact on the sound quality.

Commercial amp sims all have the ability to handle many types of sound. Amplitube, TH3, Revalver, S-Gear 2 can be recommended, although they can be expensive. Among the simplest (and less versatile) commercial sims, you can try Vermillion from Kuassa, which can produce nice clean sounds as well, and will include the impulses as well.
Grebz</em>

Top of page