Version française


? | Home page | Tutorial | Mixing in theory

Homepage
Home page


MIXING IN THEORY

During the mixing step, you will balance instruments, place them in the sound space, set their volumes, modify their frequencies, fix or hide the flaws. The purpose is to define each instrument's location, make them separated from one another and create a song that is pleasant to listen to.

Dynamics
Equalization
Panning
Compression
Reverb
Delay
Depth
Conclusion

Top of page

DYNAMICS

Dynamics is the interval between the lowest and the highest volumes in a sound. OK, fine, but we are doing Rock music, who cares about low volume? We want to kick ass! Drums must beat, guitars must yell, the bass must make the walls shake and the vocals must be loud! Pump up the volume! Wooo... calm down!

If everything is loud, then nothing is

Yes, that's logical. If everything is loud all the time, nothing stands out. But it's the contrasts that bring both subtleties and raging moments to light. How do you expect to surprise your listeners with a sound hurricane if you've already given them thunder and lightning without a break? You have to spare some quiet moments before the storm. Let's compare this with drawing. A black dot on a white background will stand out more easily than the very same black dot on a dark-gray background.
Black dot
Obvious? Yes, but many musicians just care for that "powerful sound" to such an extent that it eventually becomes tiring to listen to.

You can increase the contrasts through the very writing of the song (guitar/vocal bars, followed by a passage with 3 guitars, 1 distorted bass, big drums...), or through interpretation (the musicians play louder, faster...), or through the use of effects (saturation, compression...).

Contrasts don't have to be huge, it all depends on what kind of emotion you wish to convey, on the music genre, on the topic of the song, on what you are looking for...

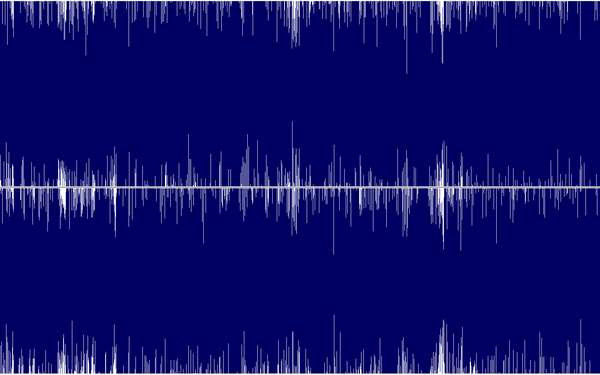
Nowadays, too many songs just look (and sound) like this:
Over compression
Do your ears a favor: don't do this
Top of page

EQ

EQ stands for equalization. It's a tool that allows you to set the level of the frequencies that make the sound. Basically, it's like a volume knob, but instead of changing the volume of a whole song, you lower or raise only the frequencies of your choice. Just like when you use a stereo amplifier for instance: you can find "bass", "medium" and "treble" knobs. They are a simple EQ that help you to tune the sound.

Well, you are going to apply this same principle to each of the instruments of your song.

The purpose of equalization is simple: changing the sound, so that each instrument primarily occupies the frequency range that defines it the best, without encroaching on the other instruments.

In other words, lower the level of the frequencies that are not necessary to an instrument without distorting it, and see to it that the various instruments main frequencies do not overlap. Each instrument will thus be alone in its own sound space without encroaching on the others, ensuring all instruments are clearly distinct from the rest.

The hard part is to do this without distorting the sound of the instruments, and also to see to it that instruments which have common frequencies by nature be well-marked.

You will deduce that the more instruments there are, the more complex mixing becomes.
Top of page

PANNING

Music is usually mixed in stereo. Not always, but we have two ears, we use headsets or speakers that usually come in pairs, so it only makes sense to use left and right channels when mixing.

That's what panning is: acting on the width of a sound, from left to right.

On top of the EQing described above, we can also part instruments from one another by placing them in different spaces. If two guitars play simultaneously in your song, you may want to place one on the left and the other one on the right. This will help to distinguish them and it will also balance the sound.
Top of page

COMPRESSION

Compression affects the dynamic range of a sound signal.

It reduces the amplitude modulations of the sound, that is to say the gap between the lowest and the highest levels.
Kjaerhus Audio Classic compressor
I will use the above compressor as an example. All compressors have more or less the same basic functions, so it will be easy to reproduce the manipulations on alternative models.

Let's see how this works:

- Threshold: this defines the minimum level from which the compressor will start affecting the sound. 0 is the highest sound level.
- Ratio: this is the level of compression you are going to apply. A 1:1 ratio has no effect, whereas an infinite ratio will limit the sound to the threshold level. In this case, the compressor acts like a limiter and nothing will go higher than the threshold. The higher the ratio, the more compressed the sound will be, and the volume level will be reduced in proportion, until we use the output button.
- Knee: this knob sets how much the compression will affect the sound right before and after the threshold. The softer it is, the softer the transition will be. A hard knee will result in a more abrupt transition. It is rather difficult to hear the effect of this function.
- Attack: this knob indicates the time it takes for the compression to start acting once the threshold is reached. Set it short (0 ms) to compress the sound as soon as the threshold is reached, and set it longer to avoid compressing the attack of an instrument. For example, with a solo guitar, you may want to preserve the string attack and thus set the attack knob on 10 or 20 ms. It all depends on what you wish to do.
- Release: this knob indicates the time it takes for the compression to stop acting once the volume level goes back lower than the threshold. A long release allows for a less brutal change of gain.
- Output: it can also be called "Gain". This knob sets the output volume level after compression of the sound. It compensates for the loss of volume due to the compression.

So basically, compression takes all the sound energy there is between the threshold and the highest level of the original signal and crushes it in a smaller gap. Then you raise the whole signal with the output button, which eventually renders a denser, richer sound compared to the uncompressed signal. This can be subtle or obvious, depending on your settings and the original sound.
Top of page

REVERB

Reverberation brings a little air to a recording that would otherwise sound hollow or confined. It is not necessary to add much of it, or it could drown the sound and give the impression that the recording took place in a cathedral, unless this is what you are looking to obtain. A lot of reverb can be nice at some specific moments in a song, on one specific instrument, but I doubt anyone would apply this effect at a high level on a whole song.

It is recommended to put some on vocals. This will add depth. The more you add, the more the sound will seem to move away and get drowned in the mix. On the contrary, the less there is, the more vocals will seem to be close to the listener. A nice little touch of reverb makes vocals sound richer, deeper and more beautiful. Just find the right level.
Top of page

DELAY

Delay is a sound effect that allows to... delay an audio signal and have it repeated. It's very much like an echo: shout and you will hear your voice first, then the echo of your voice repeated one or several times.

This effect is somewhat related to the reverb effect, with one major difference: delay repeats at regular intervals without generating a continuous surrounding sound. You can use it instead of the reverb to avoid overcrowding the mix.

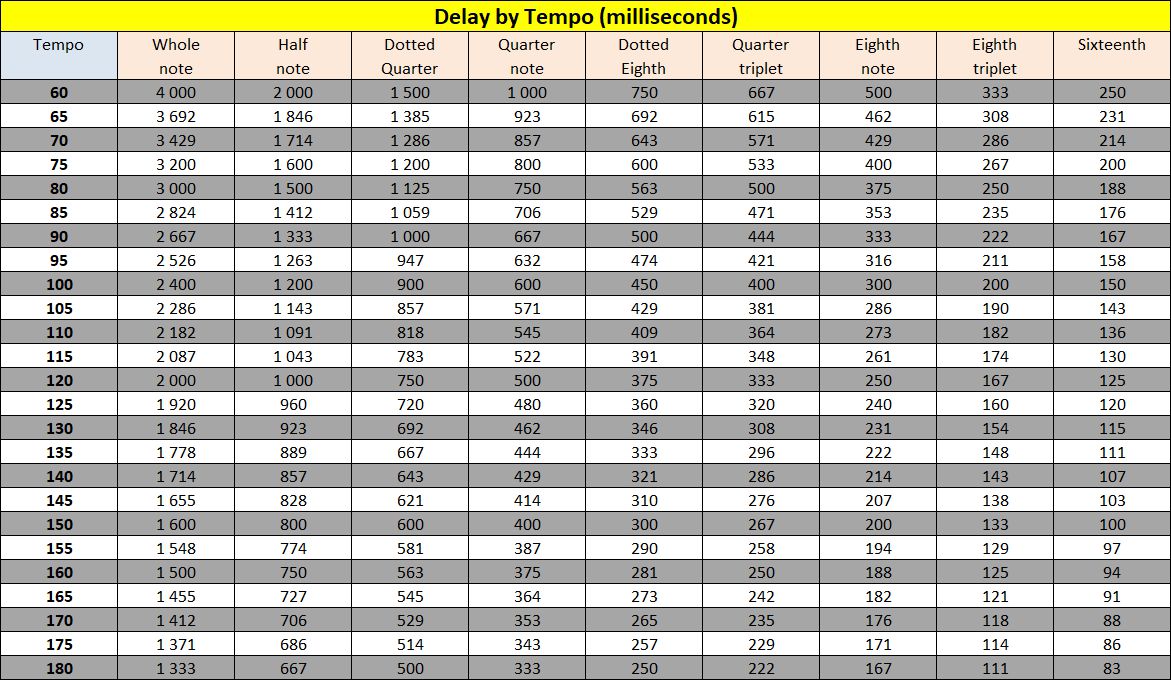
As a general rule, set this effect by basing it on the song tempo. Choose whichever interval you wish to hear the echoes. Here is a chart to help you:
Delay by tempo
Click on the chart to download the corresponding Excel file ("Delay by Tempo & Instrument Frequencies.xls" - 64 KB)
Top of page

DEPTH

By changing not only the volume, but also the frequencies or some effects like reverb, you can give the impression that a sound is more or less near the listener. This adds depth to a recording.

In everyday life, how do you recognize a distant sound?

Its volume is low. At least relatively. A motorbike engine roaring in the distance will be much less loud than if it were 2 metres away from you. Thus, the first thing to do is to lower the volume of the instrument you want to place in the background.

Distant sounds don't have much bass frequencies. Bass frequencies require a lot of energy to move. Unless you hear a very powerful sound (like an explosion), the bass tone won't get to you. So you may cut low frequencies with a high-pass filter or an EQ.

On the other end of the sound spectrum, high frequencies of a distant sound are also fainted because they are absorbed by obstacles as they're moving. So you also need to lower these high frequencies.

Distant sounds are indistinct, unintelligible. Human voice, for example: if you hear someone speaking in the distance, you will of course recognize that this is a human voice (yes, your brain is that smart), you will probably know whether it belongs to a man or a woman, but you will not understand a word. You are going to have to reproduce this lack of clarity to simulate distance. A little reverb, a little chorus or some phaser touch will do. Give it a try and see what suits your music best.

You can't always tell exactly where the faint sound you're hearing is coming from. So pan the background instruments in the middle position and leave the sides to foreground instruments.

When listening to a music, a listener will mainly focus on changing elements. The use of a repeating, short musical pattern, treated as described above, will be easily forgotten and place itself in the background. The purpose of a background instrument is to add some fullness to the song, without being so interesting that it draws attention. It should be kept simple to have it blend into the song without being noticed too much.
And of course, on the contrary, foreground instruments will be the ones bringing volume, lowest and highest frequencies, melodies, and elements of surprise.
Example of a voice that gradually goes away from the listener
(full screen for a better view)
Top of page

CONCLUSION

When adding effects, check the result by activating and deactivating them as the song (or the instrument) plays. It will help you to see whether an effect is too present, or not enough, whether it is necessary, whether it is too agressive, etc. You may like heavy reverb, but too much of it just drowns it all and makes the song inaudible. Control is essential. Too little is useless, you might as well remove the effect completely, whereas too much will make everything weighty and will surely waste the whole piece.

An effect often turns out to be... effective if you miss it when it's gone, even though you were not certain to hear it when it was on.
Recording - Previous | Next - Mixing in practice
Top of page


MESSAGES

(leave a message)

Messages page # 1 2 3 4 5 6 7 8 9 10 11 12 13 14 15 16 17 18 19 20 21 22 23 24 25 26 27 28 29 30 31 32 33 34 35


zico73
le 13/07/2011 à 21h29

Excellent site !!
J'ai beaucoup appris en lisant tout ceci.
Merci beaucoup !
Je vais essayer d'appliquer maintenant mais je pense que je reviendrai vers toi pour te poser quelques questions car il y a des choses que je n'ai pas bien saisies et qui méritent d’être éclaircies.
Bonne continuation. Musicalement,

Christophe

* * * * * * * * * * * * * * * *

<em>Content que ça puisse aider. À bientôt !

Grebz</em>


Ghis
le 16/06/2011 à 22h49

Hello !

C'est en cherchant un moyen d'utiliser mon ampli comme enceinte à relier à un ordi que j'ai trouvé ce site. Il m'a l'air très sympa et je le regarderai plus sérieusement pour faire des enregistrements moi-même (le pied !) plus tard.
Pour l'heure les études m’empêchent de m'y mettre à fond et l'on m'a confié la dure mission de résoudre un problème de sono pour une fête qui arrive début juillet (l'anniversaire de ma môman).

j'aurai donc juste une question (qui semblera insolente si la réponse se trouve bien évidemment sur ce site - mille excuses d'avance) : peut-on utiliser l'ampli (j'ai un Behringer V-amp combo) en simple baffle relié à un ordinateur tout bête à l'aide d'un simple câble. Et si oui... quel câble !!?

En remerciant d'avance pour la réponse et sinon bonne continuation.

Ghis

* * * * * * * * * * * * * * * *

<em>Bonjour et bienvenue,

A priori, tu devrais pouvoir y arriver en reliant la sortie casque de ton PC et une entrée auxiliaire sur ton ampli. En espérant qu'il y a bien une entrée "Aux" sur l'ampli. À l'arrière probablement. C'est sans doute une prise jack.

Il te faudrait idéalement un câble mini-jack stéréo / jack stéréo. (prise de type casque baladeur à un bout et gros jack à l'autre) MAIS on ne trouve que des câbles mini-jack stéréo vers double jack mono (un embout d'un côté, et deux embouts de l'autre), donc à moins d'avoir 2 entrées Aux Left et Right sur ton ampli, tu n'auras que la moitié du son.

Et honnêtement, je ne suis pas sûr que tu obtiennes un bon résultat. Les amplis guitare n'ont pas vraiment un son génial si tu y branches autre chose qu'une guitare. De la musique là-dedans, ça risque d'être assez moche.
Et si l'ampli est mono, la musique sortira en mono également. Un peu dommage si tu as prévu de faire danser les gens par exemple.

Bref, si tu as la prise qu'il faut sur ton ampli, c'est faisable, mais le résultat ne sera sans doute pas à la hauteur de tes espérances.

Il vaudrait mieux un ampli hifi et des enceintes hifi, bien sûr. Fais un essai. Un câble mini-jack / jack, ça doit coûter une poignée d'euros. Dans tous les cas, inutile de prendre un câble cher, un câble sans marque fera l'affaire, c'est pas de la haute fidélité.

Grebz</em>


LARYCRAFT
le 10/05/2011 à 04h39

Merci pour ce site très bien conçu, une mine d'or pour les maoistes en mal de conseils.

* * * * * * * * * * * * * * * *

<em>Merci beaucoup !
Ouais, Mao et moi, on est comme les doigts de la main :-)

Grebz</em>


morgan75
le 07/05/2011 à 18h51

Rebonjour,

Je viens de prendre connaissance de ton message. Donc si j'ai bien compris, l'nterface audio M-Audio livrée avec ProTools sera suffisante pour enregistrer quelques pistes de guitare ?

Je te remercie de tes réponses.

Amicalement,

Morgan

* * * * * * * * * * * * * * * *

<em>Oui, c'est bien ça. Le seul point négatif, c'est ProTools. Attention, ProTools est un outil connu et reconnu, je ne le dénigre pas du tout, mais je ne suis pas sûr qu'il sache utiliser de base (c'est à dire sans une extension spéciale, probablement payante) tous les plugins au format VST, comme ceux dont je parle sur mon site. Toutefois, je n'en suis pas certain, mais c'est un point à vérifier absolument.

Le format d'extension de ProTools, c'est le RTAS. Or, les RTAS gratuits sont bien moins répandus que les VST gratuits. C'est un point très important à considérer, à moins que tu ne sois prêt à dépenser pas mal d'argent en plugins.

Comme je l'ai dit, pour avoir un bon séquenceur pas cher, il y a <a href="http://www.reaper.fm/" target="_blank">Reaper</a> (40 dollars, soit moins de 30 euros), mais on peut le télécharger et l'utiliser 30 jours gratuitement. Après, l'utilisateur est prié de passer à la caisse, mais le logiciel continue d'être fonctionnel. À chacun de choisir de payer ou non, donc, mais si le logiciel convient, il est honnête de payer, surtout à ce prix-là. C'est à mon avis un bon choix. C'est en tout cas bien moins cher que Cubase ou Sonar.

Quoi qu'il en soit, la carte M-Audio, que tu te serves ou non de ProTools, est un bon choix. Il y a mieux, mais c'est plus cher et pas forcément utile pour commencer.

Bons enregistrements à toi !

Grebz</em>


morgan75
le 01/05/2011 à 16h10

Hey !

J'aimerais avoir un petit renseignement : comment relier mon ampli de guitare (marshall 15 watts mg fx ) à un ordi ? Faut-il un matériel spécial ? Je pensais à <a href="http://www.sonovente.com/m-audio-mobilepre-mkii-cartes-son-interfaces-p26091.htm" target="_blank">cela</a>, vendu avec le logiciel Protools ! Que faire ? Je souhaiterais enregistrer quelques morceaux... Merci de ton aide !
Cordialement,

Morgan

* * * * * * * * * * * * * * * *

<em>Bonjour,

L'équipement que tu indiques est une interface audio, c'est à dire une carte son. Mais ces interfaces audio, contrairement aux habituelles cartes son intégrées dans les PC, permettent d'obtenir une meilleure qualité de son, de diminuer la latence, et aussi de brancher des prises micro (format XLR) ou instruments (format jack). La latence, pour simplifier, c'est un retard qui se produit entre le moment où tu joues ta note sur un instrument, et le moment où tu l'entends dans les enceintes reliées à l'ordinateur. Cette latence est très gênante lors de l'enregistrement. Pour enregistrer une voix ou un instrument dans de bonnes conditions, une interface audio de qualité correcte est indispensable. J'en cite quelques-unes <a href="http://www.grebz.fr/musique_homestudio_tutorial_required_2.php#interface" target="_blank">ici</a>. M-Audio est plutôt une bonne marque, a priori, pas de souci.

Pour enregistrer une guitare,voilà ce qui tu as comme solutions :

1 - Enregistrer en direct : tu branches ton jack de guitare dans ton interface audio. L'interface contient un préampli de plus ou moins bonne qualité selon l'interface utilisée, qui permet d'amplifier le son à un niveau correct. Ou bien ajouter un <a href="http://www.grebz.fr/musique_homestudio_tutorial_required_2.php#preamp" target="_blank">préampli</a> entre la guitare et l'interface audio pour amplifier encore plus si besoin. Mais cela veut dire que tu n'utilises pas ton ampli de guitare, et donc que tu devras ajouter des simulateurs d'ampli dans ton séquenceur. L'avantage est que c'est moins bruyant qu'un ampli de guitare.

2 - Tu branches la sortie casque de ton ampli à l'interface audio (ou préampli + interface audio) et tu enregistres donc le son qui sort de la prise casque. Je ne sais pas si le son sera génial de cette manière, mais si tu as une prise casque, ça devrait marcher.

3 - Tu achètes un micro correct et tu le places devant ton ampli. Tu joues avec ton ampli et tu branches le micro sur l'interface audio (ou préampli + interface audio). Le micro va donc enregistrer ce que tu joues. À toi de bien placer ton micro pour obtenir le son désiré. L'emplacement est très important. Il suffit de bouger le micro de quelques centimètres pour obtenir un son différent. Tu peux d'ailleurs faire plusieurs prises en plaçant le micro différemment à chaque fois et obtenir un son plus riche en superposant les prises obtenues dans différentes pistes du séquenceur. Un bon micro pour commencer, pas trop cher pour enregistrer un ampli de guitare, c'est le <a href="http://www.grebz.fr/musique_homestudio_tutorial_required_2.php#microphone" target="_blank">Shure SM57</a>.

Enfin, pour le séquenceur, ProTools est un bon logiciel, très réputé (et que je n'aime pas trop à titre personnel, mais bon... on s'en fout). S'il est fourni (sans doute dans une version "light") avec l'interface audio, ça fait toujours ça de moins à acheter. Sinon, tu as Reaper, très bon logiciel pas très cher. Après, tu as Sonar ou Cubase, par exemple, qui fonctionnent tous sur les mêmes principes, mais ces logiciels ne sont pas donnés.

Grebz</em>

Top of page