Version française


? | Home page | Tutorial | Mixing in practice | Bass

Homepage
Home page


BASS

Reminder: we work on this song I wrote: Life


I recorded my bassby plugging it directly in a preamp, connected to my audio interface. I don't use a real amplifier and a microphone to record the instrument, like you would in a professional recording studio. Why not? Because I don't have any bass amplifier... As we are about to see, I use an amp simulator and an impulse loader instead. Advantages: you can play at a reasonable sound volume, or with headphones, without disturbing anyone, and you can edit the recorded sound at a later time by changing simulators and effects, without having to re-record anything. Drawback: it may not sound as warm, as realistic as a live recording. But we are in a home studio situation, with all the constraints that go with it (noise, room for the gear, cost of the gear...). Furthermore, even professional studios often record bass directly through consoles.

Here is the list of the plugins I used for the bass part:
        * Tube Saturator from Wave Arts, a tube saturation simulation
        * NoAmp from Mokafix, a free amp simulator for guitar and bass, with a hot sound
        * LeCab 2 from Poulin, a free impulse loader for my cabinet impulses
        * WizooVerb from Wizoo, a reverb plugin
        * TrackPlug from Wave Arts, a parametric equalizer
In the case of retail plugins, I will tell you which free plugins you can use to replace them.

In Life, the bass comes in rather late (around 2'59''). That's a deliberate choice, to add some thickness to the end of the song.

Track 1: raw bass - Track 2: saturated bass - Bass bus

There are two bass audio tracks. The audio of the second track is a copy-pasted version of the audio in the first track. What's the point? This allows me to produce two complementary bass sounds by applying different processings on each track.
The first track is the raw sound of the bass, as directly recorded.
The second track have various plugins to obtain a slightly saturated sound.

Both tracks are routed towards the Bass bus

Top of page

RAW BASS TRACK

Mono audio track
Volume: 0 dB
Panning: center
This is the raw bass sound


No plugin is used to modify the raw bass. It is sent to the main Bass bus where it blends with the saturated bass sound coming from the other bass track.

Top of page

SATURATED BASS TRACK

Tube saturation - Amp head simulator - Impulse loader

Mono audio track
Volume: 0 dB
Panning: center
The plugins are used in this order: tube saturation, amplifier head simulator, impulse loader.
Note that I don't use reverb with the bass. I think it tends to make the bass sound sort of blurry. Of course, it's a question of taste, and it also depends on the song. Here, the instrumentation is rich enough, with guitars, keyboards, vocals and drums, and there isn't enough room for reverb on the bass.
I will also use some EQ on the Bass bus. Thus the equalization will be the same for both raw and saturated bass tracks.

Saturation

This is the bass sound processed with a tube saturation plugin


At this stage, the sound is merely that of a bass recorded directly with some saturation. It still needs to go through an amplifier!

The purpose here is to obtain the same effect as if a real tube saturation device was used with a real amplifier head.

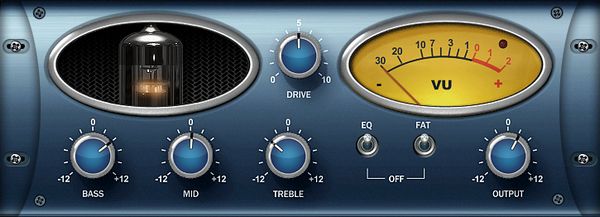
Settings used with the plugin Tube Saturator from Wave Arts:

     - "Bass" is set on 2 o'clock in order to boost low frequencies a bit, "Mid" remains centered, "Treble" is on 10 o'clock to slightly decrease the amount of high frequencies, "Drive" is centered, so it brings some saturation but not too much, "EQ" is activated (or else, the "Bass, "Mid" and "Treble" buttons would not work), and so is "Fat". "Fat" raises the level of saturation when activated. Lastly, "Output" is set on 1 o'clock. That's the output level, and I set it so the maximum level obtained doesn't go over 0 dB.

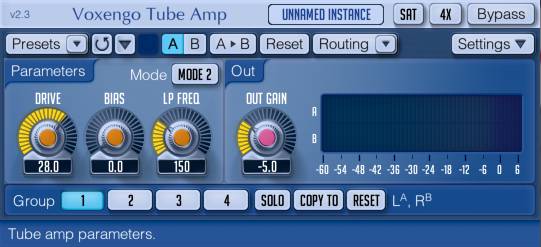
     - This plugin is a commercial product, and you can replace it by Tube Amp, a free plugin from Voxengo, which can bring the same kind of tube saturation. The settings are different, but you can achieve similar results.

Plugin Tube Saturator
Tube Saturator plugin
Plugin Tube Amp
Tube Amp plugin

Amplifier head simulator

This is the sound of the bass goign through a saturation and an amp head simulator


Like with real gear, the sound now needs to go through a cabinet.

To complete the sound of this amp sim, we are going to add an impulse loader.

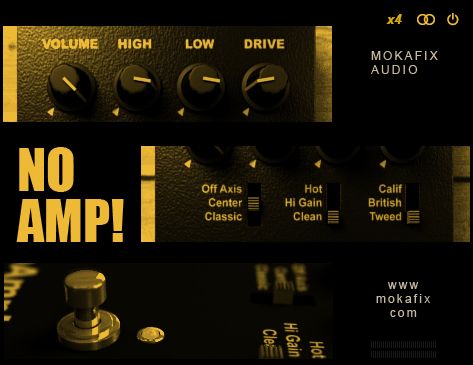
Settings used with the plugin NoAmp from Mokafix:

     - This is a free plugin. You can download it here.

     - The settings are visible in the screenshot below.

Plugin NoAmp
NoAmp plugin

Impulse loader

This is the sound of the bass going through a saturation an amp head sim and a simulated cabinet


Settings used with the plugin LeCab 2 from Poulin:

     - LeCab 2 is a free impulse loader plugin from Poulin. Impulses are "sound prints" from real cabinets. It allows to load up to 6 impulses simultaneously. I only used two impulses for the bass, that's why the screenshot below only shows 2 of the 6 available slots.

     - LeCab 2 offers various parameters you can set with each impulse slot. I set the volume to 1 (the maximum value), panning is centered, low-pas filter is set on 6 KHz to cut all irrelevant high frequencies. The other settings remain on their default value

     - I used impulses from RedWirez, a collection of high quality commercial impulses. Here, I used impulses from the cabinets Aguilar DB115, a 1x15" speaker cabinet (the real gear costs about 1000 euros and weighs 39 kg!). The first impulse is recorded at the center of the speaker with an Earthworks TC30 microphone placed against the cabinet cloth. The second impulse is recorded with a Shure Beta 52 microphone facing the edge of the speaker cone at a distance of 12" (about 30 cm). The first microphone puts the saturation forward, and the second one gives a warmer, rounder, less saturated sound. Blending the two sounds results in the sound you can here in the demo. If you want to load free impulses, you can find some on this page of my site,but they're not really sorted... You will have to look for the impulses you may find interesting, or look for others on the Internet.

Plugin LeCab 2
LeCab 2 plugin
As there is no reverb for this bass, the saturated sound is now complete. We now need to assemble the sound of both Bass tracks on the Bass bus.

Top of page

BASS BUS

This is the sound of the bass processed with saturation, amplifier head and a cabinet, before equalization


And after equalization


The sound of the bass is now ready. It will only be edited some more during the Mastering stage.

This is where both bass tracks are converging. The sound of the bass on this bus is final (before Mastering).
I add a TrackPlug plugin from Wave Arts, to eq the bass sound.

Volume: -6 dB
Panoramique: center

TrackPlug is a commercial product. You will find free equalizers here. I advise you to use Cocks ReaEQ.
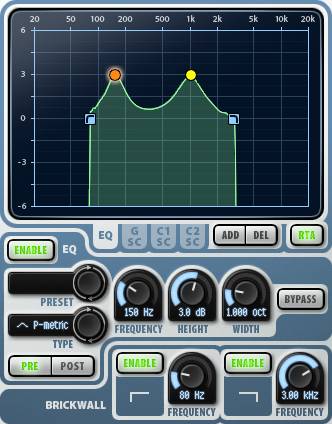
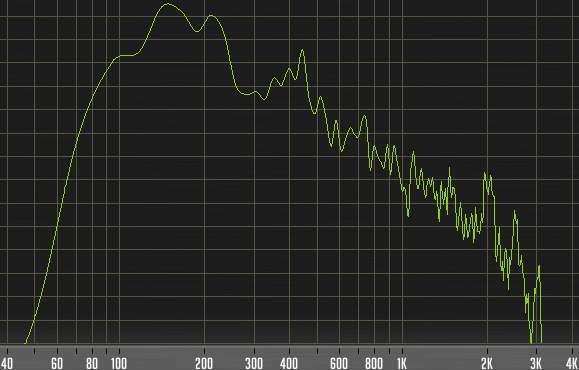
     - The plugin TrackPlug is used to equalize the bass sound. The sound will not change completely. A syou can see on the screenshot below, I edited the following parameters:

     - A brickwall is applied to both high and low frequencies. I cut all frequencies below 80 Hz and all frequencies above 3 KHz. This will decrease the bass range and prevent to conflict with the bass synth called Saw Bass in low frequencies (this synth is boosted by 2 dB at 60 Hz). It will not interfere either with the guitars and voices in high mediums. Yet, it won't alter the bass, as you can perfectly recognize it's a slightly saturated bass.

     - I added a +3 dB point at 150 Hz (orange point), and another one at 971 Hz (yellow point) by +3 dB in order to boost these two frequencies that help the bass to stand out in the mix. There's no magic, I just swept through all frequencies while playing the song in order to find what frequencies bore the sound I was looking for, and chose those two.

     - Usually, bass sound is compressed to make it denser and stand out. I did not find it useful for this song. First, I think that the saturation I used compresses it enough already, and second, the bass is loud enough as it is. Compressing it further wouldn't have been necessary as the very low frequencies are taken care of by the Saw Bass synth.

Plugin TrackPlug
TrackPlug plugin
Fréquences de la basse
Bass frequencies
Mixing in practice : Preparing the session | Bass | Drums | Rhythm guitars | Solo guitars | Keyboards | Vocals | Mastering
Top of page


MESSAGES

(laisser un message)

Page de messages n° 1 2 3 4 5 6 7 8 9 10 11 12 13 14 15 16 17 18 19 20 21 22 23 24 25 26 27 28 29 30 31 32 33 34 35


Only
le 19/01/2011 à 21h18

Je suis en République Démocratique du Congo,dans la capitale Kinshasa. Je voudrais monter un home studio avec une bonne qualité de son. Je veux savoir comment installer le matériel, quelle est la disposition. C'est possible de monter un home studio avec un budget de 5000 euros ?

* * * * * * * * * * * * * * * *
<em>Je ne connais pas les tarifs au Congo, mais avec 5000 euros, tu peux déjà te faire plaisir. Après, tout dépend de ce que tu cherches. Si tu n'as rien du tout et que tu veux te faire un local avec isolation sonore, acheter un ordinateur, des logiciels et puis des instruments de musique, c'est pas sûr que ce soit suffisant.

Mais si c'est simplement pour acheter un ordinateur, une interface audio, un micro, un préampli et des enceintes de monitoring, alors oui, 5000 euros suffisent.

Un conseil : il faut que les élements cités ci-dessus soient homogènes dans la chaîne sonore. Inutile d'acheter un super micro très cher pour l'associer à un préampli bas de gamme. Tout doit être dans la même gamme de qualité (ce qui ne veut pas forcément dire dans la même gamme de prix !).

Pour plus de détails, parce que je ne peux pas répondre à tous sur chaque problème particulier, et que ce n'est pas le but de mon site, je vous conseille le site <a href="http://fr.audiofanzine.com/" target="_blanck">Audiofanzine</a>, qui est très complet et dont le forum est une mine d'informations inépuisable.

Grebz</em>


jeff2902
le 19/01/2011 à 19h51

Bonjour,

Je voudrais pouvoir obtenir un son proche de celui de groupes de pop-punk tel que <a href="http://www.youtube.com/watch?v=GcNiKCmWdYE" target="_blanck">All time Low</a> par exemple, un son assez propre.

J'utilise déjà Guitar Rig 4 et Amplitube mais les sons ne me conviennnent pas. J'ai essayé plusieurs amplis Lepou, mais impossible d'obtenir un son propre. Pourriez vous m'aider svp ? Je vous remercie d'avance.

PS : le MySpace du <a href="http://myspace.com/nastyshades" target="_blanck">groupe dans lequel je joue</a>.

* * * * * * * * * * * * * * * *

<em>D'après ce que j'entends, il y a un gros travail d'égalisation pour éviter les recoupements de fréquence, ce qui permet de bien séparer les sonorités des guitares. Je pense aussi qu'ils ont au minimum doublé les prises de guitare pour faire un effet "mur du son". Il y a des guitares partout qui jouent plus ou moins la même chose, on n'a pas un instant de repos.

La caisse claire est très en avant, de même que la voix lead. Juste après, on a les guitares, la basse est plutôt en retrait (en même temps, le bassiste ne fait pas grand-chose d'intéressant, il se contente de suivre les accords) et les cymbales sont assez discrètes aussi.

Il semblerait que le groupe All Time Low utilise des amplis et baffles Mesa, des simus de chez Line 6, et qu'ils font aussi appel à des simulateurs d'amplis et de baffles (comme moi !).

Fais des essais avec des simulations Nick Crow, le NRR1 d'Ignite Amps ou le Lecto de Lepou, en ajoutant un simulateur de baffle avec des impulsions de baffle MESA (je crois qu'il y en a dans celles que je propose).

Grebz</em>


Pioud
le 02/01/2011 à 12h16

Hello Grebz,

Super ton tuto sur la convolution ! Très intéressant !
Merci pour toutes ces informations !
Je vois peut être un axe d'amélioration afin d'obtenir une convolution de bonne qualité :
Lorsque tu relies la sortie de ton interface audio à ton ampli guitare, tu as un problème d'impédance qui n'est pas respecté : il faut je pense utiliser une boite de reamp (inverse d'une DI) afin d'adapter l'impédance.
Voilà, bonne continuation et bonne année !!!

PJ

* * * * * * * * * * * * * * * *

<em>Alors là, je n'en sais rien du tout. Dans les différents tutoriaux que j'ai pu lire ou voir en vidéo (en anglais dans la plupart des cas, c'est pour ça que j'ai décidé d'en faire un en français), je n'ai jamais rien vu qui concerne l'impédance. Ce qui ne veut pas dire que le problème ne se présente pas, d'ailleurs.
Mais je dois dire que je n'ai rien constaté de gênant lors de la création de mes impulsions. N'ayant pas de boîte de reamp, je ne vais pas pouvoir essayer, mais que ceux qui suivent le tuto n'hésitent pas à essayer d'en ajouter une dans la chaîne, histoire de vérifier que ça améliore les choses. Et si c'est le cas, tant mieux ! Tout ce qui peut contribuer à améliorer les techniques est le bienvenu.

Et bonne année à tous, bien entendu ! Bonheur, bonne bouffe et teint hâlé !

Grebz</em>


Brughes
le 27/12/2010 à 11h43

J'ai composé un morceau rythmique. Si cela t'intéresse, je te l'envoie.

* * * * * * * * * * * * * * * *

<em>Si vous avez des morceaux, indiquez-moi plutôt un lien où les écouter (myspace, jamendo ou autre...)

Grebz</em>


LaurentB
le 24/12/2010 à 11h41

Bonjour,

J'essaie Sonar X1 depuis quelques jours et je le trouve super, sauf un problème que je n'arrive pas à résoudre : voir mes plugins VST !

J'ai bien entendu précisé le chemin de mes plugins (program files\vstplugins)et la quasi-totalité de mes VST n'est pas visible quand je veux affecter un effet audio à une piste.

J'ai pourtant l'habitude de faire fonctionner des VST dans FL Studio ou Reaper.
Le plus bizarre, c'est que mis à part un ou deux rejetés, Sonar semble les voir lors du scan : je ne comprends pas.

Si vous pouvez m'aider, ça serait sympa.

Merci pour votre site et les impulsions d'ampli à télécharger.

* * * * * * * * * * * * * * * *

<em>Si vous utilisez un Sonar 64 bits sur un Windows 64 bits également, il ne faut pas oublier que Windows gère 2 dossiers Program Files différents. Le premier s'appelle "Program Files (x86)" et contient tous les programmes 32 bits. Le second s'appelle "Programmes" (dans la version française, et "Program Files" dans la version anglaise) et contient tous les programmes 64 bits.

Il est tout à fait possible de placer manuellement ses plugins dans l'un ou l'autre des répertoires, mais bien entendu, il faut indiquer à Sonar d'aller chercher dans les deux.

Dans mon cas, mes VST 32 bits sont dans ce répertoire-là :
C:\Program Files (x86)\Cakewalk\Vstplugins
Et mes VST 64 bits sont là :
C:\Programmes\Cakewalk\Vstplugins

Certains VST sont fournis avec un programme d'installation. Il ne faut pas simplement les placer manuellement dans le bon répertoire VST, ils vont s'installer eux-mêmes dans un répertoire spécifique, à moins bien sûr de choisir le répertoire VST lors de l'installation.

Par exemple, le simulateur d'ampli TH1 de Overloud s'installe par défaut dans le répertoire C:\Programmes\Overloud
Il n'est donc pas dans un répertoire VST. Pour que Sonar le voit (j'imagine que c'est pareil dans un autre séquenceur), il faut ajouter ce chemin dans le gestionnaire de plugins de Sonar, sinon il sera introuvable dans la liste des VST disponibles.

Grebz</em>

Top of page