Version française


? | Home page | Tutorial | Mixing in practice | Drums

Homepage
Home page


DRUMS

Reminder: we work on this song I wrote: Life


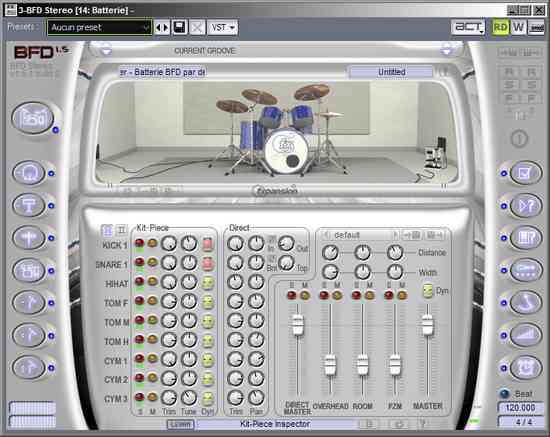
For this song, I used a virtual drums software called FXpansion BFD 1.5, which is rather old but still sounds good. It uses real drum samples (kicks, snares, toms, cymbals) and sounds realistic. Many settings are available and allow you to change the way your drums will sound (drum head tension, microphone positioning...). Since then, I upgraded to BFD 3, but I was still a BFD 1.5 user when I composed this song.
FXpansion - BFD 1.5
Life uses the following drum elements:
        * Kick drum
        * A rimshot snare drum sound during the quieter parts
        * A normal snare drum hit sound for louder parts
        * A hi-hat and a few crash and ride cymbal hits
I didn't use any splash cymbal or toms in the song.

Routing

The drums are routed as follows:

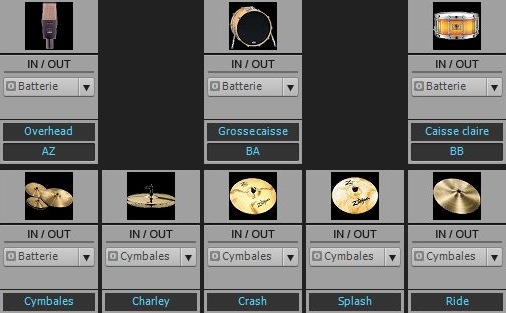
MIDI AND AUDIO DRUM TRACKS
Life - MIDI drums track
The MIDI track contains the drum score itself. It is linked to the audio tracks of each drum element.
Each one of the audio tracks is routed to the corresponding bus (snare drum track routed to snare drum bus, etc.)
Life - Drums buses
Bus KICK DRUM
Bus SNARE DRUM
Bus CYMBALS (hi-hat, crash, splash, ride)
Bus OVERHEAD
DRUMS bus

Top of page

KICK DRUM


This is the sound of the kick drum before processing


"Kick drum" bus

On this bus, I put a parametric equalizer plugin called "TrackPlug" from Wave Arts.

This is the sound I get after applying the TrackPlug plugin


Source: kick drum audio track
Target: Drums bus
Volume: -7.5 dB
Panning: 2% left

Kick drums are usually located at the center of the stereo field. I put it slightly to the left, by 2%, so that it leaves way to the vocals in the center, even though vocals and kick drum frequencies are unlikely to interfere. You will also see that I put the snare drum slightly to the right, by 2%, for the same reason. Kick drum and snare drum are thus slightly separated, although it isn't that obvious when listening to it.
TrackPlug plugin
TrackPlug plugin

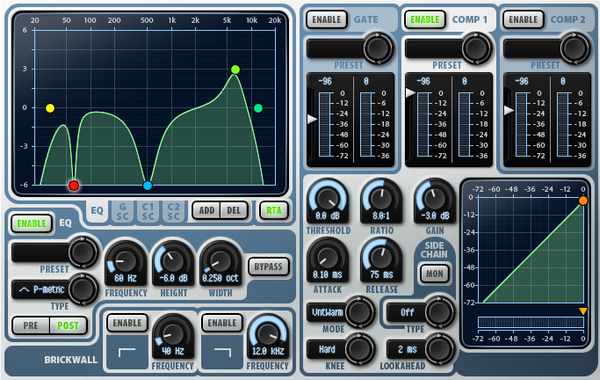
To obtain this kick drum sound, I used the following settings:

     - A high-pass filter at 30 Hz (yellow dot): below this value, frequencies become useless. On the one hand, few audio devices are able to reproduce them, they are not very musical and like all low frequencies, they demand a lot of energy to be rendered correctly, and that is to the detriment of other frequencies. So I cut them, and I did not want a song heavily loaded in low frequencies.

     - A 60 Hz band, set at -6 dB and a width of 0.25 octave (red dot). This dip frees some room for the "Saw bass" low synth, for which I boosted this particular frequency by 2 dB (see here). The low tone of the synth is thus more audible, and the kick drum sound is not affected too much.

     - A 500 Hz band, set at -6 dB and a width of 1 octave (blue dot). This dip reinforces the kick drum "boom" and suppresses some unpleasant tones. This also leaves some room for low vocal frequencies.

     - A 6.12 KHz, set at +3 dB and a width of 1 octave (green dot). Raising this frequency adds some "slamming" to the kick sound.

     - A low-pass filter at 11 KHz (turquoise dot): There was no sound beyond this frequency, so I added this filter to cut any parasite sound that would not add anything good to the kick drum sound, and could even conflict with the cymbals in the high frequencies.

     - Compressing part of the plugin: threshold set at 0 dB, ratio of 8:1 and gain set at -3 dB. The attack time is very short with a value of 0.10 ms (that will make the hit less powerful than it originally was) and the release time is set to 75 ms.

     - In the end, the EQ and the compression result in a very dry sound, a bit thinner than the sound before treatment, with a slightly lower volume due to the negative compression gain. I did not want a huge, invasive kick drum sound. Mastering plugins will later bring some thickness to it.
Top of page

SNARE DRUM


This is the snare drum sound before processing
First, the rimshot sound, then the normal hit sound


"Snare drum" bus

On this bus, I put a parametric equalizer plugin called "TrackPlug", as well as a limiter plugin called "FinalPlug", both from Wave Arts. The order in which you place the plugins matters. Here, The EQ comes first to shape the sound, then the limiter will boost the equalized signal.

This is the sound after processing with the TrackPlug and FinalPlug plugins
First the rimshot sound, then the hit sound


Source: snare drum audio track
Target: Drums bus
Volume : 0 dB
Panning: 2% right

The snare drum is usually located in the center of the stereo field. I put it slightly to the right, by 2%, so that it leaves room for the vocals. I also deported the kick drum 2% to the left. Thus, kick drum and snare drum are separated a bit, while remaining mostly centered.
TrackPlug plugin
TrackPlug plugin

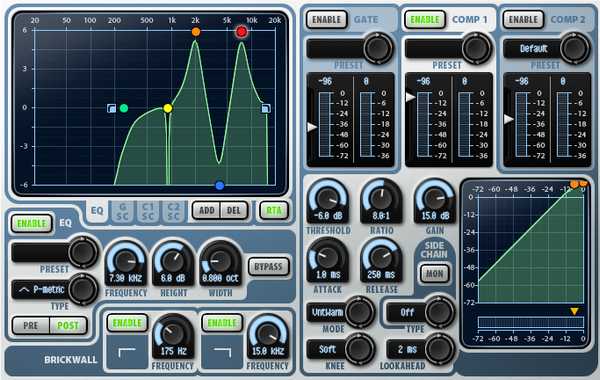
These are the settings I used with the TrackPlug plugin on the snare drum:

     - A brickwall at 175 Hz in order to cut all frequencies below this value. This makes sure that no snare drum frequency will interfere with the low synths, the bass or the kick drum. It's a bit redundant because I also us high-pass filter as described below, but let's call it a double security measure.

     - A high-pass filter at 2500 Hz (green dot): lower frequencies start declining at 2500 Hz and decrease more and more below this value.

     - A "notch" 880 Hz band. This type of band completely suppresses the sound in the target frequency. I used this on a width of only 0.1 octave because it was generating an unpleasant sound. Maybe because of the drum sample used? Anyway, suppressing this precise frequency solved the problem without affecting my snare drum sound.

     - A 1.97 KHz, set at +6 dB and a width of 0.8 octave (orange dot). This adds a little smack to the snare drum sample I chose.

     - A 3.88 KHz, set at -6 dB and a width of 0.8 octave (blue dot). Decreasing this frequency does make the snare drum sound somewhat thinner if you listen to it soloed, but it makes the sound more dry and prevents from encroaching upon guitar or vocals frequency ranges. Once drowned in the mix, decreasing this frequency isn't really audible.

     - A 7.3 KHz band, set at +6 dB and a width of 0.8 octave (red dot). Boosting this frequency boosts the brightness and clarity of the snare drum, and helps standing out in the mix.

     - Another brickwall at 15 KHz to suppress all very high useless frequencies.

     - The compressor part of the plugin has a threshold set at -6 dB, a ratio of 8:1 and an important gain, around +15 dB. The attack is set to a fast 1 ms and a slow decrease of 250 ms.

     - Like the kick drum, the EQ and the compression make the snare drum sound very dry, somewhat high-pitched, and it stands out easily in the mix. The Mastering stage will boost a bit further.
FinalPlug plugin
FinalPlug plugin

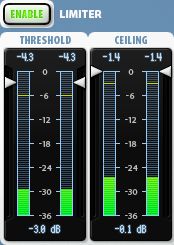
These are the settings used with the plugin FinalPlug for the snare drum:

Final Plug is a commercial plugin, you will find free limiters here, as well as a compressor (that can also be used as a limiter with the appropriate settings).
A limiter will boost the sound by defining a bottom volume from which the sound will be raised up to the maximum ceiling value

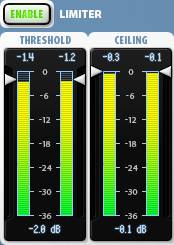
     - Threshold set at -3 dB. This is a rather small compression amount, just enough to boost the sound a bit, without having to edit the bus volume itself.

     - Ceiling: set at 0.1 dB. The plugin will limit the bus volume just before reaching the maximum.


Top of page

CYMBALS

The buses of the hi-hat, the crash and the ride cymbal are all routed to the "cymbals" bus.
This is the sound of the cymbals before processing

Hi-hat


Crash


Ride


"Cymbals" bus

Each of the buses for the hi-hat, the crash cymbal and the ride cymbal include an EQ plugin, the Trackplug plugin from Wave Arts, and the Cymbals bus includes a limiter plugin, the FinalPlug from Wave Arts. So the 3 cymbals are EQed on their respective bus, before their signal is sent to the main Cymbals bus.

Source: audio tracks from the Hi-hat, the Crash cymbal and the Ride cymbal
Target: the buses of the Hi-hat, the Crash and Ride Cymbal are routed to the Cymbals bus, which in turn is routed to the Drums bus
Volume: 0 dB (Hi-hat, Crash and Ride buses), -3 dB (Cymbals bus)
Panning: 35% right (Hi-hat), 25% right (Crash), 35% left (Ride), 0% (Cymbals bus)

The stereo placement of the cymbals isn't always the same as the one I chose. You could enlarge the stereo panning by putting the Hi-hat more to the right (90 or 100% for instance), and the ride on the opposite side. Or you could on the contrary narrow the stereo panning by putting the elements closer to the center. You may also invert the panning by placing the Hi-hat on the left and the ride on the right. The audience in a concert sees the Hi-hat on their right side, whereas it is located on the left from the drummer's point of view. Also the elements are located all around the drummer from his point of view, but from the audience's point of view, the sound of the whole drumkit seems to be coming from one point in space. So depending on which point of view you wish to refer to, you may pan the element in very different positions.
Plugin TrackPlug Charley
Hi-hat TrackPlug plugin

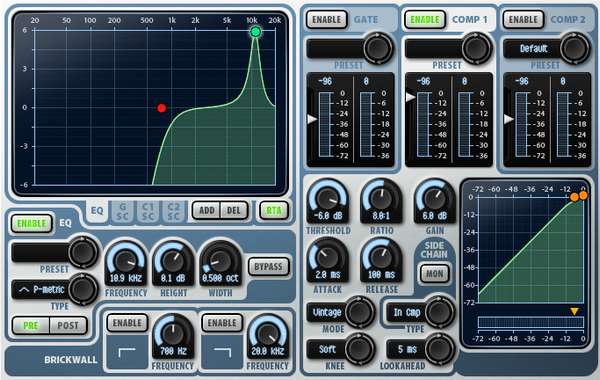
Settings for the TrackPlug plugin on the Hi-hat bus:

This is the sound obtained after processing with the TrackPlug plugin ("hi-hat", "Crash" and "Ride" buses) and the FinalPlug plugin ("Cymbals" bus)

Hi-hat

     - A high-pass filter at 750 Hz (red dot): the lower frequencies are useless with a Hi-hat, as it's merely producing a high-pitched sound, like all cymbals.

     - a band at 10.9 KHz, with a volume of +6 dB and a width of 0.5 octave (green dot). After scanning the frequencies, I found this one was the best choice for the Hi-hat in my opinion.

     - The compressor part of the plugin is set with a threshold at -6 dB, an 8:1 ratio and a gain level of 6 dB. The attack is very short with 2 ms and the release value is 100 ms.

Plugin TrackPlug Crash
Crash TrackPlug plugin

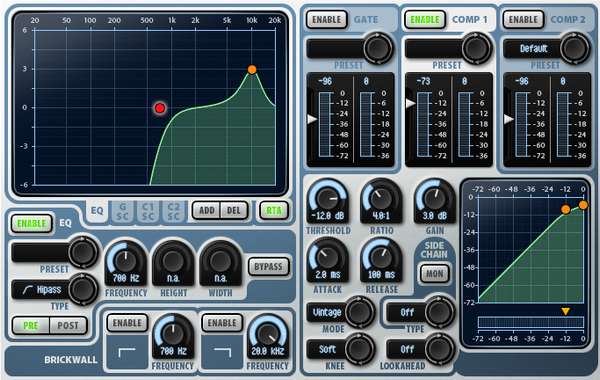
These are the settings of the TrackPlug plugin on the Crash bus:

This is the sound obtained after processing with the TrackPlug plugin ("Hi-hat", "Crash" and "Ride" buses) and the FinalPlug plugin ("Cymbals" bus)

Crash

     - A high-pass filter at 700 Hz (red dot): the lower frequencies are useless with a Crash cymbal, as it's merely producing a high-pitched sound, like all cymbals.

     - a band at 9,87 KHz, with a volume of +3 dB and a width of 1 octave (orange dot). After scanning the frequencies, I found this one was the best choice for the Crash cymbal in my opinion.

     - The compressor part of the plugin is set with a threshold at -12 dB, a 4:1 ratio and a gain level of 3 dB. The attack is very short with 2 ms and the release value is 100 ms.

Plugin TrackPlug Ride
Ride TrackPlug plugin

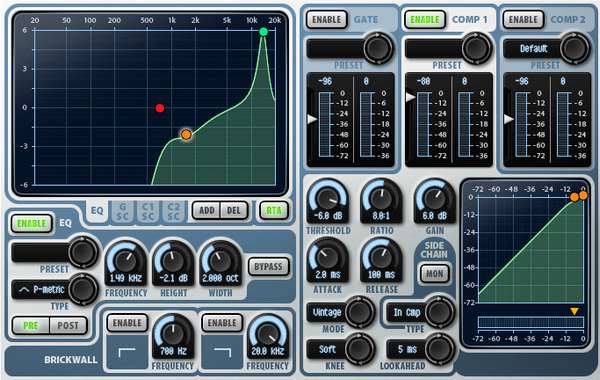
These are the settings of the TrackPlug plugin on the Ride bus:

Voici le son obtenu après l'ajout du plugin TrackPlug (bus "Charley", "Crash" et "Ride") et du plugin FinalPlug (bus "Cymbales")

Ride

     - A high-pass filter at 700 Hz (red dot): the lower frequencies are useless with a Ride cymbal, as it's merely producing a high-pitched sound, like all cymbals.

     - a band at 1,49 KHz, with a volume of -2 dB and a width of 2 octaves (orange dot). I found that this frequency was conflicting with other instruments, like guitars and vocals, so I dimmed it by 2 dB, not so much that it would negatively alter the sound of the Ride cymbal.

     - a band at 13,7 KHz, with a volume of +6 dB and a width of 0.5 octave (green dot). After scanning the frequencies, I found this one was the best choice for the Ride cymbal in my opinion.

     - The compressor part of the plugin is set with a threshold at -6 dB, an 8:1 ratio and a gain of 6 dB. The attack is very short with 2 ms and the release value is 100 ms.

Plugin FinalPlug
FinalPlug plugin

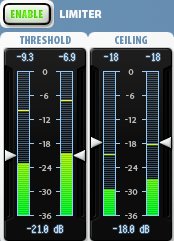
These are the settings of the FinalPlug plugin on the Cymbals bus:

     - The threshold is set on -21 dB, a low value because the cymbals' volume, especially the Hi-hat's is rather low, so I need to go get them low enough for the limiter to be effective.

     - The ceiling is set on -18 dB, 3 dB above the threshold. This is a weak compression, just enough to boost the sound a bit. In order to prevent the cymbals to sound too loud, the ceiling is set on a low value

     - The overall sound of the cymbals will be boosted further by the plugins from the Drums bus and the Master bus. The limiter triggering at -18 dB is therefore not an issue, even thought it may sound weak.
Top of page

OVERHEADS

The overheads are usually a pair of microphones placed above a drumkit to record the whole instrument, and particularly the cymbals. As we are using a virtual drum plugin, we are not using real microphones, but BFD can simulate overheads.

This is the sound of the overheads before processing


"Overhead" bus

On this bus, I added a parametric equalizer plugin called "TrackPlug" from Wave Arts, as well a limiter plugin called "FinalPlug", from the same company.
This is the sound obtained after using TrackPlug


Source: overheads audio track
Target: Drums bus
Volume: -9 dB
Panning: center

With a real drumkit recording, the overheads sound comes as a support for the other microphones and adds a touch of ambiant sound. As they are placed above the drumkit, they record not only the drum sounds themselves, but also the reverberation of the room, unlike the other microphones that are placed close to the kick drum, the snare drum, etc.
Such room reverberation is indeed simulated within our drums plugin. But as I'm adding a reverb plugin on the main Drums bus at the end of the chain in order to finalize the drums sound, I thus set the Overhead bus volume relatively low (-9 dB), so that it doesn't stand out too much. I removed a lot of lows, the overhead sound will merely bring some brightness to the drums sound.
Plugin TrackPlug
TrackPlug plugin

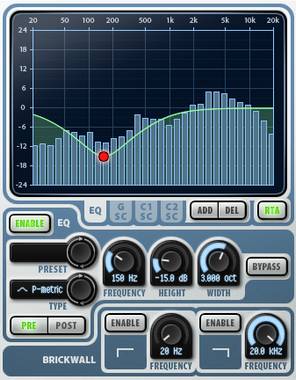
For the overheads, I set the EQ from TrackPlug like this:

     - A parametric band at 150 Hz, with a width of 3 octaves to get an impact in all low frequencies up to the low mediums, dipped a lot down to -15 dB.

     - I haven't completely removed the low frequencies but I lowered them quite a lot. Just listen how different the raw sound and the EQed sound are. As a consequence: the kick and snare drums sound very thin through the overheads, whereas the hi-hat is much more present.

     - No compression was used on this bus.
Top of page

DRUMS BUS

On this bus, the drums sound is complete (before mastering). I add a limiter with soft settings and a reverb effect. Therefore, it sounds more spacious and more pleasant to hear.

This is the sound of the kick drum with the effects of the Drums bus


*    *    *    *    *

This is the sound of the snare drum with the effects of the Drums bus
First the rimshot sound, then the normal hit sound


*    *    *    *    *

This is the sound of the cymbals with the effects of the Drums bus
Hi-hat


Crash cymbal


Ride cymbal


This is the sound of the overheads with the effects of the Drums bus


Source: Kick drum, snare drum, cymbals and Overhead buses
Target: Master bus
Volume : -4 dB
Panning: center

FinalPlug plugin
FinalPlug plugin

These are the settings used with the FinalPlug plugin on the Drums bus:

Final Plug is a commercial plugin, you will find free limiter plugins here, as well as a compressor plugin (that can be used as a limiter with the appropriate settings).
A limiter allows to boost the sound by setting a threshold level from which the sound will be raised up to a defined ceiling value.
     - Threshold is set on -2 dB. This is a small compression, just enough to boost the sound up to the level I wanted to reach, without having to modifiy the bus volume itself.

     - Ceiling is set on -0.1 dB.


Plugin Wizooverb
Wizooverb plugin

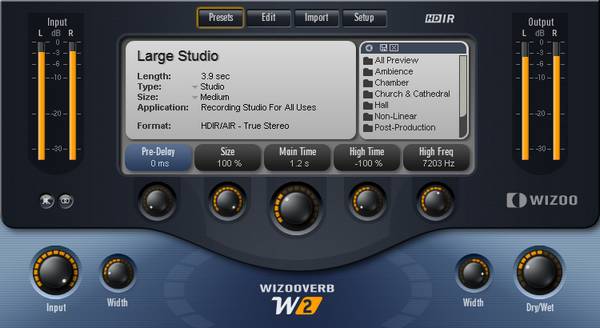
No need to go into the settings details, all reverb plugins offer different options. I'll simply define the general characteristics:

Wizooverb is a commercial plugin, but it is no longer sold, which is a pity because it's excellent. You will find free reverb plugins here. You can find a lot of alternatives on the Internet, with various levels of quality.
     - I chose a studio reverb. The Wet sound (the reverberated sound) is on 27%, so 73% comes from the Dry sound (original unaffected sound).

     - The reverb duration is 1.2 second.

     - There isn't any pre-delay (0 ms). Pre-delay is the time after which reverbs is triggered, after the sound has started playing. In the present case, the reverb starts immediately. The longer the pre-delay, the larger the venue seems to be (depending also on other factors such the Dry/Wet ratio, the room size parameter (if applicable), the reverb duration...). The shorter the pre-delay, the less you will hear the attack of the instrument, as it gets slightly drowned in the reverb. Here, the attack of a drum sound is the impact sound of the stick on the drum element. With a 30 or 40 ms pre-delay, the drum sounds would have been more percussive, as the reverb sound would trigger after the impact sound. I did this choice to smoothe the drums a bit.

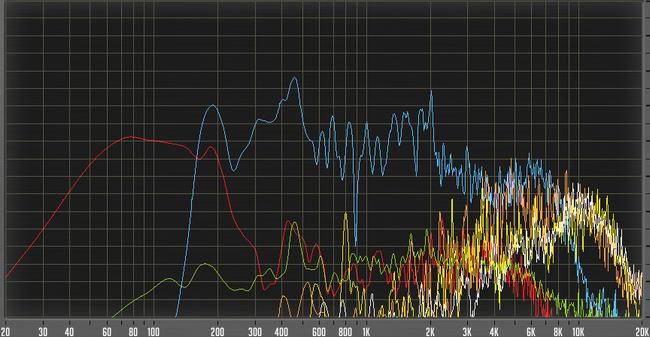
Fréquences de la batterie
Drums frequencies

Red - Kick drum
Blue - Snare drum
White - Hi-hat
Orange - Crash
Yellow - Ride
Green - Overheads

Of course, many of these frequencies seem to override in the highs, but these are cymbals and they don't play all at the same time.
Mixing in practice : Preparing the session | Bass | Drums | Rhythm guitars | Solo guitars | Keyboards | Vocals | Mastering
Top of page


MESSAGES

(leave a message)

Messages page # 1 2 3 4 5 6 7 8 9 10 11 12 13 14 15 16 17 18 19 20 21 22 23 24 25 26 27 28 29 30 31 32 33 34 35


CelticBreizh
le 12/04/2010 à 22h00

Encore merci de votre réponse. Je me demande même si je ne vais pas craquer pour votre carte qui a plus de réglages en façade, laissant l'arrière aux Jacks et à l'alim.

* * * * * * * * * * * * * * * *

<em>Comme vous voulez, mais avez-vous vraiment besoin de 8 entrées ? Dont seulement 2 avec préampli (les deux à l'avant) ? À vous de voir,

Grebz</em>


CelticBreizh
le 12/04/2010 à 09h21

Bonjour,

J'envisage l'acquisition d'une nouvelle interface audio type EDIROL FA-66 et je voulais savoir ce que vous en pensiez étant donné que vous avez déjà une EDIROL FA-101, un modèle un peu semblable mis à part le nombre important d'entrées.

Ma carte Presonus me joue des tours mais je souhaiterais rester sur une connexion en firewire. Pouvez-vous me dire si c'est un bon choix ?

* * * * * * * * * * * * * * * *

<em>Bonjour Éric,

<a href="http://fr.audiofanzine.com/carte-son-externe/edirol/FA-66/avis/">Les avis sur Audiofanzine</a> sont tous très bons. Visiblement les utilisateurs sont satisfaits de leur achat. De mon côté, je suis également satisfait de ma FA-101 qui ne m'a jamais fait défaut, que j'enregistre seul chez moi en n'utilisant qu'une seule entrée, ou bien en enregistrant un groupe en live avec 8 entrées simultanées. Les préamplis de la carte ne sont pas extraordinaires, mais devraient suffire néanmoins. En cas de besoin, il sera toujours possible de leur adjoindre ultérieurement un préampli externe supplémentaire.

La connexion Firewire a l'avantage d'utiliser très peu de ressources processeur (moins qu'une connexion USB), ce qui permet de libérer ces ressources supplémentaires pour le séquenceur, d'être très stable et d'avoir une bande passante supérieure à l'USB 2.
Dans le cas de la musique, toutefois, cette dernière caractéristique n'a pas vraiment d'importance. C'est plus important dans le domaine de la vidéo.

Au niveau des défauts, la connexion Firewire nécessite l'utilisation d'une alimentation secteur lors d'une utilisation sur un portable. La prise mini-Firewire qu'on trouve sur les portables ne peut pas fournir d'alimentation électrique contrairement à l'USB. Donc, il faudra brancher l'interface sur le secteur, ce qui fait des branchements en plus. Mais pour une installation fixe, ce n'est pas trop gênant.

Les drivers de la FA-101 sont stables, ils existent en 32 et 64 bits et fonctionnent sous Windows XP, Vista et Seven. Il me semble que les drivers sont communs pour la FA-101 et la FA-66... en tout cas, les fichiers qui composent ces drivers, téléchargés sur <a href="http://www.rolandus.com/products/productdetails.php?ProductId=731">le site d'Edirol</a>, sont quasiment identiques à 2 ou 3 détails près. La FA-66 n'est de toute manière qu'une FA-101 allégée, elles doivent sortir du même moule !

Donc oui, je peux vous recommander cette interface audio. De toute façon, achetez-la et essayez-la, vous avez légalement une semaine pour vous rétracter auprès de votre vendeur.

Grebz
</em>


Jikoo
le 12/04/2010 à 01h42

Superbe page (simulateurs d'ampli) !
J'ai appris plein de choses. C'est vraiment très intéressant. Merci beaucoup et bonne continuation.

Jerry Coox - Musicien
(Facile à trouver sur le web !)

* * * * * * * * * * * * * * * *

<em>Merci à vous !

Je rajoute un lien vers <a href="http://www.myspace.com/jerrycoox" target="_blanck">votre MySpace</a>, j'ai écouté ce que vous faites, c'est vraiment très bien !

Grebz</em>


CelticBreizh
le 24/03/2010 à 20h06

Bonjour,

Merci encore de votre précédente réponse.
Pour information, voila ce que j'ai relevé sur mon portable ACER :
Avant tout, j'ai pensé à ce portable parce qu'il est silencieux. Je ne dispose pas d'une pièce dédiée et suis en fauteuil roulant. Ce n'est pas toujours simple pour tous les branchements. Dans la MAO, je cherche juste à mettre de la musique, piste à piste, derrière mes textes. Alors maintenant mon ordinateur portable, c'est :
Modèle Aspire type 5670 / 5673 WLMi
Processeur : Intel Core Duo T2400 (1.83 GHz, 667 MHz FSB, 2MB L2 cache)
En fait, c'est un Intel Centrino Duo destiné plus particulièrement aux portables.
L'écran est un 15.4 pouces WXGA. C'est un peu petit pour y caser le séquenceur, la table de mixage, les VST et VSTi etc... ça finit par être complètement brouillon. Je sais qu'il me faut un autre écran (d'ailleurs mon portable peut l'accepter). Le séquenceur d'un côté et de l'autre, le mix et tous le reste. Ce serait plus clair. J'envisage effectivement l'achat d'un 24 ou 26 pouces.
La vidéo, c'est bien sûr de l'intégré, ATI Mobility Radeon X 1600
Le disque dur : 120 GB SATA partitionné. J'ai un disque dur externe Western Digital Caviar d'1To acheté récemment.
La mémoire : 2 Go DDR2 (support dual channel).
C'est sans doute là que ça pêche le plus, avec 2 Go et mon processeur centrino, je vais vite atteindre les limites si j'utilise beaucoup de VST ou VSTi.
Un petit plus, j'ai une prise FireWire sur laquelle je branche ma carte son externe Presonus Fire Box.
Je n'ai pas encore de préampli mais j'envisage d'en acheter un. Un petit et modeste appareil, je n'ai ni les prétentions, ni les moyens d'un studio professionnel.
J'ai repéré chez Thomann en Allemagne un ART TUBE MP à 38€. Ce sera sans doute mieux que rien vu que je n'en utilisais pas avant. Ça me fait 2 alim de 48 Volts pour mon micro statique SAMSON.
Par contre, j'utilise un EDIROL PCR - A30 et là, j'ai sans doute encore mal choisi puisqu'apparemment il serait doté d'une Audio Interface, cette interface n'était sans doute pas nécessaire puisque j'avais déjà une carte son PRESONUS ???
Ce clavier se branche en USB mais est aussi doté d'un transfo, c'est peut-être plus stable, je ne sais pas.
Les infos relevées sur ce clavier : EDIROL PCR - A30 - ROLAND, 24 Bit 96 kHz Digital Audio, USB Audio Interface, Midi Key Board Controller.
Je sais que l'on peut contrôler certaines fonctions mais j'avoue que je ne l'utilise que comme un clavier midi. Je suis loin d'en tirer le maximum.
Un ami me l'avait conseillé mais maintenant, je ne sais pas si c'est un bon choix.
Et pour finir, je suis sous XP, et j'aimerais le rester.
C'est un portable que je veux remettre à plat en formatant et en le consacrant uniquement au son et rien d'autre.
La connexion Internet (pour les mises à jour windows) sera coupée pendant le travail sous Cubase, de même qu'Avast, mon antivirus. J'espère ainsi alléger le système. Il n'y aura même pas de messagerie.

Au fait, comment fait-on pour geler des pistes ?

Je suis preneur de tous conseils. D'avance merci.

CelticBreizh


CelticBreizh
le 24/03/2010 à 01h45

Bonjour,

Un excellent site qui permet de s'y retrouver facilement dans la MAO.

Avant de trouver des séquenceurs "non limités", j'avais investi dans bon nombre de matériels, tables de mixage, racks en tous genres dont compresseur, ampli casques, microverb Alesis etc... tout en analogique bien entendu. Certaines tables de mixage étaient dotées d'une alim phantom pour mon micro statique, d'où cet achat que je regrette maintenant compte tenu des possibilités des petites cartes son externes bien suffisantes à mon goût (ma presonus gère le 48V). Quand Cubase a pu gérer correctement l'audio et pas seulement le midi, j'ai soigneusement rangé tout ce matériel. Pour un temps, j'ai continué à me servir de ma table de mixage mais, l'encombrement fait que je vais me résoudre à utiliser le mix du séquenceur mais l'écran d'un portable n'est pas extensible et cela devient vite un casse tête d'ouvrir toutes ces fenêtres à l'écran et avoir constamment la main sur la souris. Mon portable n'a que 2 Go de ram, j'espère qu'il ne plantera pas durant les enregistrements que je faisais avant sur un fixe assemblé par mes soins. Pourquoi alors ce portable ? Moins de bruit, moins d'encombrement, moins de fils. Bien que vieux de 4 ans, son processeur est un double-coeur. Je vais lui adjoindre un disque dur externe et j'espère que cela suffira pour mes compos. Si vous pouviez me donner votre avis éclairé sur mon modeste matériel, merci d'avance.

En tous cas, bravo pour les sujets abordés, ça a le mérite d'être clair alors que d'autres auraient traité cela de façon ultra technique sans que je puisse m'y retrouver.

À bientôt. Éric

* * * * * * * * * * * * * * * *

<em>Bonjour Éric,

Tout d'abord merci de votre message sur mon site, ça fait plaisir de voir que je peux rendre service à quelqu'un. Si je fais cela, c'est parce que moi-même, j'ai pas mal galéré en me lançant dans la MAO voici quelques années et que j'ai eu du mal à m'y retrouver face à toutes ces notions déroutantes au départ. Je ne suis pas devenu un spécialiste pour autant, mais j'ai appris suffisamment pour essayer d'aider à mon tour, dans un langage que j'espère accessible au plus grand nombre, sans verser non plus dans l'abêtissement. Il faut parfois appeler un chat un chat (ou un compresseur un compresseur) pour éviter les dérives de langage qui perdent tout le monde... Bref.

En ce qui concerne votre matériel analogique, je ne sais pas s'il faut regretter de l'avoir acheté. J'imagine que financièrement, ça représente un investissement et qu'il est toujours dommage de s'apercevoir au bout de quelques temps qu'on n'a pas forcément fait le bon choix, mais malheureusement, dans les domaines "techniques" (informatique, musique, vidéo...), il sort constamment de nouveaux équipements qui supplantent les anciens et si on attend le bon moment... on ne se lance jamais ! Après, il y a l'encombrement qui peut également poser problème. Mais l'analogique a aussi des qualités : le son (évidemment, tout dépend du matériel), et la manipulation physique, plus naturelle à l'usage qu'une souris. Mais tout est question d'habitude.

Pour ce qui est de votre matériel actuel, un portable, vous avez vous-même parlé de ses limites : la taille de l'écran qui fait qu'on se sent vite à l'étroit, et le fait qu'il soit déjà un peu ancien (en termes informatiques bien entendu).
Pour l'écran, il vous est toujours possible de lui adjoindre un écran plat si vous disposez de la place suffisante, et du budget bien entendu. Un bon écran plat de bonne taille (disons 24 ou pourquoi pas, soyons fou, 26 pouces !) ajoutera beaucoup de confort pour un tarif à situer entre 200 et 300 euros selon la marque et la qualité attendue. Non négligeable, mais très confortable. Il est même possible de disposer ainsi d'un double écran, sur le portable et sur l'écran supplémentaire, à condition que la carte graphique du portable gère cette fonctionnalité, ce qui est bien souvent le cas.

Avoir un processeur dual-core est un avantage évident, tout dépend cependant du processeur en question. Certains dual-core un peu anciens ne sont pas très puissants, rien ne remplace un bon test par soi-même pour tester les limites de la machine.

J'utilise moi-même un portable de marque ASUS. Je l'ai acheté voici bientôt 3 ans, il a également un processeur dual-core à 2,5 GHz et 3 Go de mémoire. Fourni à l'origine avec Windows Vista, je l'ai remplacé récemment par Windows 7 en version 64 bits.

Voilà ce que je peux vous dire de mon expérience avec ce portable pour une utilisation musicale :
Déjà, je ne l'utilise pour la musique qu'en déplacement, puisque j'utilise normalement mon ordinateur de bureau, bien plus puissant. Ce que j'ai constaté, c'est qu'il réagit mieux lorsque j'utilise mon séquenceur Sonar en version 32 bits qu'en version 64 bits. j'ai installé les 2 versions et cette dernière est plus lourde semble-t-il. C'est en tout cas mon ressenti.
Hormis cela, aucun souci pour enregistrer. J'ai déjà enregistré plusieurs fois des concerts live, avec parfois jusqu'à 8 pistes simultanément, pour un enregistrement sans interruption pendant un peu moins de 3 heures. Ni le disque dur, ni le processeur (très peu sollicité par l'enregistrement) n'ont montré de signes de faiblesse. Le disque dur est pourtant un simple disque à 5400 tours par minute, donc pas franchement un foudre de guerre.
J'ai également enregistré une pièce de théâtre amateur en branchant simultanément une carte son USB et un caméscope FireWire et donc en enregistrant 2 pistes audio sur sonar, pendant que la vidéo s'enregistrait (sur le même disque dur) via un logiciel de montage. Toujours sans souci.

En fait, je trouve les limites de mon ordinateur portable lors de l'utilisation de plugins VST ou d'instruments VSTi. Là, je constate une nette différence avec mon PC de bureau. Mon processeur de portable sature bien plus vite. Mais j'avoue que j'utilise pas mal de plugins, parfois plusieurs dizaines sur un projet. La seule solution dans ce cas est de "geler" les pistes, de façon à libérer le processeur. Si vous utilisez peu de VST, il ne devrait pas y avoir de problème, mais dans le cas contraire, attendez-vous à rencontrer des ralentissements, voire des interruptions de lecture. Et lors d'enregistrements, désactivez les plugins inutiles pour soulager le processeur.

Quant aux 2 Go de mémoire, c'est peut-être un peu juste avec Windows Vista, mais cela devrait suffire pour XP ou Windows 7. Sachez qu'avec un 32 bits, Windows ne laisse pas plus de 3 à 3,5 Go de mémoire disponible pour l'utilisateur, et que chaque application ne peut disposer que de 2 Go au maximum. Le système lui-même va consommer une partie variable de la mémoire selon les applications et services installés.

C'est l'intérêt d'un système en 64 bits : à condition que le processeur le gère, un système 64 bits va pouvoir utiliser l'intégralité de la mémoire à sa disposition, et les applications 64 bits ne seront pas limitées non plus. Mais un logiciel 32 bits sur un système 64 bits sera toujours limité à 2 Go. Pour aller au-delà, il faut que le logiciel soit lui-même programmé en 64 bits.

Voilà ce que je peux vous dire. Musicalement vôtre,

Grebz</em>

* * * * * * * * * * * * * * * *

Merci d'avoir pris le temps de me répondre. ça me semble si clair maintenant. Un grand merci et encore bravo pour votre site.

Éric

Top of page