Version française


? | Home page | Tutorial | Mixing in practice | Drums

Homepage
Home page


DRUMS

Reminder: we work on this song I wrote: Life


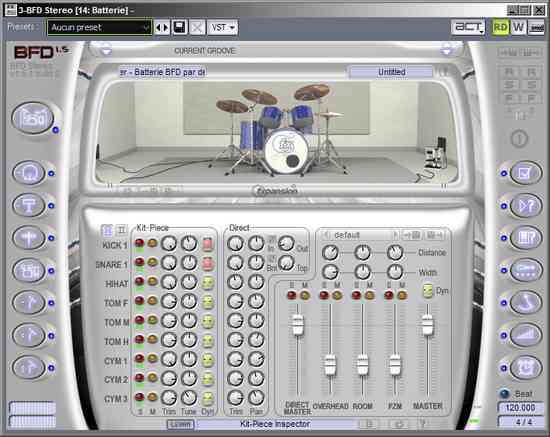
For this song, I used a virtual drums software called FXpansion BFD 1.5, which is rather old but still sounds good. It uses real drum samples (kicks, snares, toms, cymbals) and sounds realistic. Many settings are available and allow you to change the way your drums will sound (drum head tension, microphone positioning...). Since then, I upgraded to BFD 3, but I was still a BFD 1.5 user when I composed this song.
FXpansion - BFD 1.5
Life uses the following drum elements:
        * Kick drum
        * A rimshot snare drum sound during the quieter parts
        * A normal snare drum hit sound for louder parts
        * A hi-hat and a few crash and ride cymbal hits
I didn't use any splash cymbal or toms in the song.

Routing

The drums are routed as follows:

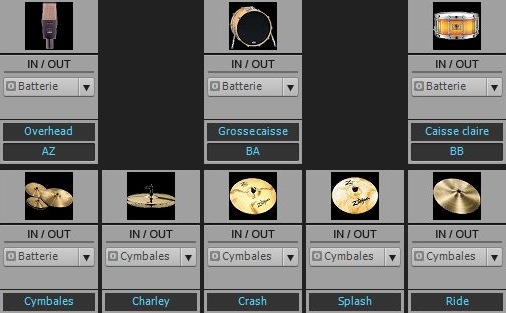
MIDI AND AUDIO DRUM TRACKS
Life - MIDI drums track
The MIDI track contains the drum score itself. It is linked to the audio tracks of each drum element.
Each one of the audio tracks is routed to the corresponding bus (snare drum track routed to snare drum bus, etc.)
Life - Drums buses
Bus KICK DRUM
Bus SNARE DRUM
Bus CYMBALS (hi-hat, crash, splash, ride)
Bus OVERHEAD
DRUMS bus

Top of page

KICK DRUM


This is the sound of the kick drum before processing


"Kick drum" bus

On this bus, I put a parametric equalizer plugin called "TrackPlug" from Wave Arts.

This is the sound I get after applying the TrackPlug plugin


Source: kick drum audio track
Target: Drums bus
Volume: -7.5 dB
Panning: 2% left

Kick drums are usually located at the center of the stereo field. I put it slightly to the left, by 2%, so that it leaves way to the vocals in the center, even though vocals and kick drum frequencies are unlikely to interfere. You will also see that I put the snare drum slightly to the right, by 2%, for the same reason. Kick drum and snare drum are thus slightly separated, although it isn't that obvious when listening to it.
TrackPlug plugin
TrackPlug plugin

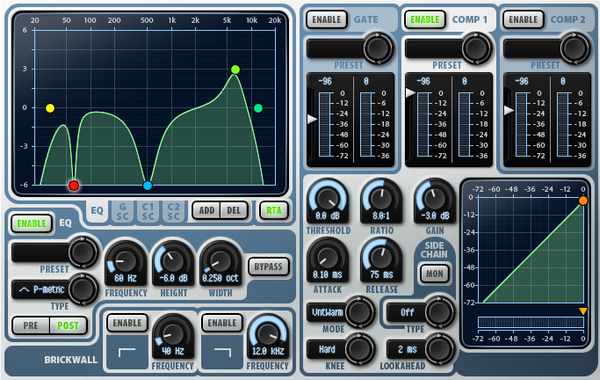
To obtain this kick drum sound, I used the following settings:

     - A high-pass filter at 30 Hz (yellow dot): below this value, frequencies become useless. On the one hand, few audio devices are able to reproduce them, they are not very musical and like all low frequencies, they demand a lot of energy to be rendered correctly, and that is to the detriment of other frequencies. So I cut them, and I did not want a song heavily loaded in low frequencies.

     - A 60 Hz band, set at -6 dB and a width of 0.25 octave (red dot). This dip frees some room for the "Saw bass" low synth, for which I boosted this particular frequency by 2 dB (see here). The low tone of the synth is thus more audible, and the kick drum sound is not affected too much.

     - A 500 Hz band, set at -6 dB and a width of 1 octave (blue dot). This dip reinforces the kick drum "boom" and suppresses some unpleasant tones. This also leaves some room for low vocal frequencies.

     - A 6.12 KHz, set at +3 dB and a width of 1 octave (green dot). Raising this frequency adds some "slamming" to the kick sound.

     - A low-pass filter at 11 KHz (turquoise dot): There was no sound beyond this frequency, so I added this filter to cut any parasite sound that would not add anything good to the kick drum sound, and could even conflict with the cymbals in the high frequencies.

     - Compressing part of the plugin: threshold set at 0 dB, ratio of 8:1 and gain set at -3 dB. The attack time is very short with a value of 0.10 ms (that will make the hit less powerful than it originally was) and the release time is set to 75 ms.

     - In the end, the EQ and the compression result in a very dry sound, a bit thinner than the sound before treatment, with a slightly lower volume due to the negative compression gain. I did not want a huge, invasive kick drum sound. Mastering plugins will later bring some thickness to it.
Top of page

SNARE DRUM


This is the snare drum sound before processing
First, the rimshot sound, then the normal hit sound


"Snare drum" bus

On this bus, I put a parametric equalizer plugin called "TrackPlug", as well as a limiter plugin called "FinalPlug", both from Wave Arts. The order in which you place the plugins matters. Here, The EQ comes first to shape the sound, then the limiter will boost the equalized signal.

This is the sound after processing with the TrackPlug and FinalPlug plugins
First the rimshot sound, then the hit sound


Source: snare drum audio track
Target: Drums bus
Volume : 0 dB
Panning: 2% right

The snare drum is usually located in the center of the stereo field. I put it slightly to the right, by 2%, so that it leaves room for the vocals. I also deported the kick drum 2% to the left. Thus, kick drum and snare drum are separated a bit, while remaining mostly centered.
TrackPlug plugin
TrackPlug plugin

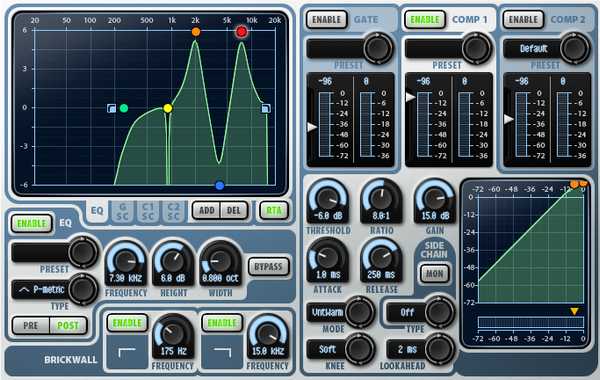
These are the settings I used with the TrackPlug plugin on the snare drum:

     - A brickwall at 175 Hz in order to cut all frequencies below this value. This makes sure that no snare drum frequency will interfere with the low synths, the bass or the kick drum. It's a bit redundant because I also us high-pass filter as described below, but let's call it a double security measure.

     - A high-pass filter at 2500 Hz (green dot): lower frequencies start declining at 2500 Hz and decrease more and more below this value.

     - A "notch" 880 Hz band. This type of band completely suppresses the sound in the target frequency. I used this on a width of only 0.1 octave because it was generating an unpleasant sound. Maybe because of the drum sample used? Anyway, suppressing this precise frequency solved the problem without affecting my snare drum sound.

     - A 1.97 KHz, set at +6 dB and a width of 0.8 octave (orange dot). This adds a little smack to the snare drum sample I chose.

     - A 3.88 KHz, set at -6 dB and a width of 0.8 octave (blue dot). Decreasing this frequency does make the snare drum sound somewhat thinner if you listen to it soloed, but it makes the sound more dry and prevents from encroaching upon guitar or vocals frequency ranges. Once drowned in the mix, decreasing this frequency isn't really audible.

     - A 7.3 KHz band, set at +6 dB and a width of 0.8 octave (red dot). Boosting this frequency boosts the brightness and clarity of the snare drum, and helps standing out in the mix.

     - Another brickwall at 15 KHz to suppress all very high useless frequencies.

     - The compressor part of the plugin has a threshold set at -6 dB, a ratio of 8:1 and an important gain, around +15 dB. The attack is set to a fast 1 ms and a slow decrease of 250 ms.

     - Like the kick drum, the EQ and the compression make the snare drum sound very dry, somewhat high-pitched, and it stands out easily in the mix. The Mastering stage will boost a bit further.
FinalPlug plugin
FinalPlug plugin

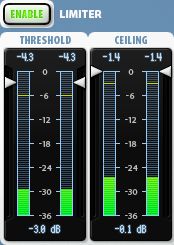
These are the settings used with the plugin FinalPlug for the snare drum:

Final Plug is a commercial plugin, you will find free limiters here, as well as a compressor (that can also be used as a limiter with the appropriate settings).
A limiter will boost the sound by defining a bottom volume from which the sound will be raised up to the maximum ceiling value

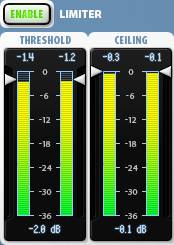
     - Threshold set at -3 dB. This is a rather small compression amount, just enough to boost the sound a bit, without having to edit the bus volume itself.

     - Ceiling: set at 0.1 dB. The plugin will limit the bus volume just before reaching the maximum.


Top of page

CYMBALS

The buses of the hi-hat, the crash and the ride cymbal are all routed to the "cymbals" bus.
This is the sound of the cymbals before processing

Hi-hat


Crash


Ride


"Cymbals" bus

Each of the buses for the hi-hat, the crash cymbal and the ride cymbal include an EQ plugin, the Trackplug plugin from Wave Arts, and the Cymbals bus includes a limiter plugin, the FinalPlug from Wave Arts. So the 3 cymbals are EQed on their respective bus, before their signal is sent to the main Cymbals bus.

Source: audio tracks from the Hi-hat, the Crash cymbal and the Ride cymbal
Target: the buses of the Hi-hat, the Crash and Ride Cymbal are routed to the Cymbals bus, which in turn is routed to the Drums bus
Volume: 0 dB (Hi-hat, Crash and Ride buses), -3 dB (Cymbals bus)
Panning: 35% right (Hi-hat), 25% right (Crash), 35% left (Ride), 0% (Cymbals bus)

The stereo placement of the cymbals isn't always the same as the one I chose. You could enlarge the stereo panning by putting the Hi-hat more to the right (90 or 100% for instance), and the ride on the opposite side. Or you could on the contrary narrow the stereo panning by putting the elements closer to the center. You may also invert the panning by placing the Hi-hat on the left and the ride on the right. The audience in a concert sees the Hi-hat on their right side, whereas it is located on the left from the drummer's point of view. Also the elements are located all around the drummer from his point of view, but from the audience's point of view, the sound of the whole drumkit seems to be coming from one point in space. So depending on which point of view you wish to refer to, you may pan the element in very different positions.
Plugin TrackPlug Charley
Hi-hat TrackPlug plugin

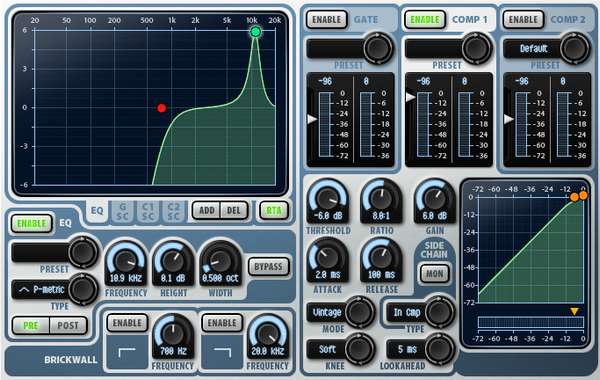
Settings for the TrackPlug plugin on the Hi-hat bus:

This is the sound obtained after processing with the TrackPlug plugin ("hi-hat", "Crash" and "Ride" buses) and the FinalPlug plugin ("Cymbals" bus)

Hi-hat

     - A high-pass filter at 750 Hz (red dot): the lower frequencies are useless with a Hi-hat, as it's merely producing a high-pitched sound, like all cymbals.

     - a band at 10.9 KHz, with a volume of +6 dB and a width of 0.5 octave (green dot). After scanning the frequencies, I found this one was the best choice for the Hi-hat in my opinion.

     - The compressor part of the plugin is set with a threshold at -6 dB, an 8:1 ratio and a gain level of 6 dB. The attack is very short with 2 ms and the release value is 100 ms.

Plugin TrackPlug Crash
Crash TrackPlug plugin

These are the settings of the TrackPlug plugin on the Crash bus:

This is the sound obtained after processing with the TrackPlug plugin ("Hi-hat", "Crash" and "Ride" buses) and the FinalPlug plugin ("Cymbals" bus)

Crash

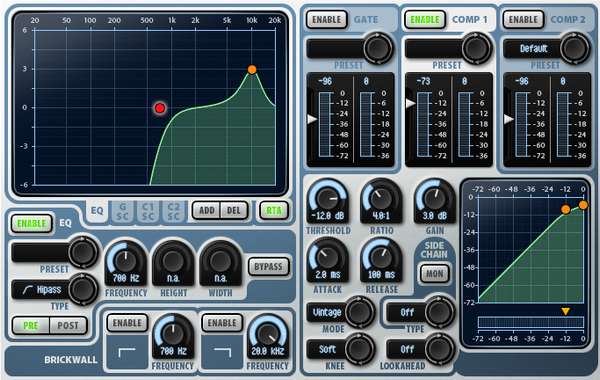
     - A high-pass filter at 700 Hz (red dot): the lower frequencies are useless with a Crash cymbal, as it's merely producing a high-pitched sound, like all cymbals.

     - a band at 9,87 KHz, with a volume of +3 dB and a width of 1 octave (orange dot). After scanning the frequencies, I found this one was the best choice for the Crash cymbal in my opinion.

     - The compressor part of the plugin is set with a threshold at -12 dB, a 4:1 ratio and a gain level of 3 dB. The attack is very short with 2 ms and the release value is 100 ms.

Plugin TrackPlug Ride
Ride TrackPlug plugin

These are the settings of the TrackPlug plugin on the Ride bus:

Voici le son obtenu après l'ajout du plugin TrackPlug (bus "Charley", "Crash" et "Ride") et du plugin FinalPlug (bus "Cymbales")

Ride

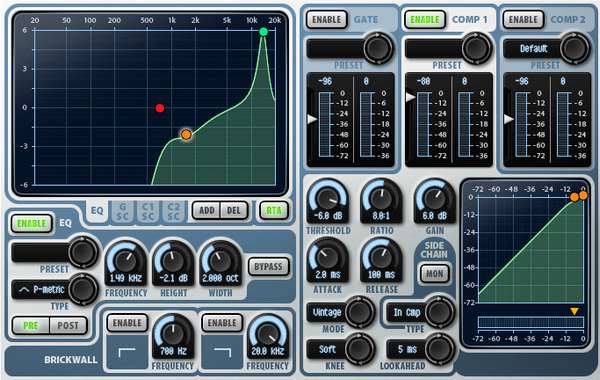
     - A high-pass filter at 700 Hz (red dot): the lower frequencies are useless with a Ride cymbal, as it's merely producing a high-pitched sound, like all cymbals.

     - a band at 1,49 KHz, with a volume of -2 dB and a width of 2 octaves (orange dot). I found that this frequency was conflicting with other instruments, like guitars and vocals, so I dimmed it by 2 dB, not so much that it would negatively alter the sound of the Ride cymbal.

     - a band at 13,7 KHz, with a volume of +6 dB and a width of 0.5 octave (green dot). After scanning the frequencies, I found this one was the best choice for the Ride cymbal in my opinion.

     - The compressor part of the plugin is set with a threshold at -6 dB, an 8:1 ratio and a gain of 6 dB. The attack is very short with 2 ms and the release value is 100 ms.

Plugin FinalPlug
FinalPlug plugin

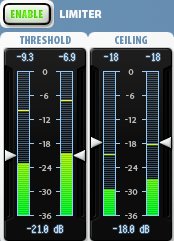
These are the settings of the FinalPlug plugin on the Cymbals bus:

     - The threshold is set on -21 dB, a low value because the cymbals' volume, especially the Hi-hat's is rather low, so I need to go get them low enough for the limiter to be effective.

     - The ceiling is set on -18 dB, 3 dB above the threshold. This is a weak compression, just enough to boost the sound a bit. In order to prevent the cymbals to sound too loud, the ceiling is set on a low value

     - The overall sound of the cymbals will be boosted further by the plugins from the Drums bus and the Master bus. The limiter triggering at -18 dB is therefore not an issue, even thought it may sound weak.
Top of page

OVERHEADS

The overheads are usually a pair of microphones placed above a drumkit to record the whole instrument, and particularly the cymbals. As we are using a virtual drum plugin, we are not using real microphones, but BFD can simulate overheads.

This is the sound of the overheads before processing


"Overhead" bus

On this bus, I added a parametric equalizer plugin called "TrackPlug" from Wave Arts, as well a limiter plugin called "FinalPlug", from the same company.
This is the sound obtained after using TrackPlug


Source: overheads audio track
Target: Drums bus
Volume: -9 dB
Panning: center

With a real drumkit recording, the overheads sound comes as a support for the other microphones and adds a touch of ambiant sound. As they are placed above the drumkit, they record not only the drum sounds themselves, but also the reverberation of the room, unlike the other microphones that are placed close to the kick drum, the snare drum, etc.
Such room reverberation is indeed simulated within our drums plugin. But as I'm adding a reverb plugin on the main Drums bus at the end of the chain in order to finalize the drums sound, I thus set the Overhead bus volume relatively low (-9 dB), so that it doesn't stand out too much. I removed a lot of lows, the overhead sound will merely bring some brightness to the drums sound.
Plugin TrackPlug
TrackPlug plugin

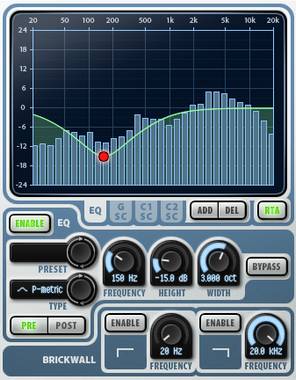
For the overheads, I set the EQ from TrackPlug like this:

     - A parametric band at 150 Hz, with a width of 3 octaves to get an impact in all low frequencies up to the low mediums, dipped a lot down to -15 dB.

     - I haven't completely removed the low frequencies but I lowered them quite a lot. Just listen how different the raw sound and the EQed sound are. As a consequence: the kick and snare drums sound very thin through the overheads, whereas the hi-hat is much more present.

     - No compression was used on this bus.
Top of page

DRUMS BUS

On this bus, the drums sound is complete (before mastering). I add a limiter with soft settings and a reverb effect. Therefore, it sounds more spacious and more pleasant to hear.

This is the sound of the kick drum with the effects of the Drums bus


*    *    *    *    *

This is the sound of the snare drum with the effects of the Drums bus
First the rimshot sound, then the normal hit sound


*    *    *    *    *

This is the sound of the cymbals with the effects of the Drums bus
Hi-hat


Crash cymbal


Ride cymbal


This is the sound of the overheads with the effects of the Drums bus


Source: Kick drum, snare drum, cymbals and Overhead buses
Target: Master bus
Volume : -4 dB
Panning: center

FinalPlug plugin
FinalPlug plugin

These are the settings used with the FinalPlug plugin on the Drums bus:

Final Plug is a commercial plugin, you will find free limiter plugins here, as well as a compressor plugin (that can be used as a limiter with the appropriate settings).
A limiter allows to boost the sound by setting a threshold level from which the sound will be raised up to a defined ceiling value.
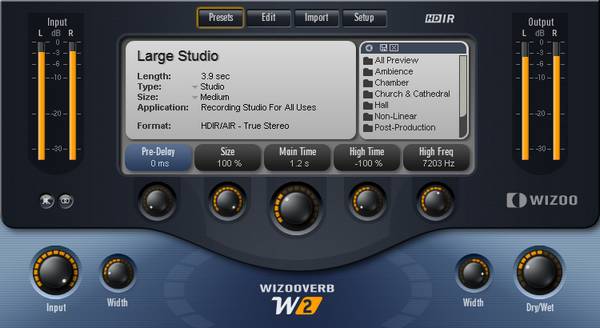
     - Threshold is set on -2 dB. This is a small compression, just enough to boost the sound up to the level I wanted to reach, without having to modifiy the bus volume itself.

     - Ceiling is set on -0.1 dB.


Plugin Wizooverb
Wizooverb plugin

No need to go into the settings details, all reverb plugins offer different options. I'll simply define the general characteristics:

Wizooverb is a commercial plugin, but it is no longer sold, which is a pity because it's excellent. You will find free reverb plugins here. You can find a lot of alternatives on the Internet, with various levels of quality.
     - I chose a studio reverb. The Wet sound (the reverberated sound) is on 27%, so 73% comes from the Dry sound (original unaffected sound).

     - The reverb duration is 1.2 second.

     - There isn't any pre-delay (0 ms). Pre-delay is the time after which reverbs is triggered, after the sound has started playing. In the present case, the reverb starts immediately. The longer the pre-delay, the larger the venue seems to be (depending also on other factors such the Dry/Wet ratio, the room size parameter (if applicable), the reverb duration...). The shorter the pre-delay, the less you will hear the attack of the instrument, as it gets slightly drowned in the reverb. Here, the attack of a drum sound is the impact sound of the stick on the drum element. With a 30 or 40 ms pre-delay, the drum sounds would have been more percussive, as the reverb sound would trigger after the impact sound. I did this choice to smoothe the drums a bit.

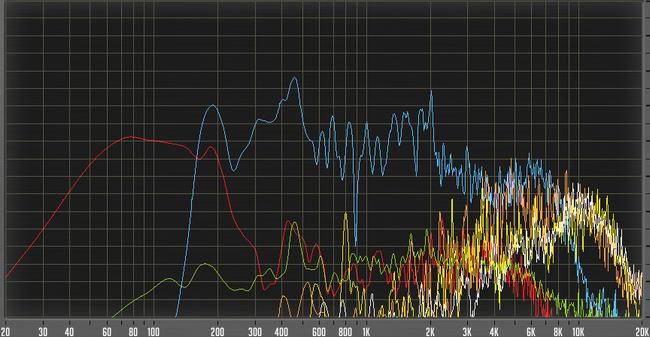
Fréquences de la batterie
Drums frequencies

Red - Kick drum
Blue - Snare drum
White - Hi-hat
Orange - Crash
Yellow - Ride
Green - Overheads

Of course, many of these frequencies seem to override in the highs, but these are cymbals and they don't play all at the same time.
Mixing in practice : Preparing the session | Bass | Drums | Rhythm guitars | Solo guitars | Keyboards | Vocals | Mastering
Top of page


MESSAGES

(leave a message)

Messages page # 1 2 3 4 5 6 7 8 9 10 11 12 13 14 15 16 17 18 19 20 21 22 23 24 25 26 27 28 29 30 31 32 33 34 35


Bonivoice
le 26/02/2012 à 20h47

Merci pour toutes ces précieuses infos. Bien à vous.


Gulibert
le 25/02/2012 à 15h12

Bonjour Grebz,

Merci de tes précieux conseils... Mon projet avance grandement. :-) J'ai un PC usagé avec une carte son SB Live et le logiciel Cakewalk v7 (je crois que c'était avant Sonar...) Le musicien qui m'a vendu le système m'a laissé tous les Soundfonts qu'il avait (gratuits ou non).

Si je peux me permettre, j'aurais 1-2 autres petites questions... Je vais acheter un ordinateur portable en supplément pour le studio. J'ai un œil sur un Vaio de Sony (voir le lien pour les specs). Or ce portable possède de belles qualités sonores et graphiques. Celui que j'ai configuré possède 8 Go de mémoire. Bien sûr, Sony prône pour le software Acid ou Sony Studio. Mais là n'est pas le problème (<a href="http://store.sony.ca/webapp/wcs/stores/servlet/CategoryDisplay?catalogId=100803;storeId=20153;langId=200;identifier=S_Laptops_F_Family" target="_blanck">Site de Sony</a>).

Considérant la configuration du PC, est-ce que tu crois qu'utiliser la sortie HDMI pour le son relié à un ampli est une bonne configuration ? (si tu as des suggestions...)
Et si j'installe Sonar ou autre logiciel, etant donné que ce n'est pas une carte son SB Live (ce que j'utilise en ce moment), est-ce que je devrais me tourner vers des VSTi ?

* * * * * * * * * * * * * * * *

<em>Le choix du séquenceur est très personnel. J'utilise Sonar mais tous les séquenceurs modernes sont recommandables. Reaper n'est pas cher, Cubase est très populaire, Acid, Ableton, ProTools, Studio One sont de bons logiciels... L'offre est vaste et le choix doit se faire en fonction de ses goûts, de ce que possèdent ses connaissances (ça peut faciliter les échanges d'utiliser le même logiciel que les amis), en fonction du prix, en fonction de la réputation du logiciel, de sa simplicité, de sa stabilité...

Pour ton ordinateur portable, il a l'air de proposer un bon processeur, suffisamment de RAM et de capacité disque dur, donc pas de souci. Il est possible de choisir un écran Full HD ou avec une résolution plus faible (et un prix sans doute moins élevé). Étant donné que dans un séquenceur, on a souvent tendance à se retrouver avec plusieurs fenêtres ouvertes simultanément, la plus haute résolution sera la plus pratique.

En revanche, pour la carte son, ça reste une carte multimédia, pas prévue pour faire de l'enregistrement et du mix. Ça marchera, mais ce n'est pas l'idéal, et ça ne sera pas mieux qu'une carte son intégré à un ordinateur "tour" (par opposition à un portable), ou une Sound Blaster. Je recommande vraiment de trouver une interface audio USB externe à un prix correct. Les capacités audio annoncées ont l'air alléchantes sur le papier... pour du multimédia... et pour un portable, mais les enceintes d'un portable, aussi bonnes soient-elles ne peuvent pas remplacer des enceintes de monitoring (l'idéal), un bon casque de studio, ou des enceintes de chaîne hifi de très bonne qualité. Par défaut, il vaut mieux investir dans un bon casque autour de 150 euros (comme un bon Beyer Dynamic).

En ce qui concerne la sortie HDMI, pourquoi pas ? Il faut juste vérifier que la sortie HDMI de l'ampli permet bel et bien de transmettre ensuite le son à des enceintes. J'ai lu à plusieurs reprises sur le Net que certains amplis bas de gamme ne permettaient pas de le faire, et donc qu'on se retrouve avec des enceintes muettes ! À vérifier dans le manuel de l'ampli.

Enfin, pour ce qui est des soundfonts, il faut théoriquement une carte son SoundBlaster pour les utiliser, mais en fait, il existe des plugins VST qui permettent d'utiliser des soundfonts avec n'importe quelle carte son, comme SFZ par exemple. Sauf incompatibilités, ça ne devrait donc pas être un problème d'utiliser tes soundfonts actuels sans Sound Blaster.

Quant aux VSTi, il en existe de très nombreux gratuits sur le Net. Il y en a même tellement qu'il est difficile de trouver ce qu'on cherche exactement, et il y en a de très bons comme de très mauvais. Beaucoup sont des synthés. Il est bien plus difficile de trouver des VSTi gratuits et de bonne qualité qui reproduisent le son de vrais instruments.

Grebz</em>


Cyril All You Bring
le 10/02/2012 à 08h25

Hey !

Comme tu as déjà répondu avec pertinence à une de mes questions, je me permets de t'en poser une autre!

Je possède une carte son Line6 UX2, qui ne possède pas de prise MIDI... Pour enregistrer ma batterie éléctro, acheter un clavier maître est-il la bonne solution ?

Sera-t-il relié a ma carte son ou directement à mon PC ou MAC via USB ?

Que me conseilles-tu comme clavier maître, juste pour éditer la batterie ou synthé sur un VSTi ?

Musicalement

Cyril

* * * * * * * * * * * * * * * *

<em>Bonjour Cyril,

Alors là... je suis bloqué. Je n'ai pas trouvé s'il était possible de brancher une batterie électronique en midi directement sur les prises midi d'un clavier maître. En théorie, je ne vois pas pourquoi ça ne marcherait pas, mais je n'ai pas trouvé la confirmation.

Sinon, il existe des interfaces midi seules, à brancher sur un port USB de l'ordinateur. Mais ça fait encore un câble en plus ! :-)
Celle-ci par exemple : <a href="http://fr.audiofanzine.com/interface-midi/e-mu/1x1-Usb/avis/" target="_blanck">Interface USB-midi E-Mu</a> (dans les 35 euros), mais il en existe pas mal d'autres modèles.

En terme de clavier maître, moi j'utilise celui-ci : <a href="http://fr.audiofanzine.com/clavier-maitre/e-mu/Xboard25/avis/" target="_blanck">Clavier Xboard25 E-Mu</a>. Il ne fait que 2 octaves, donc il ne prend pas trop de place sur mon bureau, mais il en existe des versions 4 et 6 octaves (Xboard 49 et 61 touches). En revanche, il n'a qu'une prise midi-Out, pas de midi-In.

Regarde sur <a href="http://fr.audiofanzine.com/clavier-maitre/" target="_blanck">cette page d'Audiofanzine</a>, il y a beaucoup de choix, même si certains modèles de la liste ne sont peut-être plus en vente.

Je ne peux pas vraiment t'aider plus sur la question, bonne recherche.

Grebz</em>


Jackeels
le 07/02/2012 à 22h34

Bravo pour votre site , plein d'infos pour un novice comme moi.
Je viens à l'instant de poser un post sur un forum d'Audiofanzine et je vous le livre tel quel : peut-être aurez-vous de précieux conseils à me donner. Merci.

Demande de conseils pour prise son + config GEAR BOX + LIVE 5.2.2 + PEAVEY VYPYR 3O + UX2 + SHURE SM 57

Bonjour à tous,
Voilà, je dispose du matériel cité en sujet et je cherche désespérément une configuration afin de faire des enregistrements de qualité potable ; j'ai beaucoup de difficultés à obtenir un résultat acceptable, d'autant plus que je ne dispose pas d'enceintes de monitoring (ça va bien faire marrer les puristes...) ni de casque de studio (mais un MAGNIFIQUE Berhinger à 17 Euros). À ce tableau, désopilant pour les puristes, s'ajoute le fait que j'utilise de temps en temps mon peavey comme ampli guitare évidemment, mais aussi comme enceintes : vous voyez un peu le bordel ?
Dans ces conditions, vous allez me dire, faut pas s'attendre à sortir des merveilles et vous aurez raison ! Mais je ne suis qu'un vieux débutant et je n'ai pas tout le matériel nécessaire pour obtenir quelques chose de satisfaisant (pour l'instant). Alors j'en appelle à la bienveillance de ceux qui utiliseraient ce type de matos pour me filer des conseils afin d'optimiser tout ça, notamment au niveau des réglages. Merci, a+.


Cyril All You Bring
le 30/01/2012 à 20h34

Merci pour tes infos, j'ai pu y voir un peu plus clair sur le monde du home studio.
Je possède déjà une carte son line 6 UX2 avec POD Farm, des enceintes de monitoring, j'ai pu essayer Cubase, Audacity et possède Ableton Live et grâce à tes infos, j'ai compris la fonction de certains outils et comme je n'y connais pas grand chose, cette lecture m'a permis de me conforter dans mes idées.
Notamment que Ableton Live était plus axé live... quand je suis dessus, je me fais des sons House pendant une heure pendant que mes amis dansent dessus, mais quand je veux enregistrer, je peine !
J'ai cependant plusieurs questions si tu veux bien m'aider (sûrement basiques mais c'est pas grave !) :
Sur mes enceintes de monitoring, j'ai 2 potards (un sur chacune) "HF LEVEL" qui me laisse le choix entre -2, -1, 0, et +1 db...
Sur quoi cela influence-t-il ?
Où dois-je le positionner ? La même position sur mes 2 enceintes ?
Je n'entends pas la différence lorsque j'écoute simplement de la musique...
Cela a-t-il un rapport avec le "zéro du mal" à ne pas dépasser ???
Et je rencontre un autre problème sur Cubase ou Ableton Live : J'enregistre une piste, genre rythmique, jusque-là c'est cool.
J'enregistre une autre piste en jouant mon solo dessus, je suis calé (bon presque !), et lorsque j'écoute les 2, ma 2ème piste est décalée... Snif, what the fuck ???
Comment régler ce problème sans être obligé de recaler mes 2 pistes par la suite, ce qui est galère !

En tout cas, merci beaucoup pour tes infos claires et précises qui m'ont déjà beaucoup aidées !

Stay rock !

* * * * * * * * * * * * * * * *

<em>Bonjour Cyril,

Merci d'être passé sur mon site !

En ce qui concerne les potards HF Level (High Frequency Level) de tes enceintes, il s'agit d'un bouton d'ajustement du volume des hautes fréquences (fréquences aiguës). Ces potards servent à ajuster ces fréquences de quelques dB pour compenser un éventuel problème d'acoustique de ta pièce. En effet, dans les pièces non traitées acoustiquement, ce qui est le cas de la majorité des home studistes amateurs, le son qui sort des enceintes va aller se taper sur les murs, rebondir, et faire un peu n'importe quoi avant d'arriver dans tes oreilles. La précision des enceintes de monitoring sera mise à mal dans une pièce à l'acoustique incertaine. À ta place, je laisserai les 2 potards à zéro. En fait, comme il y a de fortes chances que ta pièce ne soit pas spécialement traitée pour le son (pas plus que la mienne, d'ailleurs), pour connaître vraiment la justesse de tes enceintes et pouvoir ensuite mixer convenablement, tu vas simplement devoir apprendre à connaître ses réactions dans les graves et les aigus en écoutant tes musiques de référence et en cherchant à mixer de manière à obtenir des mixes que tu jugeras proches de ces références. Puisque les disques de professionnels sont mixés et masterisés dans de bonnes conditions, tu peux t'y fier.
En tout cas, cela n'a rien à voir avec le "zéro du mal" qu'il ne faut jamais dépasser. Ce zéro-là est le volume à ne jamais dépasser lors de l'enregistrement. Lors du mix, chaque piste doit aussi rester en dessous de 0 dB (et même idéalement bien plus bas que ça), et la piste master aussi. Tout cela avant traitement (piste sans plugins), comme après (une fois les plugins ajoutés).

Tu ne m'as pas posé la question, mais ceci pourra intéresser des gens :
Le plus important, c'est de placer tes enceintes au meilleur endroit possible, si tu as le choix du placement. Parfois, chez soi, entre la fenêtre, la porte, l'armoire et le radiateur, il ne reste pas vraiment de choix ! Trouve l'endroit le plus approprié pour que les sons stéréo te parviennent bien là où ils doivent être lorsque tu es assis en position d'écoute. Que les sons centrés semblent se trouver en face de toi, que les sons à gauche soient bien à gauche, etc.
Si ta pièce n'a pas une acoustique géniale (si ça résonne un peu par exemple), place tes enceintes de façon à ce qu'elles ne soient pas trop loin de tes oreilles. Quand tu es assis, tes enceintes doivent être si possible à hauteur de tes oreilles, et orientées vers toi. Vous devez former un triangle, toi et tes enceintes. Assieds-toi face à ton bureau, et tends les bras vers tes enceintes (bras gauche vers enceinte gauche, bras droit vers enceinte droite) : tes enceintes doivent être placées à la même distance par rapport à toi, pour que le son de chacune d'entre elles parvienne à tes oreilles en même temps.
Pour mixer, le bon volume est un volume qui ne t'empêche pas d'avoir une conversation normale avec quelqu'un qui serait dans la pièce. Enfin ça, c'est dans le but de protéger ses oreilles et d'éviter la fatigue auditive. Pour vérifier certains détails (ou se faire plaisir), on monte le son, ou même on vérifie au casque, qui agit comme une sorte de zoom auditif.

Alors en revanche pour ton problème de décalage entre deux pistes, je ne sais pas. Un problème de latence peut-être, ou de réglage d'horloge ? Je suis désolé, mais comme je ne possède ni la Line 6, ni Cubase, ni Ableton, je ne vais pas pouvoir t'être d'un grand secours à ce sujet. Essaie les forums du site <a href="http://fr.audiofanzine.com/carte-son-externe/line-6/POD-Studio-UX2/forums/" target="_blanck">Audiofanzine</a>, tu auras plus de chances de trouver des réponses.

Grebz</em>

Top of page