
? | Home page | Simulators


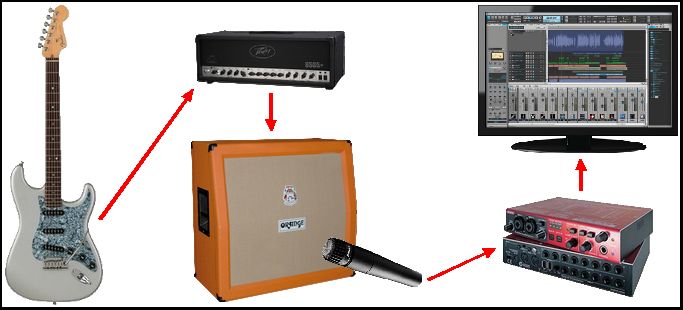
This is an essential step. As we are doing Rock music, we are necessarily going to use guitars. And it'd better sound good and heavy and impressive. If guitare comes second, it's not Rock anymore, so you must take very good care of it. But in a home studio, it is not easy to have access to good hardware that will take our guitar sounds to the next level. Real guitar amps are expensive, take space and are very noisy but fortunately, virtual amps have made enormous progress and anyone can now get gear simulations of all kinds.
Amp simulators attempt to reproduce the sound of real guitar and bass amps. Some will recreate one precise model, some will offer access to different models and brands. You can easily find reproductions of the most famous brands from one simulator to the next, but their quality and fidelity to the original can vary much from one sim to the other. You can find both free and retail simulators.
Amp sims of course are only necessary if you don't use a real guitar amp. A good amp sim will allow you to play and record with very limited noise and give excellent results. Frankly, it becomes very difficult to distinguish between a good amp sim and a real amp. Simulators have a bit less dynamics, grain and warmth, but within a good mix, the difference is subtle and if you set the right parameters, most people won't hear any difference. Another advantage in favor of simulators: it doesn't take any physical space and you can have many different models at your disposal without spending a fortune. On the other hand, when it comes to live play, nothing is worth a good old guitar amplifier... But here, we're talking about recording in a home studio.
Caution: I put forward amplifier head simulators, to which you need to add speaker cabinet simulators to build up a complete guitar amplifier. As you can hear, it sounds rather aggressive without a cabinet. According to the cabinet, the microphone and its positionning, you can get very different sounds. It's up to you to find the desired setting. Don't hesitate to use several cabs and several mikes for a single guitar as it allows for a fuller sound.
NB: all the plugins presented here are for PC with Windows. If a Mac version exists, I'll mention it and give you the download link from the official website.


As each D.A.W. is different, I cannot give you the exact procedure but only a general method. Caution: as a Windows PC user, the files I present are for Windows, and so are the explanations below.
1 - Download the plugin file you are interested in.
2 - Unzip the plugin and copy the files it contains in the VST folder of your D.A.W.. I advise you to create a folder for each plugin.
For instance, if you download the TSE X50 zip file, copy its content within the folder "C:\...\VST\TSE - X50".
In order to sort things better, I usually create this type of sub-folders "C:\...\VST\Amp simulators\TSE Plugins\X50", so everything is sorted by type of plugins and by brand.
3 - If your D.A.W. doesn't automatically do it when starting, use its plugin search/analyse function. You may have to close and restart your D.A.W. to recognize the newly installed plugins. Check in the D.A.W.'s options that it knows where to look for. It is usually possible to set one or several paths that will target the folder(s) containing your plugins.
4 - Once the new plugin is recognized by your D.A.W., place it on the track or the bus you want. Some plugins only work if they are placed on stereo tracks or buses.
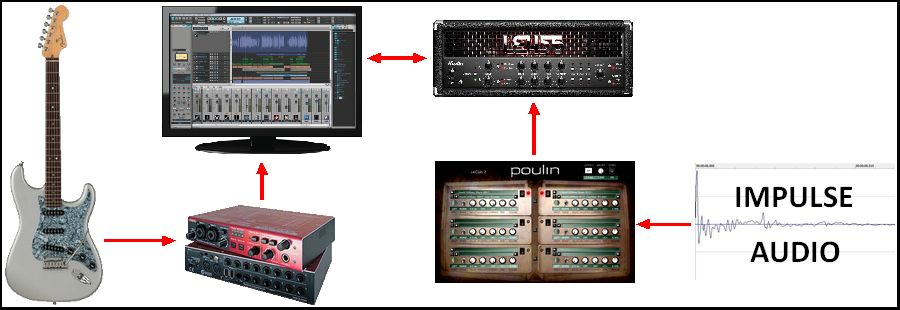
5 - Place an amplifier simulator first.
6 - Then, place a cabinet simulator, also known as an impulse loader, like LeCab 2 from Poulin, or NadIR, for example.
7 - In the cab simulator, load the impulse of your choice. Impulses, whether they are free or commercial ones, are small-sized wav audio files that you will place wherever you want on your hard drive. They don't need to be located in your VST folder. So load the impulse of your choice, for example a Marshall cabinet impulse.
8 - If everything goes well, you now have an amplifier simulator and a cabinet simulator, very much like a real amplifier.
9 - Click on the "monitoring" button of your guitar track, the very one that allows you to hear yourself playing. You can now enjoy the sound of your virtual guitar/bass amplifier.
10 - Change the settings in the amp simulator windows, set the volume, the bass, mid and trebble, etc. Change the settings as well in the cab simulator if needed (high and low pass, panning...)
11 - Pay attention to the latency. Set it low enough so that there is no delay between the moment you play your guitar and the moment you hear the sound coming out of your headset or monitors. Latency only needs to be very low when you play or record (in order to avoid a sound delay). Once the recording is over, when it is time for mixing, you can raise the latency again, in order to get more processing power. The lower the latency, the more the computer processor will be in use. That can be problematic with big musical projects, if your computer is not powerful enough to process things in real time.

Messages page # 1 2 3 4 5 6 7 8 9 10 11 12 13 14 15 16 17 18 19 20 21 22 23 24 25 26 27 28 29 30 31 32 33 34 35

Beber
le 21/12/2010 à 14h57
Salut,
J'ai vu que tu possèdes une I/O2. Je voudrais pouvoir utiliser la mienne sans PC en la branchant sur secteur via un transfo USB (objectif : jouer au casque avec mon RP 500 DIGITECH).
Mon multi-effet possède déjà une sortie casque mais le signal est trop faible, j'ai donc besoin de sortir sur l'I/O2 avec mes XLR puis d'utiliser la prise casque de l'I/O2.
PS : joli site et beau matos !!!

bibize
le 15/12/2010 à 15h59
Bonjour,
Concernant le mixage, je ne comprends pas l'intéret de créer un bus "Brut" qui joue la guitare sans effets.
* * * * * * * * * * * * * * * *
<em><strong>Pour une guitare électrique, ça n'a effectivement pas vraiment d'intérêt</strong> et je n'utilise plus ce bus. Je l'ai récemment supprimé de mon modèle de projet.
En revanche, <strong>pour une guitare acoustique, c'est beaucoup plus intéressant</strong> bien entendu.
Grebz</em>

Jukap
le 28/11/2010 à 00h00
Pour la fréquence d'échantillonnage, c'est relativement inaudible entre 44 et 88 pour un enregistrement (sauf peut-être conditions de chaîne audio parfaite), par contre cela devient TRÈS intéressant dès qu'il existe un TRAITEMENT DU SON DANS LE DAW : EQ, comp, simus, réverbes, etc... On gagne très rapidement en définition et profondeur lorsqu'on augmente la fréquence d'échantillonnage et là pour le coup, le 96 prend son sens (par contre, ça met vite à genoux le processeur...).

Jack
le 27/11/2010 à 23h32
C'est quoi que tu appelles Bus ?
* * * * * * * * * * * * * * * *
<em>Un bus se présente visuellement comme une piste, mais au contraire d'une piste, le bus ne contient aucune donnée (pas d'audio, ni de données MIDI). En revanche, tu peux y appliquer des effets et agir sur de nombreux paramètres (volume, panoramique, données d'automation...). Ils servent souvent à regrouper les données venant d'autres bus ou de plusieurs pistes en un seul endroit afin de pouvoir contrôler d'un bloc plusieurs pistes par exemple (passer en Muet toutes guitares d'un coup, ou ne mettre en Solo que les synthés, etc.)
Exemple d'utilisation d'un bus : tu crées 3 pistes de guitares, et tu souhaites leur appliquer un traitement commun, comme par exemple la même réverb.
Au lieu de mettre 3 fois la même réverb sur les 3 pistes de guitares, tu crées un bus, tu indiques à tes 3 pistes de pointer vers ce bus et tu appliques l'effet réverb sur le bus.
Résultat : tes 3 guitares auront la même réverb, mais tu n'auras utilisé qu'un seul plugin. Avantages : moins d'utilisation processeur avec une seule réverb qu'avec trois, et si tu souhaites modifier la réverb, tu n'as pas besoin de le faire 3 fois.
Autre exemple : tu souhaites appliquer des effets différents à une guitare présente sur une piste. Au lieu de créer plusieurs pistes, tu crées plusieurs bus, tu fais pointer ta piste vers chacun de ces bus, et sur chacun d'entre eux, tu places des effets différents (des simulateurs d'ampli différents, des panoramiques différents, des pédales d'effets différentes, des EQ différents, des volumes différents, etc...)
Au final, en n'ayant enregistré qu'une seule piste de guitare, tu pourras donner une grande richesse sonore à cette unique piste, tu pourras donner l'impression qu'il y a plusieurs guitares...
Grebz
</em>

Tekk
le 22/11/2010 à 09h51
Super boulot ! . . . Félicitations
