
? | Home page | Simulators


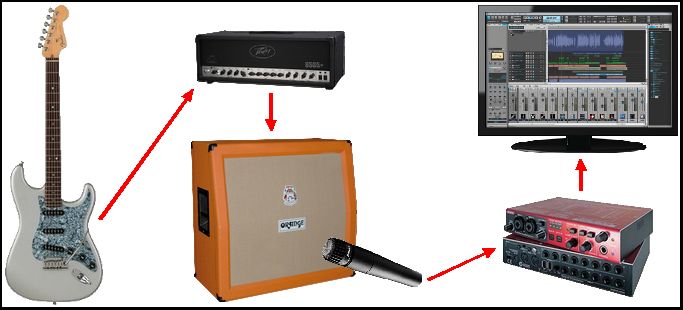
This is an essential step. As we are doing Rock music, we are necessarily going to use guitars. And it'd better sound good and heavy and impressive. If guitare comes second, it's not Rock anymore, so you must take very good care of it. But in a home studio, it is not easy to have access to good hardware that will take our guitar sounds to the next level. Real guitar amps are expensive, take space and are very noisy but fortunately, virtual amps have made enormous progress and anyone can now get gear simulations of all kinds.
Amp simulators attempt to reproduce the sound of real guitar and bass amps. Some will recreate one precise model, some will offer access to different models and brands. You can easily find reproductions of the most famous brands from one simulator to the next, but their quality and fidelity to the original can vary much from one sim to the other. You can find both free and retail simulators.
Amp sims of course are only necessary if you don't use a real guitar amp. A good amp sim will allow you to play and record with very limited noise and give excellent results. Frankly, it becomes very difficult to distinguish between a good amp sim and a real amp. Simulators have a bit less dynamics, grain and warmth, but within a good mix, the difference is subtle and if you set the right parameters, most people won't hear any difference. Another advantage in favor of simulators: it doesn't take any physical space and you can have many different models at your disposal without spending a fortune. On the other hand, when it comes to live play, nothing is worth a good old guitar amplifier... But here, we're talking about recording in a home studio.
Caution: I put forward amplifier head simulators, to which you need to add speaker cabinet simulators to build up a complete guitar amplifier. As you can hear, it sounds rather aggressive without a cabinet. According to the cabinet, the microphone and its positionning, you can get very different sounds. It's up to you to find the desired setting. Don't hesitate to use several cabs and several mikes for a single guitar as it allows for a fuller sound.
NB: all the plugins presented here are for PC with Windows. If a Mac version exists, I'll mention it and give you the download link from the official website.


As each D.A.W. is different, I cannot give you the exact procedure but only a general method. Caution: as a Windows PC user, the files I present are for Windows, and so are the explanations below.
1 - Download the plugin file you are interested in.
2 - Unzip the plugin and copy the files it contains in the VST folder of your D.A.W.. I advise you to create a folder for each plugin.
For instance, if you download the TSE X50 zip file, copy its content within the folder "C:\...\VST\TSE - X50".
In order to sort things better, I usually create this type of sub-folders "C:\...\VST\Amp simulators\TSE Plugins\X50", so everything is sorted by type of plugins and by brand.
3 - If your D.A.W. doesn't automatically do it when starting, use its plugin search/analyse function. You may have to close and restart your D.A.W. to recognize the newly installed plugins. Check in the D.A.W.'s options that it knows where to look for. It is usually possible to set one or several paths that will target the folder(s) containing your plugins.
4 - Once the new plugin is recognized by your D.A.W., place it on the track or the bus you want. Some plugins only work if they are placed on stereo tracks or buses.
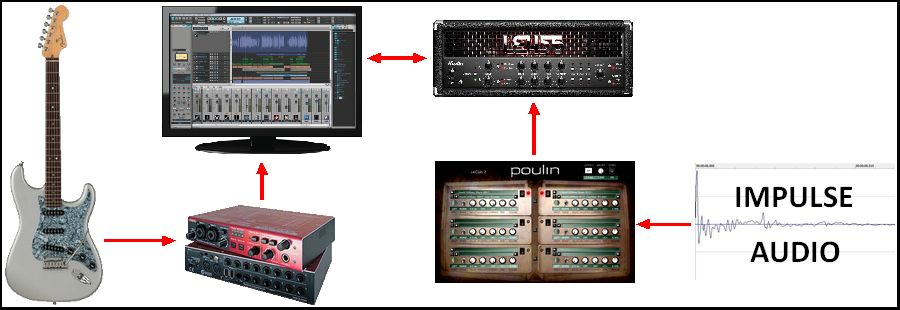
5 - Place an amplifier simulator first.
6 - Then, place a cabinet simulator, also known as an impulse loader, like LeCab 2 from Poulin, or NadIR, for example.
7 - In the cab simulator, load the impulse of your choice. Impulses, whether they are free or commercial ones, are small-sized wav audio files that you will place wherever you want on your hard drive. They don't need to be located in your VST folder. So load the impulse of your choice, for example a Marshall cabinet impulse.
8 - If everything goes well, you now have an amplifier simulator and a cabinet simulator, very much like a real amplifier.
9 - Click on the "monitoring" button of your guitar track, the very one that allows you to hear yourself playing. You can now enjoy the sound of your virtual guitar/bass amplifier.
10 - Change the settings in the amp simulator windows, set the volume, the bass, mid and trebble, etc. Change the settings as well in the cab simulator if needed (high and low pass, panning...)
11 - Pay attention to the latency. Set it low enough so that there is no delay between the moment you play your guitar and the moment you hear the sound coming out of your headset or monitors. Latency only needs to be very low when you play or record (in order to avoid a sound delay). Once the recording is over, when it is time for mixing, you can raise the latency again, in order to get more processing power. The lower the latency, the more the computer processor will be in use. That can be problematic with big musical projects, if your computer is not powerful enough to process things in real time.

Messages page # 1 2 3 4 5 6 7 8 9 10 11 12 13 14 15 16 17 18 19 20 21 22 23 24 25 26 27 28 29 30 31 32 33 34 35

daniel210567
le 29/08/2011 à 23h28
Bonjour,
Petite question : comment utilise-t-on une impulsion de cab sur Logic Pro 8 ?
Merci,
Daniel
* * * * * * * * * * * * * * * *
<em>Bonjour,
Je suis moi-même utilisateur de PC, donc les plugins que je propose ici sont pour PC. Cela dit, le principe reste le même.
Pour utiliser des impulsions, il faut un chargeur d'impulsions (impulse loader). Pour Mac, j'ai trouvé celui-ci : <a href="/Downloads/tutorial_homestudio/Convolver-v2.0a3-mac.zip">Convolver v2.0a3</a>. C'est un plugin gratuit.
Ensuite, je ne sais pas comment ça s'installe sur un Mac, mais je suppose qu'en tant qu'utilisateur de Mac, vous saurez comment faire.
Autre chose, les impulsions que je propose sur mon site sont au format WAV. Je suppose que les Mac peuvent les lire, mais je ne sais pas si ce sera le format attendu par les chargeurs d'impulsions Mac. Peut-être faut-il de l'AIFF ou autre ? Dans ce cas, il faudra convertir les impulsions au bon format, mais encore une fois, ce n'est peut-être tout simplement pas nécessaire...
Grebz</em>

Djool59
le 09/08/2011 à 14h33
Salut Grebz,
Merci pour les explications, c'est excellent ça marche !!!
C'est énorme ! J'ai déjà trouvé des super combinaisons et donc créé des sons super HEAVY.
Dis-moi, est-ce que tu sais où je pourrais trouver l'impulse ASEM RECTO V30 L2 ?? Je ne la trouve pas ?
Merci pour tout et continue à alimenter ce site.
Djool
* * * * * * * * * * * * * * * *
De rien !
Et en cadeau, voilà ton impulsion : <a href="/Downloads/tutorial_homestudio/ASEM RECTO V30 L2.zip">ASEM RECTO V30 L2</a>

JMLG
le 07/08/2011 à 02h51
Super site pour les amateurs et débutants en MAO. On ne se perd pas dans des explications scientifiques. C'est clair et concis. Continue comme ça et un conseil, passe à Cubase.
* * * * * * * * * * * * * * * *
<em>Cool que ça aide !
Et pour Cubase, non merci. Faut bien comprendre que chaque séquenceur a ses forces et ses faiblesses, mais tous permettent d'arriver aux mêmes résultats, avec des manières de procéder différentes. La grande différence, c'est l'ergonomie. Celle de Cubase ne me convient pas (j'ai essayé à plusieurs reprises).
Et puis on n'est pas là pour ouvrir un débat qui sera de toute façon sans fin et sans vainqueur. L'objectif, c'est de faire de la musique et pour y arriver, il faut l'outil adéquat : cet outil ne sera pas le même pour tous.
Grebz</em>

djool59
le 05/08/2011 à 22h26
Bonjour,
Voilà, j'utilise Cubase 5 et je viens de découvrir votre site ainsi que les plugins ampli, cab, et impulsion.
J'ai un peu de mal à comprendre comment on fait fonctionner ces plugins dans Cubase...
J'insère bien les plugins dans la zone effet de ma piste audio mais aucun son ne sort :(
Pourriez-vous me donner les démarches à suivre svp ?
Votre site est génial, et j'ai pas mal appris :)) mais pas assez.
Merci d'avance et bonne continuation.
* * * * * * * * * * * * * * * *
<em>Bonjour,
D'abord merci de votre visite.
J'ai ajouté une explication sur la façon d'utiliser les plugins. C'est assez générique parce que chaque séquenceur appelle ses fonctions différemment. Étant utilisateur de Cakewalk Sonar, je ne sais pas trop comment utiliser Cubase, mais je sais que sur le principe, ils fonctionnent de la même manière.
Les explications se trouvent <a href="musique_homestudio_tutorial_required_4.php#use_plugins">ici</a>.
Grebz</em>

Jacqus
le 03/08/2011 à 15h35
Bonjour,
Très intéressé par tout cela, je me retrouve avec un point d'interrogation : comment récupérer les simulateurs dans Cubase ?
Du type Nick Crow Wagner Mk2, 7170, 8505, HP Poulin.
Merci à l'avance, j'ai certainement loupé quelque chose ???
* * * * * * * * * * * * * * * *
<em>Bonjour,
Tous ces simulateurs d'ampli et de HP sont des plugins au format VST.
Pour pouvoir les utiliser dans un séquenceur comme Cubase, Sonar, Reaper et autres, il faut :
1- Télécharger le plugin évidemment,
2- Dézipper le fichier téléchargé,
3- Recopier le contenu du fichier zip dans le répertoire VST de votre séquenceur. Comme son emplacement dépend du séquenceur, je ne peux pas vous dire exactement où il se trouve.
Regardez dans les options de votre séquenceur, vous devriez y trouver l'information concernant l'emplacement des VST. Une fois que vous savez où il se trouve, recopiez-y les fichiers (conseil : organisez-les dans des sous-répertoires que vous créez vous-même, afin d'éviter que tout soit rangé en vrac, n'importe comment),
4- Si votre séquenceur ne le fait pas automatiquement lorsque vous le lancez, demandez (via l'option appropriée dans votre séquenceur) une reconnaissance automatique des VST présents sur votre ordinateur. Le séquenceur va ainsi vérifier quels VST sont présents et vous pourrez ensuite les utiliser normalement.
D'autre part, je précise à nouveau que tous les plugins présentés sur mon site sont pour PC Windows. Désolé pour les utilisateurs de Mac ou de Linux...
Grebz</em>
