Version française


? | Home page | Tutorial | Mixing in practice | Mastering

Homepage
Home page


MASTERING

Reminder: we work on this song I wrote: Life


(mp3 file)

Quick definition

We should say "pre-mastering" instead of "Mastering", but everyone says "Mastering", so I'll do the same.

Theoretically, the mastering is the process that results in a "Master", which is the final version of a recording before it's transfered to a physical medium (vinyl, cassette, CD, etc.), while controlling that all established norms are respected for the type of medium. Therefore, it's the last creative process as well as the last purely technical process of a recording.

But most of the time, when someone speaks about mastering, it's merely the last creative step of a musical work, the one that comes right after mixing and before broadcasting it to the public, whether that public be yourself and your family, or millions of people!

On this page

Before anything else... | What do I need? | Multiband compressor | Limiter | Conclusion

Top of page

Before anything else...

Before you start mastering anything, make sure you follow these rules:

- The mix must be completed. Don't start the mastering process unless you are happy with your mixing and there is nothing more to do in that area. Because mixing is the art of polishing each instrument individually to get a consistent whole, while mastering is the art of polishing a whole tune as a single entity. You don't deal with various parts anymore, you deal with the whole mix altogether. Which implies it must be finished.

- In order to be objective once the mix is over, I advise you to wait one day or two before starting the mastering. As the hearing memory is rather short, you will rediscover your work with a fresh ear if you wait that long.

- During the mastering process, it's better to work with studio monitors rather than with a headset, even more so than for the mix. But as always, it's better to work with a very good pair of headphones than with mediocre monitors. If you work with headphones, be aware that your perception of stereo sounds, as well as the balance of lows and highs are different with headphones. But if you know your headphones well, if you use reference songs that you know as well, you will be able to fix any possible mistakes by yourself.

- In professional studios, the mastering engineer is not the same as the mixing engineer. That gives him a fresh and neutral look over the song. Mastering monitors are also particularly accurate and placed in a well-studied room, sound-wise.
In a home studio, you will most probably mix and master yourself, with the same monitors and/or headphones (and not necessarily the best ones), in an untreated room of your appartment or house, with daily life sounds around you (cars in the street, noisy neighbors, family members in the next room...). And you're going to have to deal with it!

Top of page

What do I need?

Not much, actually, but here are the essentials, sufficient for most home-studio owners:
- A multiband compressor
- A limiter

As an option, you may also use the following gear/plugins:
- An equalizer. If your mix is good, you probably don't need to balance frequencies when mastering, but a few (very few!) corrections might be necessary here and there.
- A reference song. To help you reach your goal, keep a song you like within reach (use a song in the same style as the song you're working on, don't refer to Mozart if you're mastering a Death Metal song...). Your aim will be to obtain a sound similar to that song.

Other tools may help you give your song the atmosphere you're looking for:
- Stereo enhancement plugins
- Spectrum analyser plugins that will analyse your song and compare it to your reference song
- Plugins that will let you know about the dynamics of the song, so you don't get a sound that is too compressed and crushed. Like TT Dynamic Range Meter available on this page.

Personally, I only use a multiband compressor and a limiter. The first one helps me to highlight some frequency ranges to shape and enhance the sound. The difference with and without a multiband compressor is staggering.
The limiter will boost the perceived sound volume and make the song more energetic. But don't overdo it or you might lose some dynamics and make your song too aggressive and tiring to listen to.

Top of page

MULTIBAND COMPRESSOR

To be clear, on the Master bus, the bus towards which all other main buses converge (guitars, bass, vocals, synths, drums), I put a multiband compressor plugin on top.

Mise à part cette caractéristique, cela reste un compresseur, avec les réglages suivants :

A multiband compressor will apply different compression settings on frequency ranges defined by the user. For example, you may want to compress a lot the low frequencies, leave the mediums untouched, and slightly compresse the highs.

- Threshold: defines the level from which the compressor starts reacting.

- Ratio: defines the compression level you want to apply, from 1 (no compression) to infinite (in this case, the compressor becomes a limiter).

- Attack: defines the speed at which the compression reacts once the threshold is reached.

- Release: defines the speed at which the compressor stops reacting once the volume level goes back below the threshold.

- Knee: defines whether the compression starts reacting precisely when the threshold is reached, or starts reacting gradually when the volume level comes close to the threshold.

- Gain: the more the sound is compressed, the lower the volume gets. To compensate for the volume loss due to compression, use the gain.

Multidynamics (the multiband compressor plugin that I use) has two gain knobs; lo-gain and hi-gain. Lo-gain is the gain that is applied to the sound signal when it is below the threshold, whereas hi-gain is the gain applied to the signal when it is above the threshold. The ratio determines the transition from one to the other.

To use Multidynamics like a compressor, lo-gain must be higher than hi-gain, which will reduce the signal gain when it gets over the threshold. If you do the opposite (hi-gain higher than lo-gain), the compressor becomes an expander, that is to say the opposite of a compressor. For now, we are looking forward to using the plugin as a compressor and not as an expander.

- Output: the overall output volume.
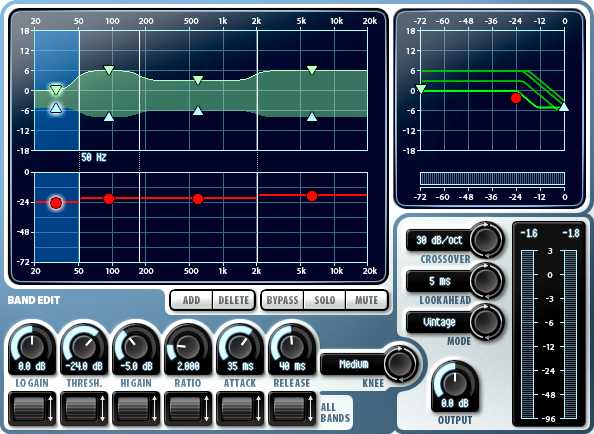
The Wave Arts multiband compressor Multidynamics can use from 3 to 6 bands. Here, I defined 4 frequency ranges (bands):
- From 0 to 50 Hz, for infra-basses
- From 50 to 175 Hz, for lows
- From 175 Hz to 2 KHz, for mediums
- From 2 to 20 KHz, for highs.

Why these specific frequencies? Because after various trials, I found this was the best setting for this song. Nothing magical about it. Trials, errors, more trials...

Settings used for the first frequency band (from 0 to 50 Hz):
- Lo-gain: 0 dB
- Threshold: -24 dB
- Hi-gain: -5 dB
- Ratio: 2
- Attack: 35 ms
- Release: 40 ms

Settings used for the second frequency band (from 50 to 175 Hz):
- Lo-gain: 6 dB
- Threshold: -21 dB
- Hi-gain: -8 dB
- Ratio: 2
- Attack: 16 ms
- Release: 25 ms

Settings used for the third frequency band (from 175 Hz to 2 KHz):
- Lo-gain: 3 dB
- Threshold: -21 dB
- Hi-gain: -6 dB
- Ratio: 2
- Attack: 5 ms
- Release: 10 ms

Settings used for the fourth frequency band (from 2 to 20 KHz):
- Lo-gain: 6 dB
- Threshold: -18 dB
- Hi-gain: -8 dB
- Ratio: 2
- Attack: 5 ms
- Release: 10 ms

Common settings for all bands:
- Knee: Medium
- Crossover slope: 30 dB/octave (behavior of transitions between frequency ranges)
- Lookahead: 5 ms (used to analyse sound peaks that can occur during play)
- Mode: Vintage

Here is the Master bus sound without any plugin:


(mp3 file)

Then the sound obtained with the multiband compressor Multidynamics:


(mp3 file)

Obviously, the multiband compressor allows for a much better sound clarity and all instruments find their place. Everything seems to breathe better, the sound is less confined, more open. Just better!

Wave Arts Multidynamics
Wave Arts Multidynamics is a commercial plugin. You may replace it with a free alternative plugin like 5orcery from Platinum Ears Plugins, a free 5 band compressor.

Download 5orcery
(5orcery.zip, 2.09 MB)

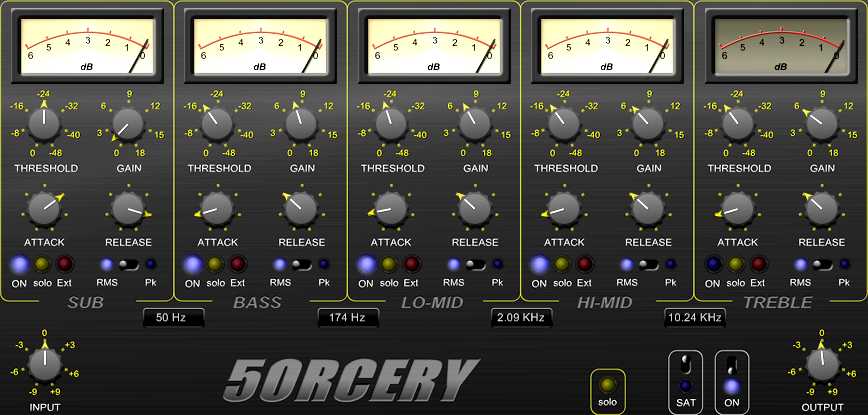
The zip file contains the PDF user manual, as well as a preset file named "5orcery_master.fxp". This is the preset I use for the song Life, and corresponds to the screenshot below.


With a free plugin...

I obtained a very similar result using the free multiband compressor 5orcery from Platinum Ears Plugins. Simpler than multidynamics, it offers all the settings you need. You get 5 frequency bands, you can manually choose the frequency that separates two bands, and each band has threshold, fain, attack and release knobs. The peak detection is achieved by selecting an RMS level for each band (RMS is an average level, similar to what the human ear can perceive), or the peaks (Pk). You can also activate or deactivate each band separately if you don't want to use all of them. You can adjust the Input signal, and you will find a Saturation knob, which does not add saturation, but is made to attenuate unexpected peaks. Finally, you have an overall Output level knob.

Using the settings shown on the screeshot above, I obtain a result pretty close to what I get with Multidynamics. It's a bit less accurate, a bit less defined, but it's definitely close.

Here is the sound I get with the multiband compressor 5orcery:


(mp3 file)
Platinum Ears Plugins - 5orcery
Top of page

LIMITER

We are one step away from the final result, and we are going to use a limiter. This is a tool that will boost the volume of a song, by raising up the volume from a defined threshold, up to a ceiling level you define manually. This is a great tool, but it can be damaging to the song. If you set a threshold too low, the sound is altered, it can become very aggressive, because the sound dynamics is crushed and everything will sound loud all the time. So, be gentle with it. With modern music (such as Dance or many Electronic musics), you can compress the signal much more than you would with musics that should have more constrast, where volume variations are desired and benefit the song, making it lively.

For the song Life, with the multiband compressor activated, the average RMS level is rather low, around -15 dB, with a dynamic range between -12 and -14 dB for the most part. This means we have quite a lot of margin, the dynamics is rather large, and we will be able to apply much compression without damaging the song, in order to raise the average level while maintaining good dynamics.

This is the dynamics we have before applying the limiter, measured with the plugin TT Dynamic Range Meter:
TT Dynamic Range Meter
In the top center, you can see the dynamic range at the moment the screenshot was made while playing the song (14.3 dB). At the bottom left and bottom right, you can see the average RMS level of the left and right channels (-16.3 dB and -15.6 dB).

Once the limiter is activated, we still have a dynamic margin between 9 and 11 dB. For your information, the album Nevermind by Nirvana, released in 1991, had a dynamic range of about 12 dB, as well as the album Wish You Were Here by Pink Floyd, released in 1975. The Fame Monster from Lady Gaga, released in 2009 has a dynamic range of 5 dB. Way more compressed!

The trend nowadays is to compress a lot, reducing the dynamic range as much as possible, which is bad for your ears and bad for musical finesse, but high compression levels allow for a high sound volume. It has been proved that a song is more attractive when played loudly, so record companies try to get the highest possible volume by compressing more and more. People are getting used to such high compression levels, they have become a standard and if you don't follow that trend, you may very well be looked down upon. Within a playlist, if the volume of a song is much lower than that of other songs, chances are the listener will just skip it, especially if they don't know it well and like it a lot. Yet, it would be so easy to simply raise the volume..

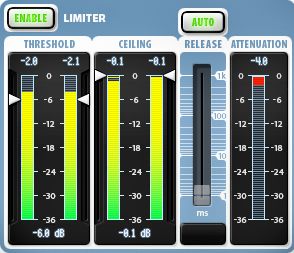
Here, the Wave Arts limiter FinalPlug is set with a threshold of -6 dB and a ceiling of -0.1 dB. This means that when the sound level reaches -6 dB, the signal will be boosted up to -0.1 dB. Release is set to Auto.
Here's the sound obtained with the limiter FinalPlug:


(mp3 file)
Wave Arts FinalPlug
Here is the dynamics measured after applying the limiter, at the same position in the song as the previous screenshot:
TT Dynamic Range Meter
As you can see, the RMS level goes from about -15 dB to about -9 dB, which corresponds to the 6 dB added with the limiter.
As for the dynamics range, it is reduced by about 3 dB, but we maintain around 10 dB.

Wave Arts FinalPlug is a commercial plugin. As an alternative, you may want to use the Classic Master Limiter from Kjaerhus.

Download Classic Master Limiter
(classic_master-limiter_v106.zip, 356 KB)


And with a free plugin...

Classic Master Limiter from Kjaerhus is a good limiter, very simple to use as there is only one knob. The only setting is the threshold. There is no ceiling setting, but it is in fact predefined to -0.2 dB. The sound obtained is slightly different from Wave Arts limiter's, but the difference is not that huge.
Here is the sound obtained with the Kjaerhus Classic Master Limiter:


(mp3 file)


Kjaerhus Classic Master Limiter
Top of page

CONCLUSION

Voilà... this tutorial is over. Mastering was the last stage.

From the begining, we went from...

a sound recorded in the box, with no effects:


(mp3 file)


We got to this version after mixing:


(mp3 file)


And obtained this final result after mastering:


(mp3 file)


Remember that this tutorial is not a magic formula that should be strictly followed all the time, with all songs of all genres. Mainly because it is not perfect, but also because there are many possible ways to mix a song to get various results. Finally, because each music, each song must be treated differently. Some plugins are useful for some songs and not for others, settings will need to change, etc.

I hope that with this tutorial, you understand better - if it wasn't already the case - how to mix a project, how to organize it, what is the purpose of the various plugins we used, how to set them, why you should use an EQ, a reverb, a compressor...

There are tons of other things to find out and learn, by yourself, with other people, through the Internet, this is a vast subject. Everyone has their habits, their hints and tips, but there's always more than one solution to a problem. Don't forget that the best way to improve your skills is to practice, again and again. So, experiment and have fun!!!

Mixing in practice : Preparing the session | Bass | Drums | Rhythm guitars | Solo guitars | Keyboards | Vocals | Mastering
Top of page


MESSAGES

(laisser un message)

Page de messages n° 1 2 3 4 5 6 7 8 9 10 11 12 13 14 15 16 17 18 19 20 21 22 23 24 25 26 27 28 29 30 31 32 33 34 35


krickgpe
le 03/05/2017 à 08h34

Bonjour et merci pour ce site très instructif. Les conseils de mixage de guitare et de basse s'appliquent-ils aussi à des pistes déjà enregistrées, je veux dire non enregistrées en live dans le daw ? Merci.

* * * * * * * * * * * * * * * *

<em>En ce qui concerne le mixage de guitares (ou basses) enregistrées par ailleurs, il faut tenir compte de la façon dont elles ont été enregistrées.
Dans mon didacticiel, je pars d’un enregistrement totalement dénué d’effets (guitares branchées directement dans l’interface audio), et j’y ajoute des simulateurs d’ampli, des chargeurs d’impulsions, de la distorsion, etc.
Bien évidemment, si vous utilisez un enregistrement d’une guitare qui passe déjà par un ampli, vous pouvez vous passer de l’étape « simulateur d’ampli » et « chargeur d’impulsions ».
Si l’enregistrement comporte déjà un son de guitare avec de la distorsion, il n’est sans doute pas nécessaire d’en rajouter, sauf si vous pensez qu’il n’y a pas assez de distorsion.
Pareil pour la réverb : si l’enregistrement comporte déjà une réverb audible, il vaut mieux ne pas en rajouter.

En revanche, vous allez sans doute devoir travailler un peu l’égalisation de votre guitare enregistrée pour qu’elle s’intègre à votre mix. Là aussi, adaptez l’EQ à votre mixage en cours, en fonction des instruments déjà présents. Toute égalisation doit se faire en fonction du reste du mix, et pas uniquement sur l’instrument tout seul. Il faut à la fois respecter le timbre de l’instrument, mais aussi veiller à ce qu’il s’intègre bien au tout. Diminuez par exemple un peu les fréquences graves de la guitare pour laisser de la place à celles de la basse. Le mixage est un jeu d’équilibre entre les différents instruments présents.

Ce didacticiel n’est pas un guide à suivre aveuglément en toutes circonstances, c’est plutôt une manière de montrer sur quels paramètres on peut agir, mais c’est à vous de choisir et doser les paramètres adaptés à votre musique.

Grebz</em>


Panigutti
le 18/04/2017 à 20h57

Great work thanks you from paraguay


zakk33
le 05/04/2017 à 18h38

Bonjour,<br/>
Je possède un ampli à lampes Jet City en combo et j'ai vu que l'on pouvait se servir du son de son ampli (préamp) avec des IR à l'aide d'une DI box branchée sur les sorties HP de mon ampli.<br/>
Faut-il une DI qui fasse en plus obligatoirement sim de cab comme les Palmer pdi09, Redbox de chez HK ou Behringer ultra gi100 ?<br/>
En sachant que je n'ai pas de boucle d'effet ni de line in/out, quelle DI pas chère me conseillez-vous ?<br/>
Après, j'utilise des impulsions Ownhammer et Redwirez avec le cab avec un simulateur d'ampli, mais je ne vois pas comment faire pour faire fonctionner un loader d'impulse avec le séquenceur Reaper (sans simu d'apli).<br/><br/>
Merci pour votre éclairage :)<br/><br/>
* * * * * * * * * * * * * * * *<br/><br/>
<em>Bonjour Chris,<br/><br/>
Merci de votre visite sur mon site.<br/>
Très honnêtement, n’utilisant pas de DI ni d’ampli connecté à mon PC d’aucune manière, je ne connais pas les branchements dont vous parlez dans votre message.<br/><br/>
En revanche, pour ce qui est d’utiliser un chargeur d’impulsions et des impulsions avec Reaper, voici comment procéder :<br/>
* Sélectionner la piste voulue pour insérer un plugin, et cliquer sur le bouton FX<br/>
* Deux nouvelles fenêtres apparaissent, dont une avec la liste des plugins détectés par Reaper sur votre ordinateur.<br/>
Sélectionnez votre chargeur d’impulsions puis cliquez sur OK.<br/>
* L’interface du chargeur d’impulsions va alors apparaître dans l’autre fenêtre<br/>
* Vous n’avez plus qu’à y charger la ou les impulsions de votre choix.<br/>
Une fois vos réglages effectuées, vous pouvez fermer cette fenêtre, et vous pourrez la faire réapparaître en cliquant de nouveau sur le bouton FX de la piste.
Si vous voulez ajouter d’autres plugins sur cette piste, cliquez sur le bouton FX pour faire apparaître la fenêtre de plugin, et cliquez sur le bouton « Add » en bas à gauche, ce qui fera apparaître de nouveau la liste des plugins, choisissez le plugin qui vous intéresse comme précédemment et il sera ajouté. Ajoutez par exemple un simulateur d’ampli, et placez-le avant le chargeur d’impulsions en le sélectionnant et en le faisant glisser au-dessus de NadIR.<br/>
Bien entendu, procédez de la même manière pour n’importe quel type de plugin (réverb, delay, EQ, etc.) pour les ajouter à une piste.<br/>
Grebz</em>


Dr Bonkers
le 26/03/2017 à 19h06

Hi, If you are looking for guitar cab and bass cab impulse response (IR) files, you might want to check out my site. I am always adding new guitar cabinet or bass cabinet ir's usually on a weekly or monthly basis in both Fractal Audio & Wav file formats. Currently I have the following for sale:
Ampeg B-15
Aguillar DB810
SVT 8X10
SWR Super Redhead
Norlin Gibson Moog Lab Series L5
1959 Valco Supro 1606 branded as Oahu Publishing Co of Cleveland Ohio 1X6
Sound samples may be found in the Samples tab of my site, which is Google translate compatable.
If you have any quesions tht the site does not answer, please feel free to contact me.
https://www.drbonkerssoundlab.com/
Best,
Dr. B


Latency
le 01/03/2017 à 20h22

Best guitar sim for clean? Not many out there with a clean focus.

* * * * * * * * * * * * * * * *

<em>In the free sims, I'd say the best for clean sounds are the Ignite Amps sims. All of them can handle clean sounds: NRR1, Anvil and even Emissary.
Lepou's sims are also able to produce nice clean sounds, like LE456, Hybrit or Lecto.
Don't forget that free amp sims are usually simulating only the head part of an actual amp. You will need to add an impulse loader (such as Lepou's Lecab 2 or Ignite Amp's NadIR), and load impulses into them. The choice of the impulse will have a huge impact on the sound quality.

Commercial amp sims all have the ability to handle many types of sound. Amplitube, TH3, Revalver, S-Gear 2 can be recommended, although they can be expensive. Among the simplest (and less versatile) commercial sims, you can try Vermillion from Kuassa, which can produce nice clean sounds as well, and will include the impulses as well.
Grebz</em>

Top of page